Showing posts with label cards. Show all posts

Wednesday, August 28, 2019

Sun's Up Mug's Up | Julee Tilman

Hi friends! It's Julee Tilman here to share another shimmery card creation with you. I love autumn colors and while the leaves aren't turning just yet, this flaming autumn blaze is what the sun feels like around here lately! 😂


I started this card with Spun Sugar Dazzlerz and used it to stencil leaves all over a piece of watercolor paper. Dazzlerz are like a super shiny shimmer paste, perfect for adding dimension and shine. When the Dazzlerz had dried, I sprayed the piece with Coloringz in Scarlet's Fever, Freshly Squeezed and Lil Yellow Skool Bus. Coloringz are flat color sprays in super vibrant colors. I love how shimmery the Dazzlerz are under the Coloringz. I splattered a bit of Chocolate & Diamonds Inklingz all around and then set aside to dry.


I had a bit of excess ink on my craft mat, so smooshed a piece of cardstock into the ink for a coordinating background and stamped my sentiment on it. The stamps are from Reverse Confetti, and I stamped the mug with water safe ink and then watercolored with the same colors I used above. This is cut with a coordinating die. For the sun background, I sprayed Lil Yellow Skool Bus and Freshly Squeezed on two circle die cuts, then stamped the rays on the yellow and layered together.  A few leaves were stamped and die cut from another sheet of paper I smooshed ink onto.  A rounded rectangle and a cream card base finish things off.


Thanks so much for stopping by today! I hope this little project has inspired you. As always, if you're feeling up for a little shopping in the Shimmerz Shop, meniton my name in the comments when you place your order for a free surprise.


Wednesday, August 21, 2019

A Good Day | Julee Tilman


Hi friends! For today's card I wanted to play a bit with Inklingz, since I usually either reach for Shimmerz or Vibez. Inklingz are a solid shimmering watercolor that you activate with water. Just spray a few squirts of water into your pot, then wait a few minutes and you're ready to go. The colors in this line include some beautiful pastels and less vibrant shades than some of the other lines of paint, but they have an amazing shimmer when dry.


I started with Bahama Mama and Blue My Mind, painting a little onto some packaging and then spritzing with water and smooshing on to the page. After doing this, I decided I needed a little more "pop" so did some more smooshing with some Grape Escape Vibez, then going back in with a little  more of the Blue My Mind until I was happy with the background.

I pulled out a fun Reverse Confetti set and stamped it over the background, then went back in with the same colors of paint and colored in the flowers.  The sentiment was embossed in platinum embossing powder first. Luckily I used my MISTI, so when I realized it didn't have enough contrast to be seen, I could restamp and emboss it in white. I like the little shadow effect it created.


I then started making a little accent cluster, starting with one of the Dotz from the Happy Thoughts collection. I added a few teeny paper roses, painting them with Bahama Mama and Grape Escape, then giving them a good coating of Angel Wingz Shimmerz. I finished off with a few rhinestones placed around the sentiment and then as centers for the stamped flowers.


Thanks so much for stopping by today! I hope your day Shimmerz!

As always, if you're in the mood to shop, place my name in your order comments for a free goodie.

Wednesday, January 30, 2019

You Make My Heart Smile | Julee Tilman

Hi Shimmerz friends! It's Julee Tilman popping in to share a card with you. I had so much fun playing with my Shimmerz paints for this card.


I started with the Heart Dangle chipboard from Scrapaholics, painting it with Moulin Rouge, Berry-licious and Sugar Plum Shimmerz. Isn't this a dreamy combination? While this was drying, I taped down and masked off a rectangle with post-it note tape to start on my background. I used the same colors of Shimmerz paint to paint the background, spritzing with water and lifting with a paper towel to get the splatter look.  Here's what it looked like before I pulled up the masking. Love that shimmer!


I thought a flower would look perfect in the center of my painted chipboard heart, so I pulled out the Fresh Start Stampz set and did some three step stamping for the flower and leaves in pinks and greens. I stamped two flowers and two leaf sprigs, then cut just portions of the second ones to layer and give the flower and leaves a bit more dimension. I curled up the top layer flower petals, too. Here's what it looked like when I was done building this portion of the card.

I thought my flower needed a little more pizazz, so I pulled out the Angel Wings Shimmerz and gave the flower and leaves a good coating. This is one of my favorite ways to add a bit of wow factor to stamped images. Love the shimmer it adds!


Done with my elements, I picked a sticker from the Small Talk idea-ology collection for my sentiment, snipped it in two and added to the bottom of the card. I layered everything together, outlined the background panel with a black permanent pen to give the illusion of a mat without extra bulk, then finished off with some sparkly scattered holeless sequins.

Thanks so much for stopping by today! I hope you're inspired to add a little Shimmerz to your next creation. And if you hadn't heard, the March Shimmerz Color Kit kicks off at 9AM Mountain today! It's a steal of a deal at 30% off and a great way to try out a few different products for your spring creations. There are limited quantities, so don't delay!


The March kit includes the following:


If you place an order, put my name in the comments so they know who sent you! 


Thursday, November 29, 2018

Winter Cards | Julee Tilman

Hi Shimmerz fans! It's Julee Tilman here sharing a couple cards using the new winter release stampz.

First up is the adorable Love Never Melts set. How darling are these little snow friends working together to get the star on top of the tree?


I stamped the image and colored with Copic markers, then highlighted with Angel Wings Shimmerz. Next I painted a piece of cardstock with Winter's Mist Shimmerz and used it as a background, with a thin mat of black in between. The sentiment is from the new Filled to the Brim set and I finished off with a silver photo corner embellishment. Snow cute!


For my second card I pulled out this sweet snowman and birdie image from the You're Snow Amazing set. I stamped and then colored with Copic markers, adding all sorts of shimmery highlights with Angel Wings Shimmerz. The sentiment is stamped in black  and then I used the teeny snowflakes in the set to stamp in Angel Wings and then while it was still wet sprinkled a bit of extra fine glitter on it for a little extra texture.


I love how easy cardmaking is when you have such fantastic images. Even a simple layout like this shines with Shimmerz!

Thanks so much for stopping by today! If you place an order in the Shimmerz store, remember to put my name, Julee Tilman, in the comments to recieve a free little gift!


Saturday, November 24, 2018

Warm Winter Wishes with Isha Gupta

Hello Shimmerz friendz, Isha here sharing a clean and simple winter card with you.

This month all the DT members are to pick one color and create a winter themed project around it. I picked the Creameez:Ride the Tide. This is a soft blue with a satin finish.

 
I started with a watercolor layer and applied Creameez:Ride the Tide to it. I then added a bit of Shimmerz: Coal to it as well. Let this dry and flick some white and blue splatters to it.
Now I die cut the pine trees and the snow banks and adhered it to the layer. I matted this layer to a red cardstock and adhered it to the card base.
 
 
Now, I stamped the images, colored them with Creameez: Red Neckling, Creameez:Ride the Tide and Shimmerz: Coal. Adhere the images to the card. Finally, I die cut the sentiment using silver and black cardstock. adhered the silver to the black keeping it slightly offset and adhered to the card.

Here is a close-up to check out the shimmer and texture.
Here are the products I used:

Creameez:Ride the Tide,
Creameez: Red Neckling

Shimmerz: Coal

Thank you for stopping by!! Hope you like my creation and got inspired to create monochromatic CAS cards. If you decide to add some shimmery goodness in your stash, please don't forget to put my name "ISHA GUPTA" in the comments and get a free surprise freebie :)

Thursday, September 1, 2016

Love Letters In September. Water Color Embossed cards.

Hello There.  Its the first of the month again and I have another video showing you an easy lettering project!  This one features Shimmerz Coloringz and embossing.


Check out the video below to see how its done!


As you can see, drawing the roses is quite easy, just squiggly lines wrapping around the centre bud, does not need to be perfect.  Draw the full flowers first, then tuck in segments of flowers that are sitting behind.  Add some leaves here and there and when you add the colour it will completely come to life.  

Tip....draw with the embossing pen under a light and you can see the 'sheen' of the embossing fluid.  Its a bit tricky to see your lines other wise!

(If you are not brave enough to try yourself you could stamp an image using embossing ink, and emboss with powder the same way!)

I cut my water colour paper to roughly 4 x 4 Inches and once my design was finished I added a stitching border on the sewing machine.

....AND, If you have been practicing your brush lettering then finishing these cards will be a breeze.

A little about the product....
Coloringz are a spray watercolour product much like Spritz and Vibez, but has no shimmer.  It sports vibrant colour, but is also transparent allowing a unique building of colour with repeat applications to create depth.  Today I used it like a liquid watercolour and dipped a brush into it (either poured into a palette or just dipped straight into the bottle.)  So easy!  

Find Coloringz in the Shimmerz Store HERE


Hope you will give this a try!

Take care, and enjoy September everyone.


Friday, August 12, 2016

A Shimmery conversion

Hey everyone its Beck BT here again with another card, this week I have decided to add a yummy shimmery touch to some coated cardstock using a fun technique.


I added dapples of Shimmerz Texturez and Dazzlers to give a more earthy feel to the card perfect for the embellishing and base of the card providing a nice and fun contrast to the fun colors of the other elements.

Shimmerz Products used:

Shimmerz Dazzlers - Barely Blue

Shimmerz Dazzlers - Tutti Frutti

Shimmerz Texturez - Gold Mine

Shimmerz Texturez - Artie Choked

Here is a quick process video I created to how you how I incorporated the yummy Shimmerz products on this card


Here are some more pictures so you can get up close and personal to my card


 Thanks so much for heading over to the blog today to check out my project!  I hope I've inspired you and shown you how lovely a little Shimmerz yumminess can easily create amazing cards!


Have you met the 3 newest colors! Snow Way Man Vibez, Winters Mist Shimmerz and Colder Than Ice Shimmerz. As well as the return of Cold as Ice Vibez. Right now, get 20% off using coupon code COLDASICE20 until August 18th. NO other promotions, such as free products, can be used with this offer.

Don't forget to mention my name when you order for some free product!  WOOT!  

Till next time


Like what I have used and would like to get your hands on some?  See below:  


Sunday, May 1, 2016

Making a Shimmerz Short Stakz into a card!

Hi there.  Lydell with you today, with a quick 'how to' showing you how I made a very simple card using a Short Stakz colouring card and some Shimmerz Aqua Huez and Creameez.  I really enjoy Colouring and I got some time today to get out my water brush and my paints and I sat quietly and coloured!


With these little pots of water Colour paints you just add a little clear water and let them sit to activate for a minute or two, then use them with a regular brush, or an aquash brush (holds water in the barrel so there's no need to wash the brush out between colours, a paper towel does the trick!)


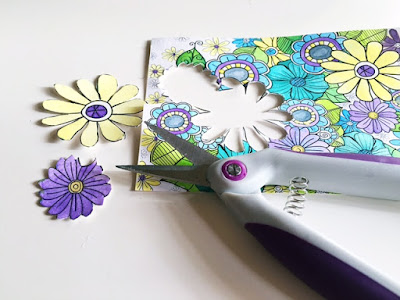
Once I had finished Colouring my card I did some fussy cutting, locating full and partial flowers and leaves that I could cut apart.


Once I did that I inked all the edges with black distress ink, just to hide the white cut edges, and and edges that were not all that neat.  It creates dimension in the finished product too!


I spent a little time playing with some arrangements to see how I could re position these flower elements to create a pleasing image.  There are loads of options here, and I wished I could make this card several times over with the options!!!!


I used a text stamp and brushed some gold Inklingz across it, and then dabbed on some more black distress in, and stamped that on my card base.  I also ran round the edge with several pen line borders.  


Once I was ready to put it altogether, I added a piece of patterned paper and built my arrangement on top, adding foam tape to some of the more forward elements and just glue on the elements that were sitting in behind.


I added a little calligraphy sentiment using black Inklingz and a calligraphy nib, and called it complete!


I quite enjoy finding ways to use my Colouring cards in the Stakz collections, that puts them to good use.  :-)

Anyway, until next month, happy creating with your Shimmerz Goodies!


Monday, June 29, 2015

Hello Shimmerz Friends,

Today I am going to share with you 5 Quick and Easy Cards
I made using Shimmerz Creameez.

I love the Shimmerz Creameez colors and I wanted to do something bright and funky.


I used Shimmerz Creameez - Ride the Tide for the above card.
I used watercolor paper and a fun technique that gave each card a different pattern.


I used Shimmerz Creameez - My Clementine for the above card.
I got to have some fun with stamps while I was at it.


I used Shimmerz Creameez Berry Hot for the above card.
Using Shimmerz Coloringz - Night Moves, I made extra splatters.


I used Shimmerz Creameez - Power to the Purple for the above card.
Love this color!


I used Shimmerz Creameez - Daffodil for the above card.
This one would have to be my favourite.

You can see how I created these cards by watching my tutorial.


If you do purchase these amazing products, don't forget to mention my name at the checkout.
In the "Instructions to Merchant" section to receive
a FREE product of your choice.

Thank you so much for stopping by!