Showing posts with label Winter. Show all posts

Saturday, November 9, 2019

Snow Yeah | November Color Kitz | Natalie Dill


Hey friends!
Natalie Dill of Dillightfully Crafty here today to share some inspiration using the November Color Kitz - Winter Wonderland. How gorgeous is this unique color palette?!

The kit is $18.95 and contains
Moody Mauve Coloringz
When Skies are Grey Shimmerz
Penny 4UR Thoughts Inklingz
Mochachino Inklingz
Winter Wonderland Dotz
Snowflake Wreath cut file designed by Paige Evans!


I loved these beautiful colors, so I wanted them to shine. I decided on three bold stripes with the pinks and browns, and to let the When Skies are Grey accent on the snowflakes.

I used a chunky brush to paint stripes on a gessoed cardstock, and gave it much time to dry. To get the darker patches of colors requires the color to sit and and dry for a bit! You can see the entire process on my YouTube channel.


After the stripes dried, I added splatters atop each stripe. I used the dotz to create a visual triangle on my page. Here the brown dot is layered over a rogue snowflake from the wreath I cut, and a die cut glitter snowflake.


A black & white photo was my best bet for this kit because I didn't have much to match pinks and browns. It worked perfectly & I love it!


I love playing with the paints because you're never entirely sure how the cells will turn out - but I love them every time! Allowing paint to pool and dry without moving or soaking it up allows for these delicious color cells of different shades from the same color source. It's a great way to get different looks from your paints!


The type of background paper you choose will also impact how the paint looks on your page. In this case, since such a large portion of the page was used to showcase the kit colors, I appreciated the textured cardstock to add interest to the color stripes.


I added a rip in the paper at the top right and on the left bottom side to include a tiny bit of pink striped paper that perfectly matches the Winter Wonderland kit. It was just another way to add embellishment and interest to the page.


I hope you've been inspired on how to use the November Winter Wonderland Color Kit today - that exclusive Paige Evans cut file will be getting tons of use all winter long! 

There are still a few kits left, so make sure to grab one to create some gorgeous, unique winter projects for your scrapbook and home.


Thursday, November 7, 2019

Season of Love | Julee Tilman

Hi Shimmerz friends! It's Julee Tilman popping in again with another shimmery cardmaking creation.


I was in the mood for some emboss resist watercoloring, so started by embossing snowflakes on watercolor paper, then masking off the edges of the panel and started on my background. I did wet on wet, plopping Well Blue Me Down randomly onto the wet paper. I dried the layer, then wet the area again and plopped some Hint of Mint in the other areas. I continued doing this until I had the mottled snowy day kind of look I was going for.

Next I moved on to this sweet snowman. I embossed him in black on watercolor paper, then watercolored with the same two colors, adding in some Bronzed Bombshell, Freshly Squeezed, and Pink Moscato for the little details.


a snowman needs to shimmer, so I finished off with a light coating of Angel Wings on the snowman body.  Then I hand trimmed around the image and set aside. The sentiment is embossed in black on the panel, then I popped the snowman image up on dimensional foam tape and added some shabby edges for a rustic touch.


Thanks so much for stopping by today! As always, you can mention my name when you place an order in the Shimmerz Shop to receive a free paint.  Happy painting!


Saturday, November 2, 2019

The November Winter Wonderland Set with Samantha Robles

Happy November everyone! I cannot express to you how much I adore this time of year. Everything feels magical. Whether it's snowing, Christmas magic or just the endless amounts of cuddling. I love it. The November Winter Wonderland Set from the Shimmerz Paints Color Kitz is just that. It's a perfect transitional kit. You get the warm rustic colors mixed with the chilly Winter hues. It's the perfect set for November.
So, I bought these adorable chip board snow globe pieces last year. It was just a fun little random find. I started this project by painting the chip board "When Skies R Grey" Shimmerz. It took 2 coats to fully cover the chipboard and it's dark edges. While that's drying, I started on getting my Snow Wreath cut file ready to cut. This cut file was created by Paige Taylor Evans with this kit in mind. It's totally exclusive to Shimmerz Paints. Pretty cool, right?!
I try with my layouts to multi task multiple pieces at a time. That way it can all come together at one time. I found this "Snow Cute" chipboard piece in my stash from "Scrapaholics" and decided to mix things up. I mixed white acrylic paint with "Moody Mauve" Coloringz and just started painting a layer on. The acrylic will give it a good base to hold on to. After that piece has dried, I began spraying it with some more Moody Mauve. This piece I did let sit and dry overnight because I did make the mistake in over saturating it.
I LOVE how it turned out. It's got a snowy rustic look to it.
I had some leftover little flowers leftover from a previous project. I used the Mochachino and Penny 4 Your Thoughts Inklingz on the flowers to add that cute little touch. I also picked up these fun foam snowflakes from Hobby Lobby to give this page more of a 3D effect. This kit also includes some adorable Dotz, made exclusively for this kit. I put those in the snow globe, added some sequins from Spiegelmom Scraps and it all tied together. Guys, I cannot express how this layout got me so excited for the season!

Now, run to the Shimmerz Shop before these Kitz FLY off the shelves. They do tend to go pretty quick because you're getting such a great value. Thanks a ton for stopping by!

Happy November!

-Samantha 

Thursday, September 26, 2019

Shimmery Winter Peace | Julee Tilman

Hi Shimmerz friends! It's Julee Tilman popping in with another card making creation featuring Shimmerz Paints!


I pulled out some Shimmerz paints to do some stenciling with the Birch Tree two part stencil from The Cat's Pajamas, starting with Chocolate & Diamonds Inklingz and stenciled the deer onto watercolor paper. To use these paints with stencils, I like to paint a little bit onto a glass mat, then pick up the paint with a mini blending tool and pounce onto the stencil. That way it's less moisture all at once, and you don't get the seepage you sometimes do when just painting directly on a bumpy surface like watercolor paper. I then traced around the stencil on post it note paper and fussy cut masks for the deer.  Then I repeated the same process with the birch stencil, this time using Colder than Ice Shimmerz.


I loved the frosty peaceful look of the scene so much that I didn't want to cover any of it up.  So I pulled out the Peace Love Joy Die and cut it, cutting off the love and joy so just the peace remained.  I painted this with Steely Blue Eyes Inklingz and then popped it up on foam dots for a bit of dimension.


Overall, a simple card, but the shimmer makes it magical! I hope you've enjoyed this project.  As always, if you're inspired to shop in the Shimmerz shop, add my name, Julee Tilman, in the comments for a free paint!

Friday, January 25, 2019

There's Snowbuddy Like You | Niki Rowland

Hey Shimmerz Fans! Niki here today and I have a layout to share that has a winter theme. These photos are from a birthday party my children went to a few weeks ago at a snow centre. They basically zoomed down a very large snow slide on giant rubber rings - how much fun is that!

As I've been in Florida for most of December and quite a bit of January...I don't have many winter photos yet so I was delighted to have these snowy ones so I could get all frosty with my Shimmerz paints!


There are so many awesome shades of blue paint in the Shimmerz store! I picked out six and applied them to the bottom of my layout using the packaging technique.

I've used:

I'm learning that to get a fabulous water colour effect background, the trick is to use several different shades of the same colour. This is demonstrated by how well this blue area turned out on this layout! It also doesn't matter too much if the colours mix together a little...becuase they are all just shades of the same colour, no muddy mixing this way.


I added lots of splatters in the same colours. I made a snowy hill for the bottom of my layout just by tearing white dotty cardstock. I kept holding this piece up against the water colour area I was working on to check for size. Amazingly I didn't get any blue fingerprints on it!

Once my background was dry I could start to assemble the rest of the layout. I used shades of blues and greens to add layers behind my photo. I bordered the whole layout with a dark blue border and I added lots of snowflakes, embellishments and sequins, also all in shades of blue. I did also add some white Perspextives and some silver thread, also a couple of glittery silvery hearts...this definitely added to the snowy effect.
 

Finally I finished off with my title which I created out of two different alphabet stickers, also in shades of blue.
 

Thank you so much for joining me today, I hope you have enjoyed my wintery layout.
Don't forget that if you place an order via the Shimmerz website and add my name in the comments you will recieve a free gift.

Happy scrapping xx 


Thursday, November 29, 2018

Winter Cards | Julee Tilman

Hi Shimmerz fans! It's Julee Tilman here sharing a couple cards using the new winter release stampz.

First up is the adorable Love Never Melts set. How darling are these little snow friends working together to get the star on top of the tree?


I stamped the image and colored with Copic markers, then highlighted with Angel Wings Shimmerz. Next I painted a piece of cardstock with Winter's Mist Shimmerz and used it as a background, with a thin mat of black in between. The sentiment is from the new Filled to the Brim set and I finished off with a silver photo corner embellishment. Snow cute!


For my second card I pulled out this sweet snowman and birdie image from the You're Snow Amazing set. I stamped and then colored with Copic markers, adding all sorts of shimmery highlights with Angel Wings Shimmerz. The sentiment is stamped in black  and then I used the teeny snowflakes in the set to stamp in Angel Wings and then while it was still wet sprinkled a bit of extra fine glitter on it for a little extra texture.


I love how easy cardmaking is when you have such fantastic images. Even a simple layout like this shines with Shimmerz!

Thanks so much for stopping by today! If you place an order in the Shimmerz store, remember to put my name, Julee Tilman, in the comments to recieve a free little gift!


Wednesday, November 28, 2018

Snow Very Much

Happy Wednesday Shimmerz fans! It's Ericka here and I can't believe it is almost December. I hope you had a chance to take advantage of some of the awesome Shimmerz Paints deals this last week as well as getting some Christmas shopping done. I'm continuing with our fun Design Team Challenge this month. I used Elfin' Magic Vibez along with some other awesome Shimmerz products and our new stamp You're Snow Amazing.


Isn't this snowman adorable? I love his hat and his cute little friends, such a perfect winter scene.
I started by stamping the image in Versafine ink on watercolor paper and heat embossing it with Polysparkle embossing powder. I then used my Elfin' Magic Vibez as a paint and colored in the hat and scarf. I love the bright green of this spray as well as the shine it has on paper.


I used a little Gold Glimmer Blingz on the snowman to give him a little shine and added some Vibez Snow Storm to blend in a whiter look.


I love the bright colors of the Shimmerz so used a variety in my card. See below for my supply list.


I finished the card by painting the sky using Shimmerz Ultra Marine, Sugar Plum and Royal Purple to give it a cold night air look. I added white paint splatters and the snowflakes included in the stamp set for snowy look.

I love how easy these Shimmerz products are to use together and how well they blend together leaving behind a beautiful shimmer to any project.

Thanks for stopping by and remember, if you make a purchase to put my name, Ericka Strange, in the notes for a special freebie.


Shimmerz Paints Supplies Used:

Shimmerz Paints - You're Snow Amazing
You're Snow Amazing
Shimmerz Paints - Vibez - Elfin' Magic
Vibez - Elfin' Magic
Shimmerz Paints - Vibez - Snow Storm
Vibez - Snow Storm
Shimmerz Paints - Blingz - Gold Glimmer
Blingz - Gold Glimmer
Shimmerz Paints - Shimmerz - Royal Purple
Shimmerz - Royal Purple
Shimmerz Paints - Shimmerz - Sugar Plum
Shimmerz - Sugar Plum
Shimmerz Paints - Shimmerz - Tickle Me Turquoise
Shimmerz - Tickle Me Turquoise
Shimmerz Paints - Shimmerz - Ultra Marine
Shimmerz - Ultra Marine

Saturday, November 24, 2018

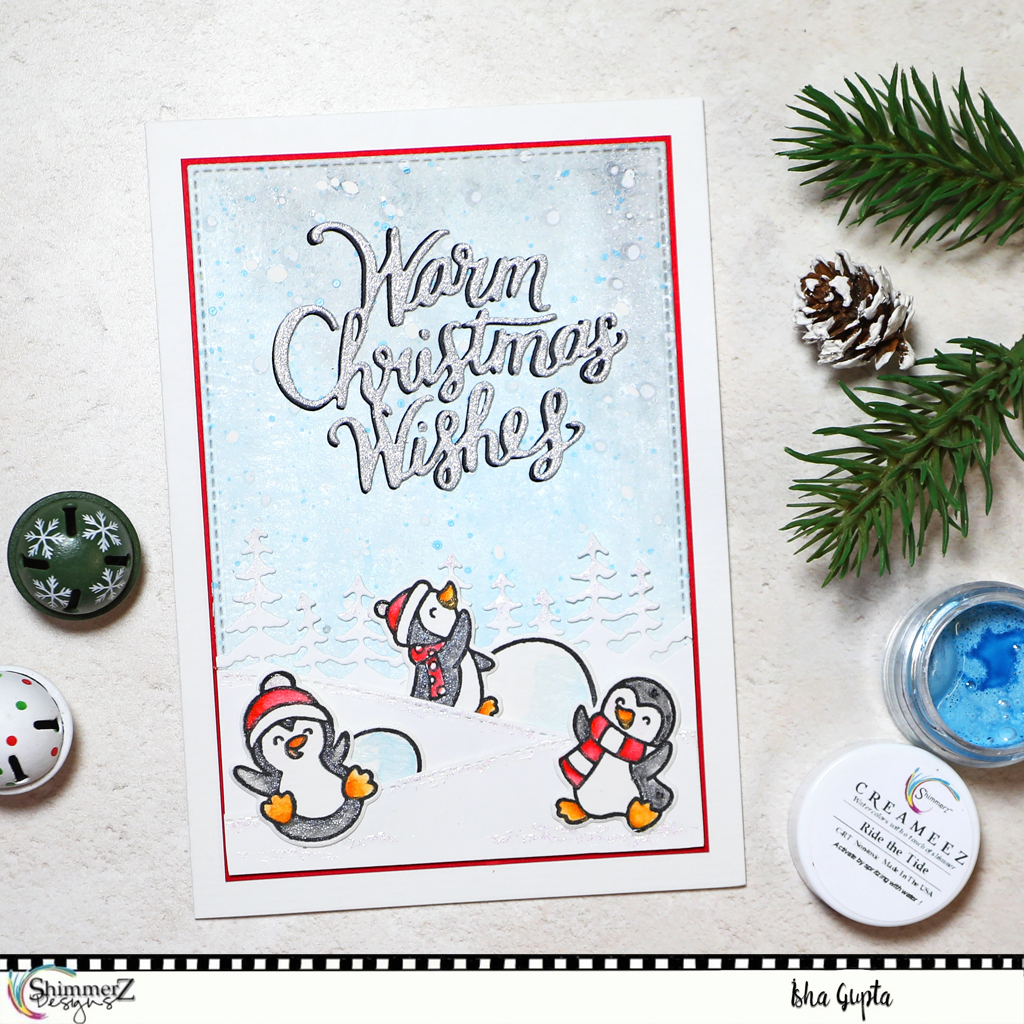
Warm Winter Wishes with Isha Gupta

Hello Shimmerz friendz, Isha here sharing a clean and simple winter card with you.

This month all the DT members are to pick one color and create a winter themed project around it. I picked the Creameez:Ride the Tide. This is a soft blue with a satin finish.

 
I started with a watercolor layer and applied Creameez:Ride the Tide to it. I then added a bit of Shimmerz: Coal to it as well. Let this dry and flick some white and blue splatters to it.
Now I die cut the pine trees and the snow banks and adhered it to the layer. I matted this layer to a red cardstock and adhered it to the card base.
 
 
Now, I stamped the images, colored them with Creameez: Red Neckling, Creameez:Ride the Tide and Shimmerz: Coal. Adhere the images to the card. Finally, I die cut the sentiment using silver and black cardstock. adhered the silver to the black keeping it slightly offset and adhered to the card.

Here is a close-up to check out the shimmer and texture.

Here are the products I used:

Creameez:Ride the Tide,
Creameez: Red Neckling

Shimmerz: Coal

Thank you for stopping by!! Hope you like my creation and got inspired to create monochromatic CAS cards. If you decide to add some shimmery goodness in your stash, please don't forget to put my name "ISHA GUPTA" in the comments and get a free surprise freebie :)

Monday, November 19, 2018

Winter Card with Isha Gupta

Hello Shimmerz friendz, Isha here sharing a clean and simple winter card with you.
This month all the DT members are to pick one color and create a winter themed project around it. I picked the Creameez:Ride the Tide. This is a soft blue with a satin finish.


I started with a watercolor cardstock and applied Creameez:Ride the Tide to it. I then added a bit of Shimmerz: Coal to it as well. Let this dry. Now I die cut the pieces using a die from Memory Box. I die cut the center frame two more times using white cardstock and stacked the frame part. I then applied Shimmeringz: Baby's Breath to the frame part.
for the sky part, I applied PASTE-EEZ: Salt of the Earth through the stencil. Let it dry a bit. Once dry, I inlaid the sky area to the center frame and adhered it to the card. I then adhered the outer frame to the card base too.
Here is a close-up to check out the texture.


Here are the products I used:

Thank you for stopping by!! Hope you like my creation and got inspired to create monochromatic CAS cards. If you decide to add some shimmery goodness in your stash, please don't forget to put my name "ISHA GUPTA" in the comments and get a free surprise freebie :)