Showing posts with label Pumpkin Shimmerz. Show all posts

Monday, September 28, 2020

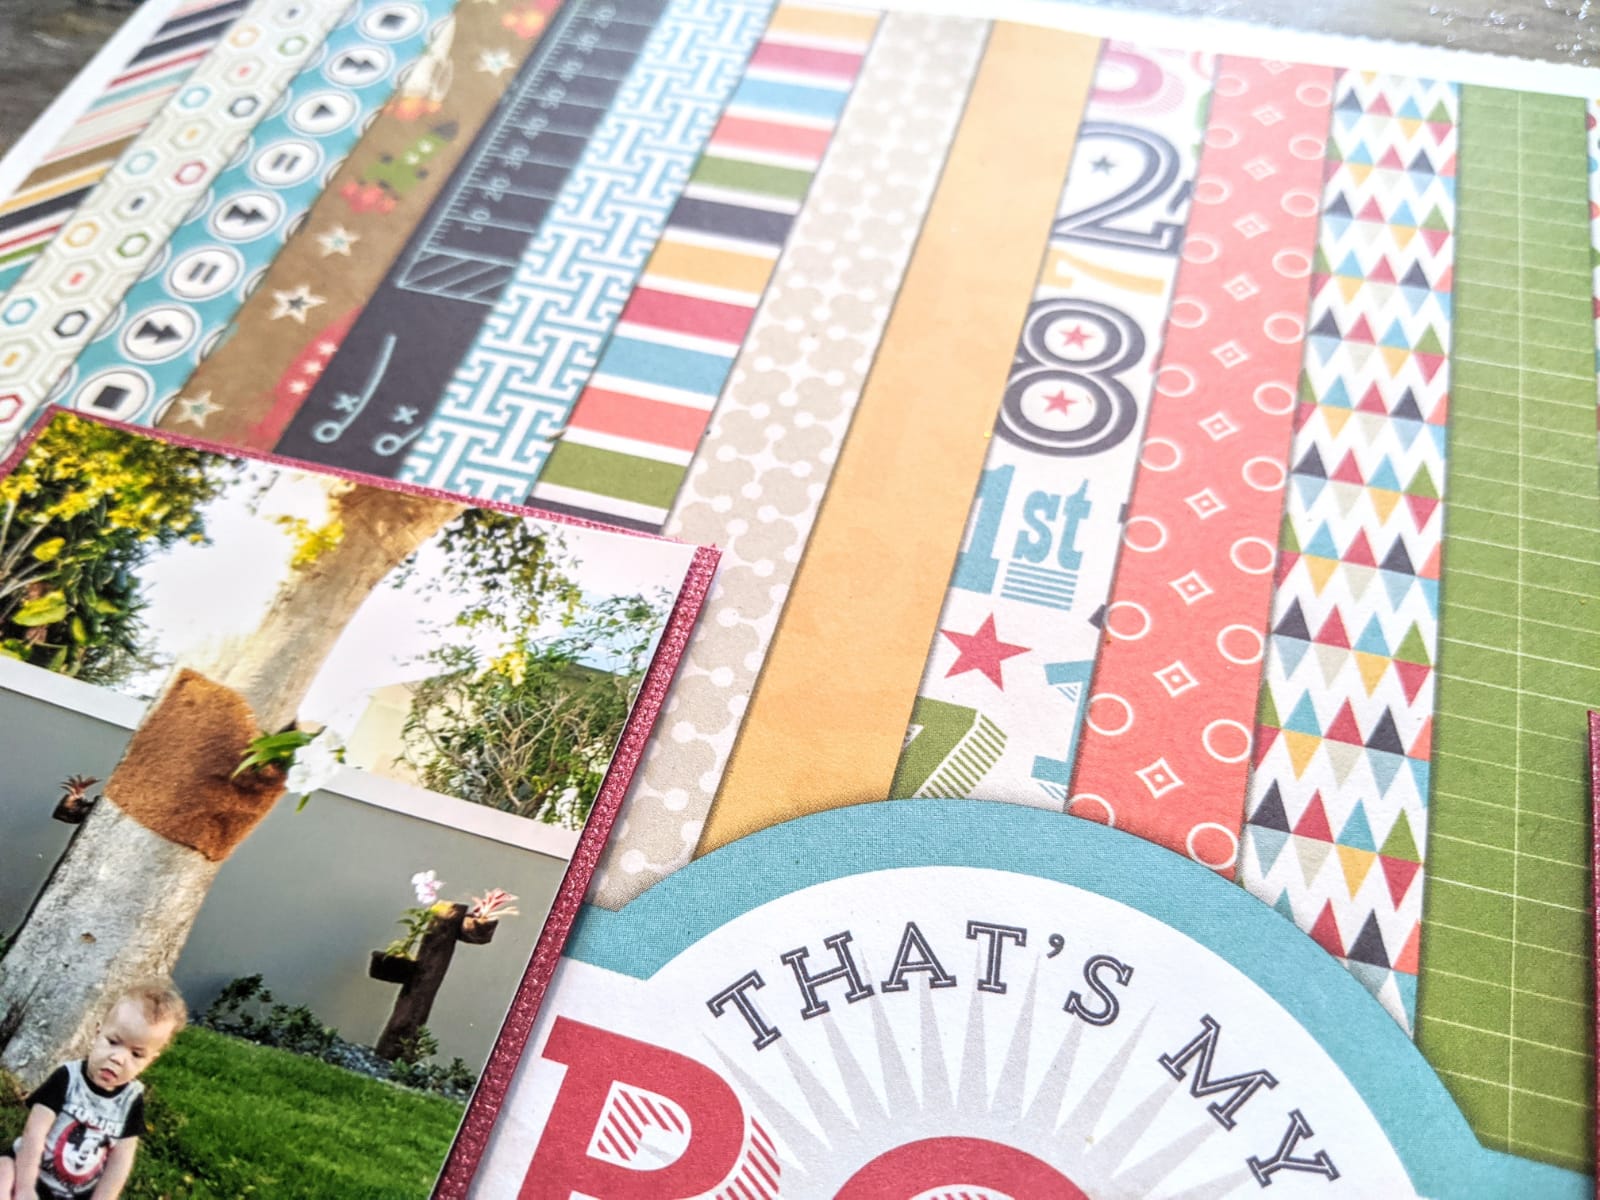
That's My Boy | Color-melting with Shimmerz Paints | Echo Park Paper | Lorimar Ortega

Hello everyone!

It's Lorimar, sharing this lovely "color-melting" layout with you today. I used a patterned paper from Echo Park's That's My Boy collection as an inspiration for layout as I wanted to make a colorful layout without going down rainbow road (LOL). I'll list all the colors I used in here (so it's easier to walk you through it): Oakie Dokie, Butter Cream, Bamboo Leaf, Keep Palm, Mustard Seed, Pumpkin, Anchors Away, Peacock's Plume, Ultra Marine, Gold Glimmer, and Pool Me Closer.


Here's what I did: as I rummaged through my stash, I found a patterned paper from Echo Park that featured a lot of color and patterns. It's actually the "cover page" from the collection; they are typically printed on shiny glossy paper, but this one was actually the A Side to the 3x4 Journaling cards. I fussy-cut around the hexagons and left the logo in to serve as my title. My idea was to use the colors from the paper and create a layout that looked like the color had melted down; and that's exactly what I did!

Using a Vicki Boutin foundations paper, I added water to the bottom of the paper (so my colors to blend and spread better) and began adding in each of the colors. I specifically used Butter Cream in between the bolder colors so the blending came out more fluid. Towards the bottoms of each of the color strips, I splashed a bit of each of the colors.

Once it was dried, it was all a matter of adding in my pictures (matted on red metallic cardstock, popped up on craft foam and placed on either side of the title) and sprinkle in a few embellishments (so as not to cover up to much of the mixed media.

And that's it! Thank you so much for joining me today, and I hope I've inspired you to make a colorful layout such as this. Remember, if you type my name, LORIMAR, in the comments sections of your next Shimmerz order, you'll be able to receive some free paint!

Take care and stay safe,

- Lorimar
PS. - If you're interested in watching the whole process, click here.


Wednesday, April 8, 2020

Homegrown Rainbows | Colorful Spring layout w/ process video

Hello everyone!

Lori here, sharing a colorful spring-filled layout. I'm certainly ready for bursts of colors any time, especially in these uncertain times.

I began my layout with selecting a bright blue cardstock as my base. I then cut out the Rainbow Heart Cutfile (part of the April Color Kitz) on white textured cardstock and backed it with patterned paper in primary colors. For added texture, I hand-stitched a simple back stitch on the cut file with red, blue, yellow and green thread.

For an extra pop of color, I added some white acrylic paint (by way of the packaging technique and splatters) as a layer beneath where the cutfile was going to be. I then did the same with Hermit the Frog (Vibez), Bed of Roses (Spritz), Jenni B Bleu (Vibez) and Heidi Ho Blue (Coloringz).
Popped the cutfile on 3D craft foam, matted my pictures on white cardstock and placed them like you see in the pictures. I made my title using three different packs of Thickers. For the word "Rainbows", I colored the letters with the same aforementioned colors in addition to Pumpkin (Shimmerz) and Lil' Yellow School Bus (Coloringz).

Finished off the layout with some embellishments from a home-made stash-bursting kit I made for my April layouts, and added a few red sequins from SpiegelMom Scraps around each heart.


Splashed a bit of Mustard Seed (Vibez) and Freshly Squeezed (Coloringz) all around the layout to tie each thing together and finished off my layout. Added my journaling in black ink right beneath one fo my photos, and done!


I love how this turned out! Hope I've inspired you to embrace the sunshine and rainbows in your life, and to get your stories documented.

Need a bit of sunshine in your day? Check out the April Color Kitz, and remember, type "Lorimar" in the comments section to receive a freebie.

Process video here: https://youtu.be/IyQe5_FiQRc

Have a great everyone, and stay safe!
- Lorimar

Thursday, January 23, 2020

Born To Explore | Boy Layout using Run! Forest, Pumpkin, Bumbly Bee | With Process Video

Hello Shimmerz friends!

Hope you are doing well and bright! Sharing this gorgeously starry layout with you today using oranges, yellows and greens. Link to process video can be found at the end of the post:

Started out with a white piece of cardstock that I've trimmed down to 11.5 by 11.5 in order to fit a border behind it later. Played a bit with the placement of patterned paper and pictures before getting out my colors:

- Can't Elope - Inklingz
- Bumbly Bee - Shimmerz
- Olive U Truly - Inklingz
- Run! Forest - Shimmerz
- Pining For You - Creameez
- Pumpkin - Pumpkin
- Orange Sherbet - Shimmerz
- Marigold - Shimmerz

I added the mixed media by colors; I began with the oranges (Can't Elope, Pumkin, Orange Sherbet) and let them dry a bit. Then added in the yellows (Bumbly Bee, Marigold) and finally worked with the greens. Each color group was worked with the packaging technique and splatters.


Once all the colors were dry, I glued my patterned paper (Amy Tangerine | Slice of Life | Rainbow Hall) and placed my pictures on craft foam for dimension. Added two small clusters of embellishments near my pictures. Had some leftover stars from a cutfile I had previously used (Circle Of Stars by Virginia Walker | COAPA Cutfiles); sprayed some of them with Tuscan Sun (Spritz) and others with Goldie Lox (Shimmeringz) and formed a sort of star burst effect on the layout with them. Each white star was added in on craft foam; I was punched out a few vellum stars and glued them unto the cardstock. Finished off the layout by added some Nuvo Drops, placed my title, wrote my journaling and then mounted the white cardstock unto a patterned paper (Amy Tangerine | Hustle and Heart). Below are a few more close-ups.


I love how this layout turned out! It's so colorful and star-filled, perfect for documenting boy memories. Hope to have inspired you and I'll see you back soon! Link to process video: https://youtu.be/wWoPn2s1mb8 
Remember, if you write my name in the comments section of your next Shimmerz order, you'll receive some free paint.


Stay crafty!
- Lorimar

Tuesday, October 22, 2019

So Sappy Cosmos | Ericka Strange

Hey Shimmerz fanz happy Tuesday! Ericka here with another Color Challenge card I made using So Sappy Shimmerz paints. This month the Shimmerz Design Team has been playing with the Color Challenge which was to pick a color to use on our projects that we might not typically use. I love making cards with flowers and so I challenged myself to use the So Sappy on a card I would normally use bright colors.


For this card I was trying to go for a Sepia look.


I stamped the Cosmo background stamp from Simon Says Stamp on watercolor paper withe Versafine ink and heat embossed it with some Emerald Creek Just Java embossing powder.
I used the following Shimmerz products on my card:

Flowers - I started with a base of So Sappy Shimmerz. Once it was dry I used Spiced Cider for the shading and Antique Lace for highlights. I love these colors together. For the middle of the flowers I used Bumble Bee and Pumpkin.

Background - I wanted to added a deeper brown color so used Coffee Shimmerz and added a couple spritz of Jeni B Bleu to the card as well.


For the sentiment I used the same embossing powder and finished it up with some vellum behind the sentiment.


That's all for me today. Thanks for stopping by and don't forget if you make a purchase on our new website, type in ERICKA in the comments and you'll receive a freebie with your order!


Thursday, October 3, 2019

My Little Pumpkin Spice - October Shimmerz Paints Color Kitz with Samantha Robles

Happy October, Friends! I LOVE this time of year. The colors, the smells, the clothes. The epic crafting opportunities! Let's be real here: Fall is a time of change and a new sense of hope. It shows us that all beautiful things change in life. This October Color Kitz is the perfect opportunity to transition from that Summer state of mind to a more mellow and relaxed place.
Through out October, we're challenging our team and readers to branch out. Try something new for a change. Maybe it's a color. Maybe it's a technique. Maybe it's something that intimidates you. I have 3:
1. The color purple
2. Rolled flowers
3. and backing cut files

It was time to take one challenge on in this layout. I chose number 2. I use to watch my mom roll flowers back in the day. So I wanted to try to modern approach with Paige Evan's Rolled Flowers. You can find every kind here on her Esty shop page.
I started my layout with a Maggie Holmes sheet of paper that has a wood background. I then just messy painted the back with white acrylic paint. While I let the paint set, I start cutting my flowers. In this months Color Kitz:
Pumpkin Shimmerz
Jolly Green Giant 
Hot Fudge Vibez
Tuscan Sun Spritz
An exclusive set of Dotz: Pumpkin Spice and Everything Nice

Before I rolled and glue my flowers together, I paint each one with 2 coats of each color. This process can take some time, so either take a heating tool to it or just kick back with some Netflix for an hour. Afterwards, your flowers will be ready tote rolled and glued.
After my flowers are all picture perfect, I then hot glue them to my page. These flowers (paint and all) can be heavy, so hot, quick drying glue will be your BFF in these times of need.
The finally tiny touch will be adding the fun Dotz and cute throwback picture of my sweet baby bear on his first Fall. 

Thank you so so much for stopping by. Don't delay though. Snag that October Color Kitz before they sell out. Shimmerz also has an all new website. Super user friendly and stunningly beautiful.

Have a wonderful week! 
XOXO
-Samantha

Wednesday, February 27, 2019

Start The Day Right | Melinda

Hello crafty friends!
Melinda here with you today and I am excited to share my latest "Shimmery" project with you.
Here's my card. I started with a soft cream cardstock, to create an A2 Top folding base. 


For my mat, I cut a piece of watercolor paper to 4 x 5.25. I then took my Bumbly Bee Shimmerz paint and spread some on an acrylic block.

I took the solid floral stamp from the Fresh Start Stamp set and "smooshed" it into the paint.


I then "stamped" it onto my mat. I started by stamping in the top left corner.

I then repeated the steps by stamping on the edges first.

I then continued to repeat the process until I had filled in the background mat. 

I finished off the mat by adding a little splatter using my So Sappy and Pumpkin Shimmerz Paints.

I then added a pretty mat from one of my border punches. and then topped it off by stamping and coloring some of the flowers from the same Fresh Start Stamp Set. I stamped the sentiment onto a strip of paper and added it to my card. I finished off the card by adding a few sequins. I think this turned out really pretty.

SUPPLIES USED


In case you missed it, the March Shimmerz Color Kit is back in stock! They sold out so quickly, they made some more available! The creative minds at Shimmerz Paints have combined some fantastic products at an amazing price for you to make your spring creations SHINE! Quantities are limited so snap yours up today!


The March kit includes the following:
 
1 package of Spiegelmom Scraps Sequins in One in a Melon
1) 2oz bottle of Pink Moscato Vibez
1) 1 oz jar of  Celery Shimmerz 
1) 1oz jar of  Good as Gold Inklingz
1) 1oz jar of Pining for You Creameez


DON'T FORGET, ADD MY NAME IN THE COMMENTS SECTION OF YOUR ORDER AND GET A FREE MINI FREEBIE TO TRY!

As always, thank you so much for stopping by. Be sure to come back by and see what the rest of these incredibly talented designers are creating! Until the next time, you have a wonderfully crafty day!

Tuesday, October 16, 2018

Hello My Pretty | Julee Tilman

Hi Shimmerz friends! My boys are super excited for Halloween this year, bringing home all sorts of Halloween drawings and projects from school each day. Their excitement inspired me to pull out some traditional Halloween colors and create this fun card using Shimmerz paints and stamps.


The background of my card is randomly stamped with the outline flower image from the Fresh Start stampz set and then loosely watercolored with Pumpkin Shimmerz. I love how simply beautiful this flower can be for making your own backgrounds.

Next I used an ink blending tool to sponge Pumpkin Shimmerz onto cardstock using the Tim Holtz Shifter Diamonds layering stencil. After this layer dried, I took another pass with Coal Shimmerz to complete the alternating pattern. I decided to use the same stencil for the black panel, repeating in Pumpkin Shimmerz twice, since it had the perfect amount of shimmer to stand out on the black cardstock.


My center piece is cut from some Pebbles Midnight Haunting paper and I painted a bit of Pumpkin Shimmerz on cardstock to mat the circle, then created a rosette with patterned paper. The rosette is a 1.25" x 12" strip of paper, scored at 1/4" intervals, then folded accordion style and glued together  I accented with a stick pin, a bit of ribbon and a flower button that I painted with Pumpkin Shimmerz to match.


Thanks so much for stopping by today. I hope you're inspired to add a little Shimmerz to your creations this week! And if you're in the mood to pick up some new colors, include my name, Julee Tilman, in the order comments at checkout for a free gift.


Shimmerz Products Used
Shimmerz: PumpkinCoal
Stampz: Fresh Start

Tuesday, September 22, 2015

Love, a lovely layout with Karine

Hi,

I'm sharing today a layout made with Shimmerz little pots of happiness.


On a Craft & You Design (Spring Garden Collection) paper previously covered with clear gesso, I applied modeling paste through a stencil. To add more texture, I also used joint tape and heavy gesso. 


When came the time to choose my colors, I was guided by the paper and by the bricks colors in my photo. I choose three Shimmerz colors: Golden Wheat, Marigold and Pumpkin. I applied them with a paint brush and a little bit of water.


I made a few drops using the same Shimmerz colors and a paint brush.


I stamped a few motifs to add texture. 


***

You can order Shimmerz products directly from the Shimmerz Paints Store. If you do, don't forget to mention my name (Karine Gagnon) in the «Instruction to Merchant/seller» part of your order form (just below your name and address). After clicking «add», you'll get a FREE product in the color of your choice. 


Saturday, August 1, 2015

Textured Journal Covers with Gabrielle {Video Tutorial}


Hello friends! It's Gabrielle here with you today to share an art journal cover I recently made using beautiful Shimmerz Paints, Dusty Attic chipboard and a variety of new stencils I designed for The Crafter's Workshop.  The Stencils I used were 'Tuscan Wall', 'Moving Vines' and 'Organic Matter'.  Because I was going for the warm colors of Tuscany, I went with yellows, blues and greens with a hint of sepia.   Here are the Shimmerz Paints colors/products I used for this project...


Shimmerz Products Used:
~ Heidi Ho Blue Coloringz
~ Glorious Day Vibez
~ Chocolate Brownie Coloringz
~ Taupe of the World Vibez
~ Bamboo Leaf Spritz
~ Olive Branch Spritz
~ Emerald City Inklingz
~ Artichoked Texturez
~ Pumpkin Shimmerz

I did a video recording, a sort of step by step of the making of this journal cover (front and back) if anyone wants to recreate the look.   So take a break from the hassles of your day and let creativity flow your way! Enjoy! 


This was so much fun to make, I hope you enjoyed watching my video tutorial as much as I enjoyed creating this project!  Here are a few close-ups, that you can check out at your leisure....


Here's a view of the back and front cover.  I was going for a kind of aged, sun-warmed Tuscan doorway look.  I began by adding lots of textures using my stencils, and then just started layering on the paint colors starting with the lightest (Glorious Day Vibez) to the darkest.(Taupe of the World Vibez).


For the door, I brushed the Heidi Ho Blue on with a paint brush rather than spritzing it on, so that I would get streaks in the chipboard resembling woodgrain.  Then I lightly dry brushed some of my white Gesso over it to give the blue a more sun-bleached look. I finished the aged look by using a stamp I designed for The Scrapbook Diaries called Crackle Textures....I used the crackle paint stamp on the door and the peeled paint design on the walls.


For my vine corner, first I used my TCW 'Moving Vines' stencil with some texture paste, the  began to layer on my greens (Bamboo Leaf and Olive Branch Vibez).  For the chipboard I used the Chocolate Brownie Coloringz for the 'wood frame' and Emerald City Inklingz for the leaves.  


For the Ivy vine, I used my all-time favorite color of Texturez called Artichoked on the Ivy cut out on my Tuscan Walls stencil.  And finally I used a very light brushing of Pumpkin Shimmerz for my cracked brick design.

NOTE:  Don't forget to get your FREE/BONUS Shimmerz product in the color of your choice with your next Shimmerz Paints order....Just mention my name 'Gabrielle' in the 'Instructions to Merchant/Seller' part of your order, and presto! Stacey will bestow an extra Shimmerz product upon you!  Perfect if you're like me and have a hard time narrowing down the colors you NEED! :P

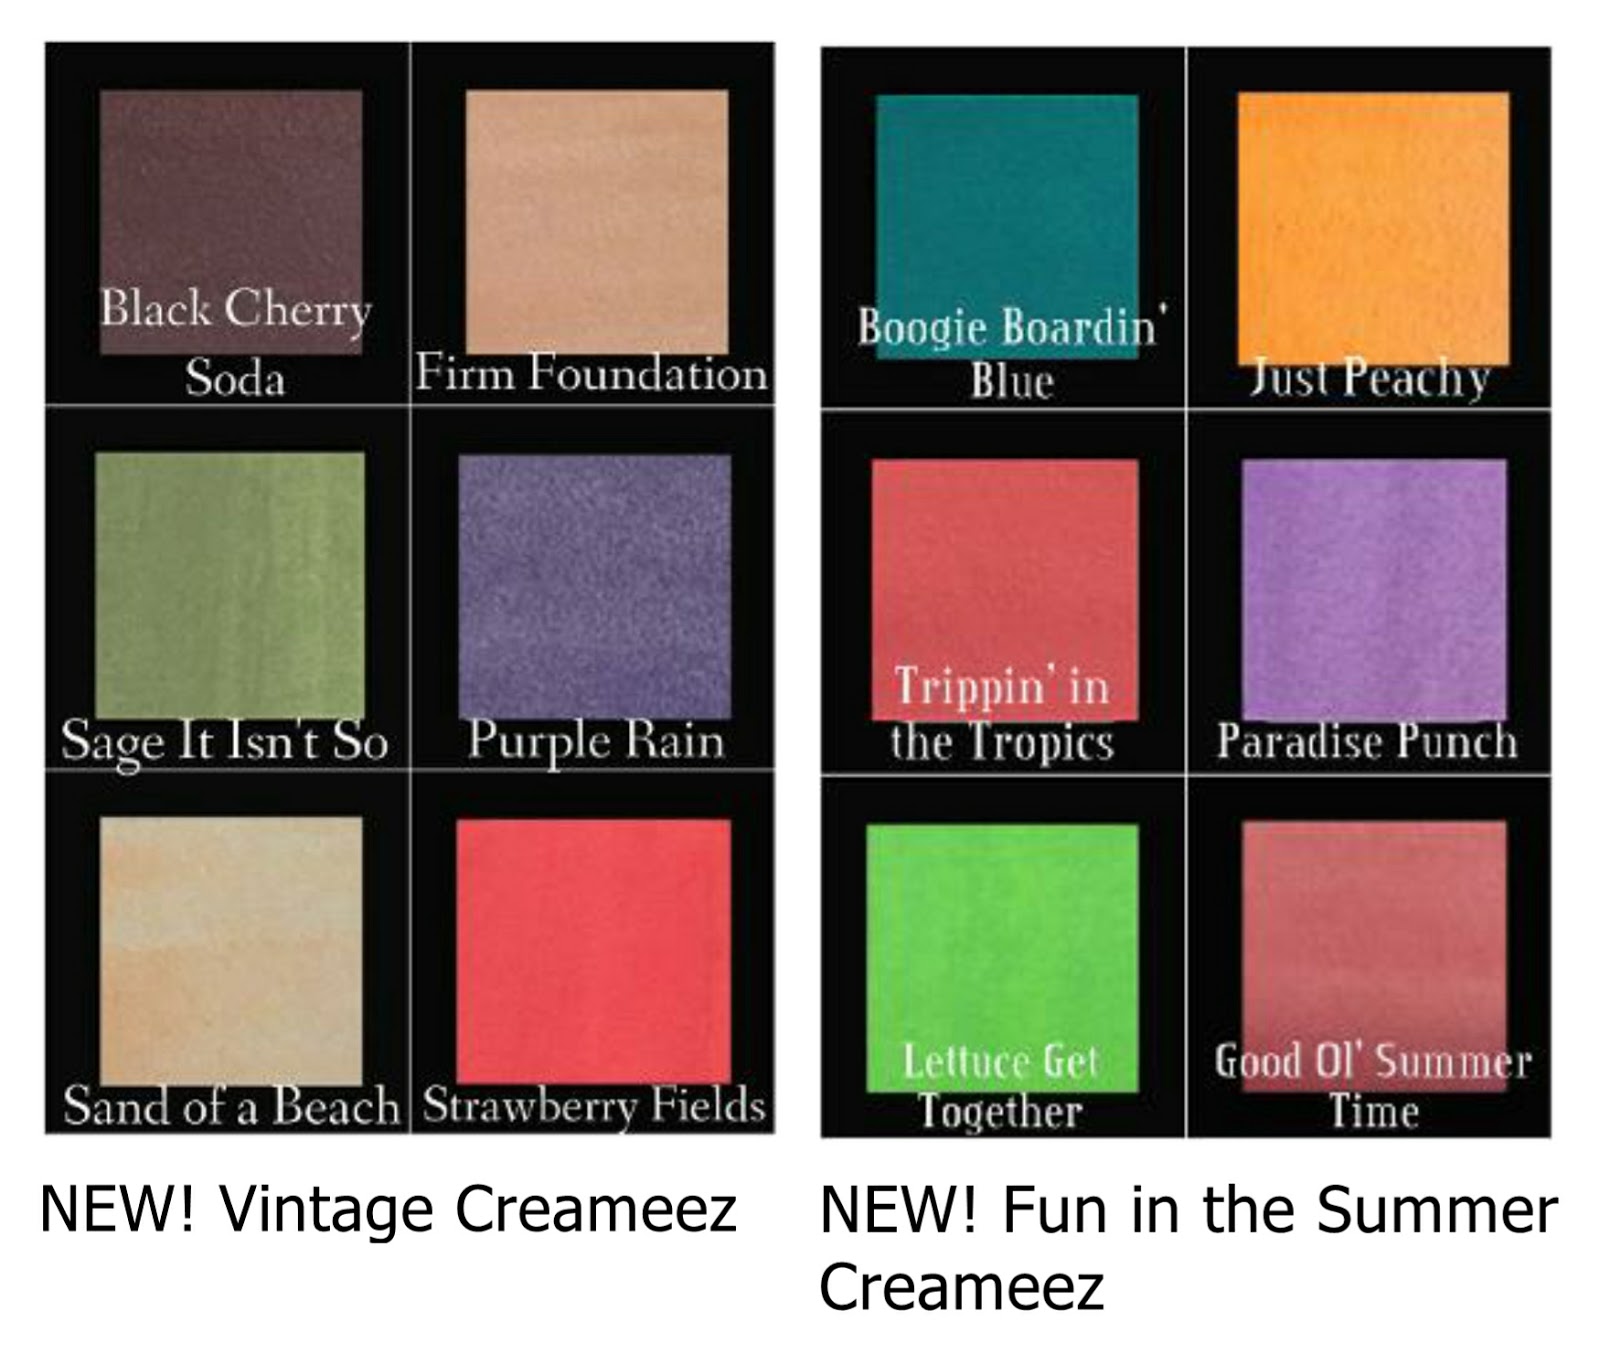
....AND....If you haven't heard the exciting news yet, Shimmerz has brought out a whole bunch of gorgeous new colors for their summer release!  I'm super excited to give these lovely colors a go!  I recently have been playing a little more with the Creameez paints and I just love the matte watercolor look they can give to a project!...I sat here trying to pick some favorite colors, but it's so hard to do, they are all so yummy! (Firm Foundation, Sage It Isn't So, Good Ol' Summer Time...seriously, how cute are those names too!). What's your favorite?