Showing posts with label Lorimar Ortega. Show all posts

Tuesday, November 24, 2020

Autumn Days | Mixed Media Layout with Simple Stories Cozy Days

 Hello everyone!

Thanksgiving is just around the corner and, while I know that things have been a bit different lately, there's always something to be thankful for.

Today's layout is mostly focused on making one's own background and piling on the embellishments. If you'd like to see how it's made, click here.


I began with a cream cardstock as my base and began spraying my base with Bamboo Leaf, Moody Mauve, Glorious Day, Cotton Candy and Hot Fudge. I didn't add any gesso this time around because I didn't want my colors to blend too much. After spraying the colors, I added a couple of splatters of Hot Fudge.

I fussy-cut some tags and icon squares from the collection (Simple Stories Cozy Days) to add to the embellishment clusters that would hang tight around each of the pictures.

My embellishment clusters contain a mix of stickers, ephemera, foam stickers, and chipboard stickers to really play with the dimension on the layout. Each picture is popped up on some craft foam, and each has a tag as a layering piece beneath them. Once I was done with everything, I splashed a bit of Moody Mauve and Glorious Day around my layout to add some more Shimmerz goodness!


That's it! It was a super simple and quick layout to make, and I hope I've inspired you to get your stories documented while playing around with your Shimmerz Paints. Remember, you can always receive a freebie in your next Shimmerz order if you type LORIMAR in the comments section when placing it.

Thank you so much for joining me today! Stay safe and happy Thanksgiving!

- Lorimar

Wednesday, November 18, 2020

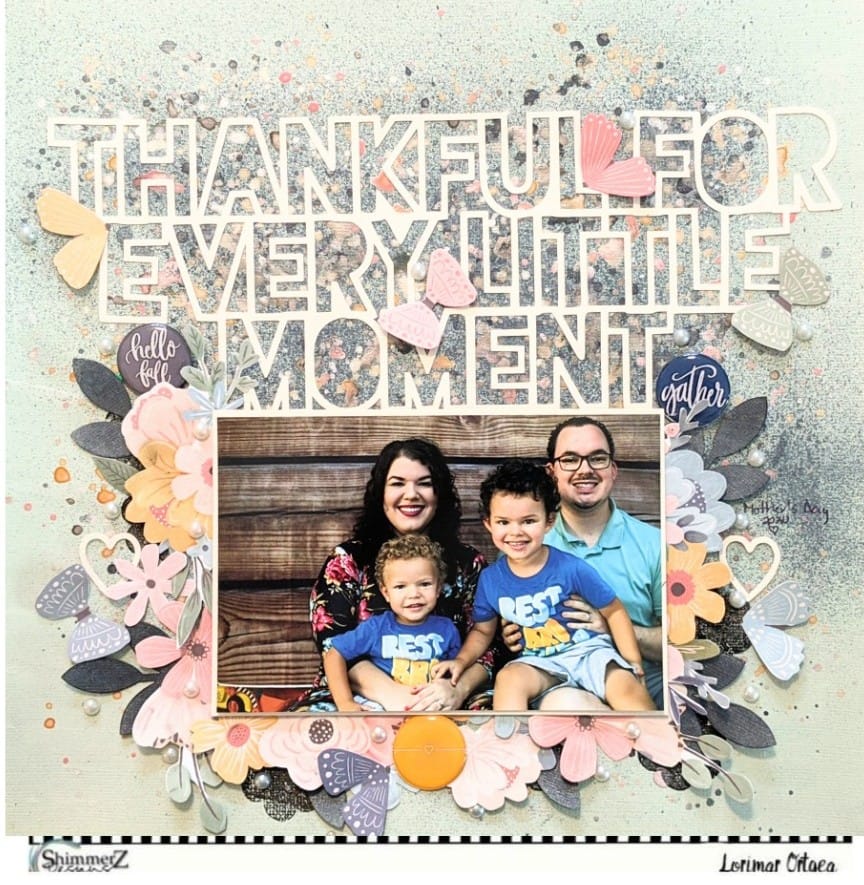
Thankful for Every Little Moment | November Color Kitz | Cocoa Vanilla Studios Daydream

 Hello everyone!

We are just a week shy of Thanksgiving, and although the year has been on the crazy side, I'm sure there are still moments that are worth being thankful for.

Today's layout features all the goodness found in the November Color Kitz, and I've added in an extra challenge: make my own embellishments. Apart from the Color Kitz, I used mainly items from Cocoa Vanilla Studios Daydream collection. If you are interested in watching the process video, click here!


Let's begin! I selected a minty-green cardstock as my base and cut out the cutfile on beige cardstock. I went for muted and delicate colors as opposed to bold colors this time around to make my photo pop. After adding clear gesso to the base and letting it dry, I began adding my colors; I sprayed Don't Rain on My Parade lightly first and then began adding each of the other colors (from the Color Kitz) by splattering them unto the base. In my mind, I was going for a sort speckled egg look for my base.


While my base dried, I went to town fussy-cutting out florals and butterflies from a Cocoa Vanilla Studios patterned paper. I also punched out some leaflets which were colored with Don't Rain on My Parade in order to add a pop of that gorgeous dark blue. As soon as my base was dried, I stamped some flowers around where I'd be adding the rest of my florals in order to make it look fuller. I then glued the cutfile at the top of the layout right unto the base and added in my photo (a true 4x6) on craft foam right below it. Afterwards, I took my time fiddling with the placement of the fussy-cut florals and butterflies; the butterflies' wings were popped up on craft foam, as were some of the florals in order to add dimension. Popped the Dotz near my photo and, finally, I sprinkled some of the stickable pearls from the Color Kitz to add a pop of delicateness to the layout, and that's it!


The layout took awhile to assemble from start to finish, but I love the result! Remember to use my name (LORIMAR) in your next Shimmerz order so you can receive a freebie. Thank you so much for sticking around this far.

Stay safe and be grateful,
Lorimar


Wednesday, September 4, 2019

Happy Adventure

 Dark background and fussy cut florals? Yes, please! I love the look floral bunches as faux photo corners. Pair that with Shimmerz on dark patterned paper and you’ve got one gorgeous layout!

     I love using dark backgrounds because they make everything pop! I selected this dark blue paper from Paige Evans Horizon collection and added some Pixie Dust (Blingz) by using the packaging technique and splatters, focusing the mixed media slightly to the right side of the layout. Then I added the text paper (also from Paige Evan Horizon) and used the same techniques only with Caribbean Sunset. Afterwards, I tore an opening on the left side and back it with some of the text paper to add another cluster area.

     I set my background aside and got to making my florals. I love fussy cutting flowers and then layering them unto a layout because they just add so much in terms of color, texture and dimension. For these I used 3 different stamp sets and black archival ink; 2 by Altenew and 1 by Maggie Holmes. For my yellow flowers, I colored some white cardstock with Lil’ Yellow School Bus (Coloringz), Tuscan Sun (Spritz), Meet Me @ Sunset (Inklings), and Dandy Lion (Creameez). I made my blue butterflies by making brushstrokes of Boggie Boardin’ Blue (Creameez), Tickle Me Turquiose (Shimmerz), and Corney Flower Blue (Inklingz) on some light blue cardstock. I stamped some leaflets on some green cardstock that I colored with Green Goddess (Inklingz), Jilted Jade (Shimmerz), and Pinin’ For You (Creameez). Finally for my pink flowers, I used hot pink cardstock, stamped it with embossing ink, poured white embossing powder on top and then set it with my heat gun. Once everything was thoroughly dry, I went to town fussy-cutting.

Once my background and florals were dry and prepped, I backed my picture con some white cardstock and layered some patterned paper from Paige’s Horizon collection. I popped this paper cluster on some craft foam and placed slightly to the left of where the two patterned papers meet. Then I spent some time fiddling with the placement of the flowers and, once I was satisfied with the look, I began sticking everything down and popped certain embellishments and flowers on 3D tape. Mixed in a couple of florals, stickers, enamel hearts from the Horizon collection. Placed the chipboard title beneath my picture, added some sequins from Spiegel Mom Scraps (Freezin’ Season), and added a few splatters of Marigold (Shimmerz) to tie everything together.


I loved how this turned out!! If you liked any of the colors you saw me use, you can find them all @ www.shimmerzpaints.com.

Want a freebie? Write my name in the comments section of your order to receive some free paint!

Thank you so much for looking and I hope you are inspired to create a layout like this!

-        Lorimar


Monday, August 26, 2019

Together


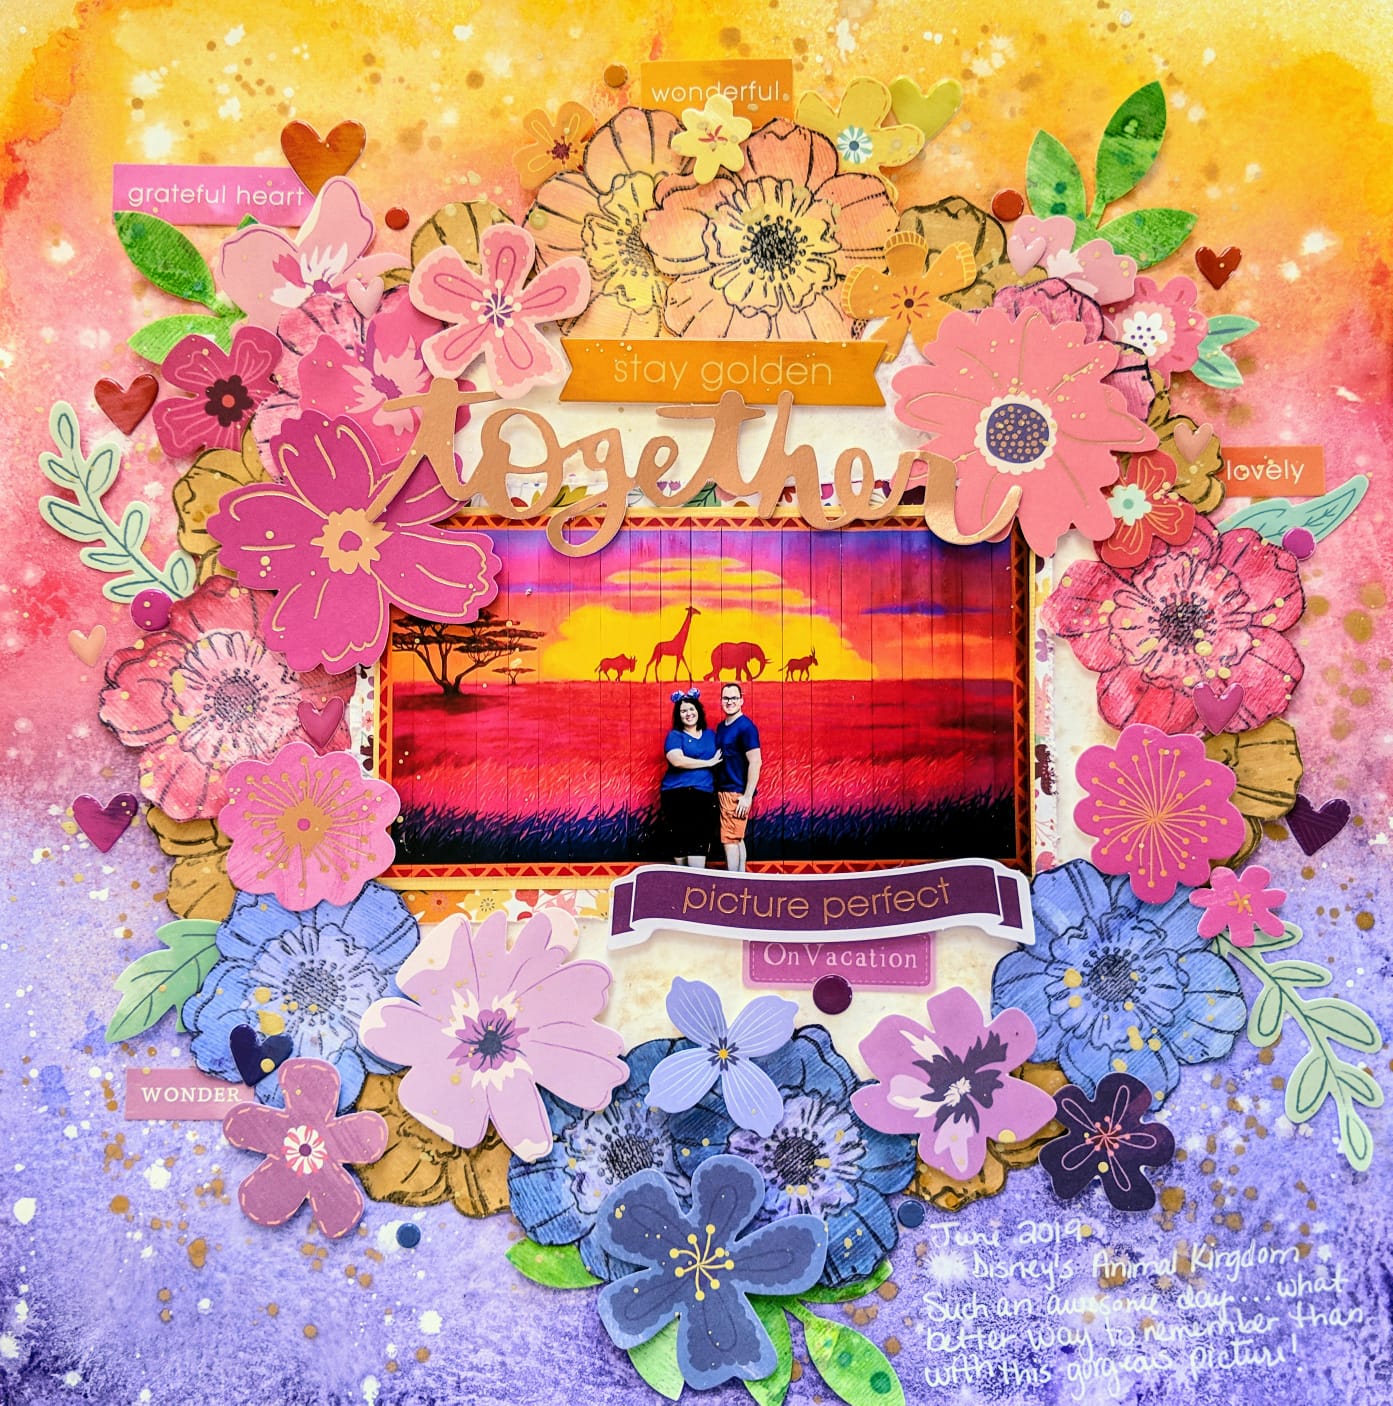
Hey everyone! I’m up on the Shimmerz Blog sharing this gorgeous layout mixing florals with the ombre look. It’s no secret that I love using florals in my layouts because they add color, dimension and shimmer! My family and I recently went on vacation and, among the pictures we snapped there, we came back with this awesome, colorful picture! I just couldn’t wait to scrap it. Like my previous blog post for Shimmerz, I’ve divided the process of making layout into 3 sections: background, florals and leaflets, and bringing it all together.


Background-
               I used Vicki Boutin’s Foundations paper because I knew that I was going to use lots of liquid with my mixed media. I grabbed a regular bowl to help me mark my center and circumference with a white gel pen. By using a white gel pen, any marks can be easily covered. Once I’d made my circle, I removed the bowl and sprayed the center with Shimmeringz Goldie Lox to give it a bit of shimmer. 

After waiting for it to dry, I placed the bowl back on the background as close to the original marking as possible, and then gathered my other mists (they are listed below) to create the ombre look. I began spraying them from the bottom up slightly overlapping the mists to achieve a smooth transition. 

Waited about 5 minutes for the mists to dry a bit, and then repeated the process. I did this to ensure that my colors were nice and bright! Without waiting for it to dry, I poured a bit of white acrylic paint and water into a mini mister and sprayed the whole background. This technique gives the colors a marbled/crackled look.


 I then watered down some white and gold acrylic paint and splattered them along the whole background. Later, I removed the bowl and set the background aside to dry.

·        Caribbean Sunset (Spritz)
·        Cotton Candy (Spritz)
·        Lil’ Yellow School Bus (Coloringz)
·        Tuscan Sun (Spritz)
·        Princess (Vibez)
·        Rip Van Periwinkle (Vibez)


Flowers and Leaflets
               Since I knew that I’d be adding floral die cuts from Paige Evans’ Whimsical, Horizon and Truly Grateful collections, I decided to make some extra florals to make the wreath look fuller. To accomplish this, I grabbed some scrap white and kraft cardstock, gold acrylic paint, a floral Vicki Boutin stamp, and archival ink and lots of Shimmerz (listed below). I made gold, yellow, blue/violet and pink flowers, and green leaflets. For the gold flowers, I used the kraft cardstock which I covered with gold acrylic paint and splatters of Miner, Miner 49er an Old Yeller. The other flowers were made one white textured cardstock. Finally, I made some green splotches from I’d punch some leaflets once dry. Once everything was dry, I fussy cut the florals out.
·        Meet Me @ Sunset (Inklingz)
·        Bahama Mama (Inklingz)
·        Limoncello (Shimmerz)
·        Miner Miner 49er (Inklingz)
·        Hermit the Frog (Vibez)
·        Goldie Lox (Shimmeringz)
·        Rip Van Periwinkle (Vibez)
·        Cotton Candy (Spritz)
·        Caribbean Sunset (Spritz)
·        Lil Yellow School Bus (Coloringz)

Bringing it all together
               I placed my photo on some layers of patterned paper from Paige’s Truly Grateful collection, popped it on 3D tape and placed it in the center of the circle. Then I began layering and tucjing in the flowers and leaflets, letting the background by my guide. Some of the flowers are completely stuck down flat; others have their tips set on 3D tape, and still others are popped up completely on 3D tape. This is how I achieved the layered look. I sprinkled a couple of epoxy dots and hearts, and stickers from Truly Grateful. To marry everything together, I splattered a bit of Miner, Miner 49er throughout the completed layout. Added my journaling at the bottom with a white gel pen. Here's the layout once more and lots of close-ups!


I loved how this turned out, love the color scheme! If you liked any of the colors you saw me use, you can find them all @ Shimmerzpaints.com.


Want a freebie? Write my name in the comments section of your order to receive some free paint!

Thanks so much for looking and I hope you are inspired to create a layout like this!

-        Lorimar


Tuesday, August 13, 2019

1 Sweet Adventure


1 Sweet Adventure

Hey everyone! I’m super excited to be sharing my first ever project (and blog post) as part of the Shimmerz Design Team. For my debut, I decided to get very colorful and push out of my comfort zone a bit. And guess what? I LOVED IT and most importantly, I LOVED THE LAYOUT!  Want to create a messy and sweet project perfect for documenting sugary adventures? Here’s how I made today’s layout:


In order to better guide you through the process, I’ve divided it up into 4 sections; (1) cutfile, (2) the backing of the cutfile, (3) background, and (4) finishing it all off.

1 – Cutfile
               When I saw this ice cream cut file that came in this month’s main color kit, I was floored! I had been looking for such a cut file to document my sons’ sticky sweet adventure but hadn’t found one that I liked… until this one! Since I already had the pictures that I’d be using in mind, it was easy for me to pick the layout’s color scheme. For the layout, I cut the cut file on some non-textured Kraft cardstock to give a more muted tone to the colors that I was going to be adding unto to it. Afterwards, I colored each of individual ice creams, toppings, and cones. Below you’ll find the colors I used.
1.      Lil’ Yellow School Bus (Coloringz)
2.      Jeni B Bleu (Vibez)
3.      Iris My Case (Shimmerz)
4.      Royal Red (Shimmerz)
5.      Marigold (Shimmerz)
6.      Brass Knuckles (Inklingz)
7.      Penny 4 Your Thoughts (Inklingz)
Once everything was dry, I added 3D tape (or foam adhesive) to the cut file, set it aside to get working on my next step, the backing of the cutfile.

2- Backing of the Cut File
               On a scrap piece of white textured cardstock, I made different swatches of yellow, periwinkle, teal, red, and orange. For some pops of texture, I used a star stencil with some modeling paste on the periwinkle swatch and used the same stencil with Shimmerz Dazzlerz Puttin’ On the Glitz on the orange swatch. For the ombre look of the triple scoop teal ice cream, I used Jenni B Bleu to the top swatch. For the middle swatch, I mixed a bit of Chance of Rain with Jeni B Bleu, and finally for the bottom scoop, used a bit more of Chance of Rain with Jeni B Bleu. These are going to be the pieces that I’ll be using to back the cut file. On a separate piece of Kraft cardstock, I sprayed some Granny Gray to give the otherwise matte cardstock some shimmer. Finally, I set everything aside to dry (and moved on to working on my background). Once everything was dry, I backed the cut file. Again, you’ll find the colors I used below.
  1.        Tuscan Sun (Spritz)
  2.       Lil’ Yellow School Bus (Coloringz)
  3.        Meet Me @ Sunset (Inklingz)
  4.             Iris My Case (Shimmerz)
  5.         Corney Flower Blue (Inklingz)
  6.        Jeni B Bleu (Vibez)
  7.        Chance of Rain (Spritz)
  8.        Marigold (Shimmerz)
  9.         Just Peachy (Creameez)
  10.             Crimson Tide (Shimmerz)
  11. 11.   Royal Red (Shimmerz)
  12.        Granny Gray (Spritz)


3 – Background
               Whenever I think of ice cream, I think of ice cream dripping down your hand on a warm summer day. Add 2 toddlers and a very hot day at the Walt Disney World Parks and you got one big sticky (and memorable) mess! Since I had lots of colors going on within the cut file itself, I wanted to keep things subtle on the background while at the same time making the cut file stand out. To remedy that I used a text patterned paper from Paige Evans’ Horizon collection, covered it in gesso, and made color “sections” in yellow, periwinkle, teal and orange by using the packaging technique and a brush for some splatters. I let some of the color pool in the center of each section and then lifted the background up to create drips… just like ice cream drips! Once done, I set it aside to dry.
  1.         Tuscan Sun (Spritz)
  2.        Rip Van Periwinkle (Vibez)
  3.        . Jeni B Bleu (Vibez)
  4.       Marigold (Shimmerz)


    4.   Finishing off the layout
               Since I had already used some patterned paper from Paige Evans’ Horizon, I gathered a few scraps of paper from it to back my 2 photos (they are roughly 2.5 x 3.5). I chose embellishments that matched the color scheme and overall theme of the layout. These vary between stickers, chipboard, brads, enamel dots, buttons, ephemera and puffy shapes. To further add to the cuteness, I found these adorable ice cream cones from Doodlebug Design and added them to the base of the cones from the cut file on some 3D foam. My title “1 Sweet Adventure” was made from a combination of different alphas and thickers.


I loved how this turned out, love the colors! If you liked any of the colors you saw me use, you can find them all @ Shimmerzpaints.com.

Want a freebie? Write my name in the comments section of your order to receive some free paint!


Thank you so much for looking and I hope you are inspired to create a layout like this!

-      -   Lorimar