Showing posts with label Cotton Candy Spritz. Show all posts

Monday, January 29, 2024

12x12 Scrapbook Layout | January 2024 Kits | Erica Rose

 Hello friends! Erica here on the blog with you today and I am excited to share a 12x12 scrapbook using the January 2024 kits

I am so in love with this months paper and color kits! It is made up of my favorite colors and I am so in love with black and white stripes! I  new I had to use the black & white stripe paper in this kit first! I paired it with the fun black circles pattern paper. I thought it would be fun to use some of the circles as frames for my photos. 

I trimmed the black and white stripe paper and covered up all but two rows of the circle pattern paper. To break up the two papers I created a pink scallop border.

To add some color behind the photos I used the Cotton Candy Spritz from the January 2024 Color Kit to add the pretty pink in four of the circles. I sprayed of the Cotton Candy Spritz  onto a piece of plastic packaging and then used my paint brush to add it to the pattern paper. I made sure to add a little bit of clear gesso to the circles to help my paper not to warp. Once it dried I adding my photos with foam adhesive. 

Next I added in some of the ephemera pieces from the January 2024 Paper Collection. To finish off the layout I created a small embellishment cluster in the bottom right corner of the layout. 
I used some small black puffy stickers from my stash to add the year on the label and a small black puffy heart to the center of the flower die cut. 
Here is a look at my completed layout using the January 2024 kits from Shimmerz Paintz! Thank you so much for stopping by the blog today! I hope you enjoyed my layout! You can check out my process video HERE on my YouTube channel.


Friday, May 22, 2020

Right Now | 12x12 Media Layout using Blues and Pinks

Hello there, Lori here!

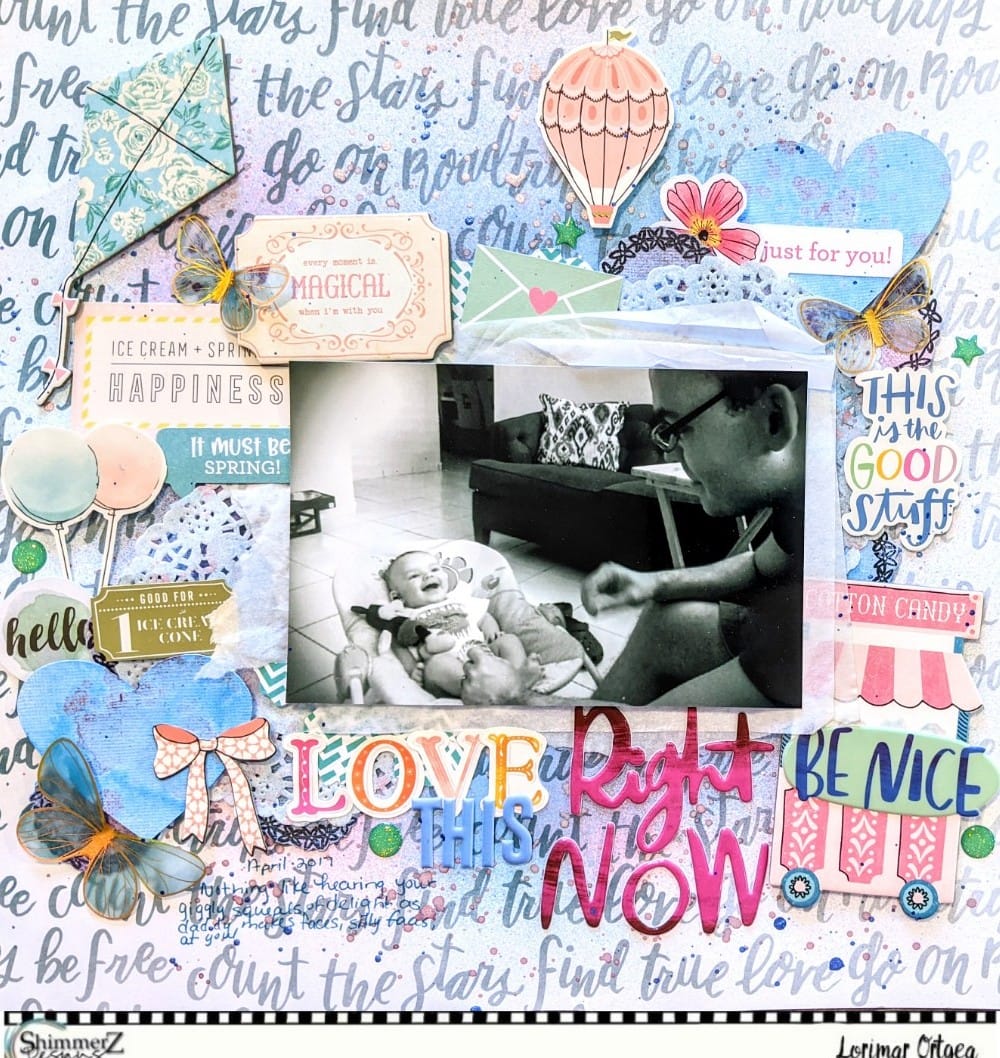
Popping by to share this Shimmerz-filled 12x12 layout in which I documented a sweet, endearing picture of my son giggling with my husband. I've also bashed a lot of leftover embellishments from my stash. Process Video: https://youtu.be/3l4AAXsYRYQ


Now, let's get started!

I first began with my base. I selected a patterned paper with a light blue scripty pattern on it and sprayed the center of it with Heidi Ho Blue (Coloringz), Jeni B Bleu (Vibez), Cotton Candy (Spritz), and Razzledazzle Berry (Vibez). My blue "cloud" is more predominant because I just wanted pops of pink throughout the layout.

Since I already had my mists with me, I went ahead and colored two doilies (Jeni B Bleu with splatters of Cotton Candy) and 2 cardstocks hearts (Heidi Ho Blue with splatters for Razzledazzle Berry).

Finally, once everything was dry,  I began to assemble my layout. I added in my two doilies diagonal to each other, added my picture (backed with tissue paper and craft foam) on top, and then began to layer in all the other embellishments, making sure to balance out the pink embellishments all around the layout.


And that's it! Thank you so much for looking and reading along. Remember, you can receive a freebie by typing my name (Lorimar) in comments section of your next Shimmerz order.

- Take care,
Lorimar

Tuesday, March 17, 2020

Shimmery Backgrounds

Hey everyone, Ericka here with a couple of cards I made for the Shimmerz Spring Forward Challenge. The challenge is all about making a layout or card WITHOUT using PATTERNED PAPER!! I love making background for my cards and here are a couple of ways you can get the look for pattern paper but by making your own.


For my first card, I started with some cardstock. I put a little of the Spun Sugar Dazzlerz paste on my craft mat and added Jeni B Bleu Vibez to give it a blue tint. I spread the Dazzlerz through the stencil and waited for it to dry. I love this sparkly paste and how easy it is to add fun colors to it for different looks.

Once it was dry, I used Cotton Candy Spritz and sprayed it on the background and wiped off the excess. The Dazzlers acts as a resist to the spray and has both shine and texture on the background.


I finished my card with a die cut sentiment and some sequins and a Butterfly Beauties Dotz for some added fun!


For my next card, I wanted to see how the Vibez and Spritz would react with photo paper.


I started with a layer of Glorious Day Vibez and let it dry and then added a layer of Jeni B Bleu. I ran the paper through my die cutting machine with a Reverse Confetti Stitched Circles cover plate one it was dry. I then add a layer of Cotton Candy to add a little pink to my background.


Since the photo paper has a layer of plastic, you can really see the spray marks which adds a fun texture. I added a die cut sentiment, some sequins and another set of Dotz for some added fun.


Thanks for stopping by and check out my blog Strangely Creative for more information on the products I used. Also don't forget we have a Spring Forward Challenge and a chance to win a $50 store credit. I look forward to seeing what you create! You can simply share your creation on the Shimmerz Sharez Facebook Group or anywhere on social media using the hashtag #shimmerzspringchallenge.

If you make a purchase, type in ERICKA in the comments and you'll receive a freebie with your order! Have a wonderful day and stay healthy and well!

Wednesday, February 26, 2020

Rainbow Cupcakes | Ericka Stange

Hello everyone, Ericka here with a fun rainbow cupcake card I made using lots of vibrant Coloringz and Spritz.

I love all these gorgeous rainbow of colors. I started by stamping the Visible Image cupcakes on Bristol Smooth paper and heat embossing them with some clear sparkle. Then I had fun spraying the cupcakes with several layers of color using the following sprays:
Coloringz - Lil' Yellow Skool Bus and Pink Stilettos
Spritz - 4 Leaf Clover, Sapphire, and Cotton Candy


I fussy cut out each of the cupcakes and added then to my stenciled background with foam tape.


I added the Visible Image Happy Birthday sentiment and heat embossed it with WOW Blue Glitz for some more shine.

As a finishing touch, I added these adorable clay polymer Wildflowers from Miss Ink. They are so tiny and adorable!

Thanks for stopping by and check out my blog Strangely Creative for more information on the products I used. Also don't forget we have a Spring Forward Challenge coming up in March! Join us as we create projects without ANY patterned paper.

If you make a purchase, type in ERICKA in the comments and you'll receive a freebie with your order! Have a wonderful day!

Sunday, September 22, 2019

Fall | Kelly Janes

Hey Shimmerz fans! Kelly here today with a new 12x12 Fall themed scrapbook layout!


I started my layout today by grabbing the Paige Evans Truly Grateful Collection and three Shimmerz colors that match; Cotton Candy Spritz, Plum Pudding Spritz, and Sweetheart Vibez. I added clear and white gesso to the background patterned paper before adding any of the mists.


I cut a Fall themed cut file from The Cut Shoppe using the Truly Grateful 6x8 patterned papers and used those 3 colors behind the cut files. I used the packaging technique, a brush, splattered and misted the colors directly on the background to get the coverage I was looking for.


I then adhered the cut file images on top of the mixed media. The colors were a little too bold in the center of each letter so I painted watered down white acrylic paint in the opening of each letter to mute the mixed media in that area.


I then moved onto adding 8 tiny photos and embellishing. I grabbed multiple Fall themed embellishments from the same Paige Evans collection and I also added hand-stitching around each of the letters to help them pop off the background.


Now you can take a look at my process video to see how this layout came together from start to finish.


I love how versatile the Shimmerz mists are and how the possibilities are endless! 


Wednesday, September 4, 2019

Happy Adventure

 Dark background and fussy cut florals? Yes, please! I love the look floral bunches as faux photo corners. Pair that with Shimmerz on dark patterned paper and you’ve got one gorgeous layout!

     I love using dark backgrounds because they make everything pop! I selected this dark blue paper from Paige Evans Horizon collection and added some Pixie Dust (Blingz) by using the packaging technique and splatters, focusing the mixed media slightly to the right side of the layout. Then I added the text paper (also from Paige Evan Horizon) and used the same techniques only with Caribbean Sunset. Afterwards, I tore an opening on the left side and back it with some of the text paper to add another cluster area.

     I set my background aside and got to making my florals. I love fussy cutting flowers and then layering them unto a layout because they just add so much in terms of color, texture and dimension. For these I used 3 different stamp sets and black archival ink; 2 by Altenew and 1 by Maggie Holmes. For my yellow flowers, I colored some white cardstock with Lil’ Yellow School Bus (Coloringz), Tuscan Sun (Spritz), Meet Me @ Sunset (Inklings), and Dandy Lion (Creameez). I made my blue butterflies by making brushstrokes of Boggie Boardin’ Blue (Creameez), Tickle Me Turquiose (Shimmerz), and Corney Flower Blue (Inklingz) on some light blue cardstock. I stamped some leaflets on some green cardstock that I colored with Green Goddess (Inklingz), Jilted Jade (Shimmerz), and Pinin’ For You (Creameez). Finally for my pink flowers, I used hot pink cardstock, stamped it with embossing ink, poured white embossing powder on top and then set it with my heat gun. Once everything was thoroughly dry, I went to town fussy-cutting.

Once my background and florals were dry and prepped, I backed my picture con some white cardstock and layered some patterned paper from Paige’s Horizon collection. I popped this paper cluster on some craft foam and placed slightly to the left of where the two patterned papers meet. Then I spent some time fiddling with the placement of the flowers and, once I was satisfied with the look, I began sticking everything down and popped certain embellishments and flowers on 3D tape. Mixed in a couple of florals, stickers, enamel hearts from the Horizon collection. Placed the chipboard title beneath my picture, added some sequins from Spiegel Mom Scraps (Freezin’ Season), and added a few splatters of Marigold (Shimmerz) to tie everything together.


I loved how this turned out!! If you liked any of the colors you saw me use, you can find them all @ www.shimmerzpaints.com.

Want a freebie? Write my name in the comments section of your order to receive some free paint!

Thank you so much for looking and I hope you are inspired to create a layout like this!

-        Lorimar


Monday, August 26, 2019

Together


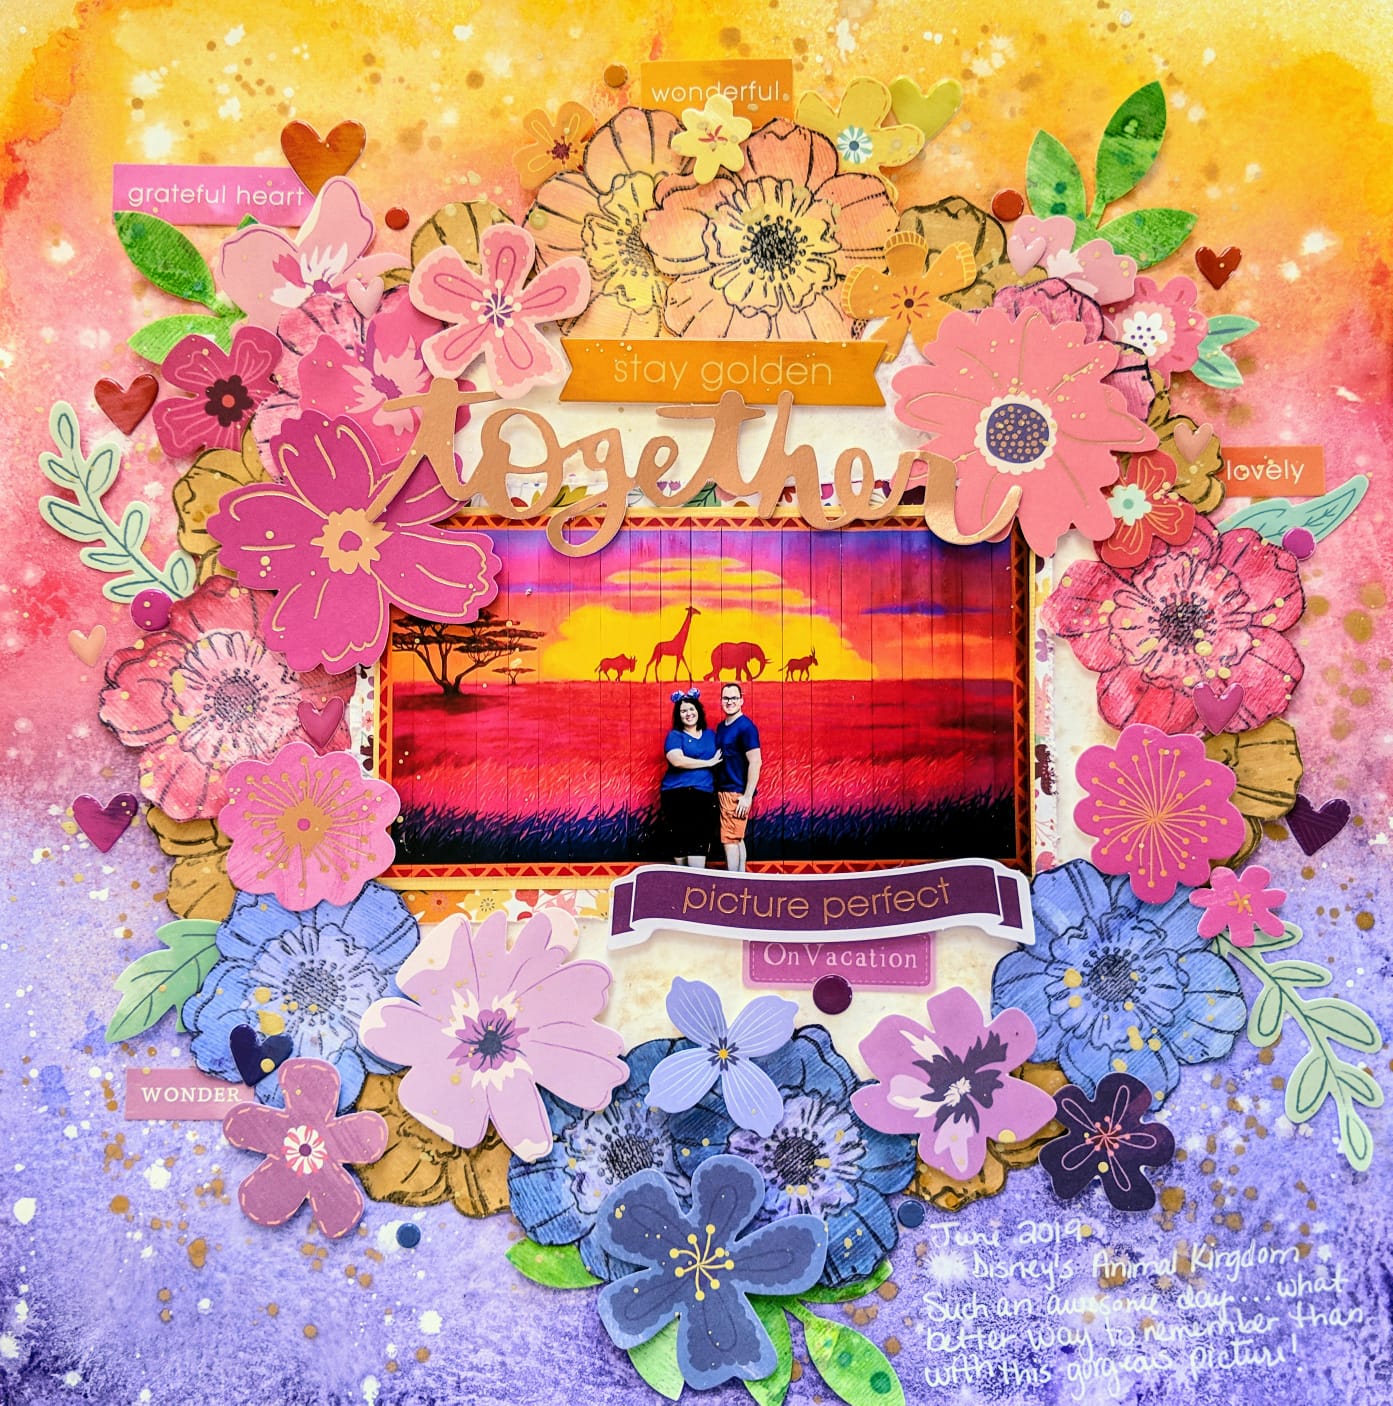
Hey everyone! I’m up on the Shimmerz Blog sharing this gorgeous layout mixing florals with the ombre look. It’s no secret that I love using florals in my layouts because they add color, dimension and shimmer! My family and I recently went on vacation and, among the pictures we snapped there, we came back with this awesome, colorful picture! I just couldn’t wait to scrap it. Like my previous blog post for Shimmerz, I’ve divided the process of making layout into 3 sections: background, florals and leaflets, and bringing it all together.


Background-
               I used Vicki Boutin’s Foundations paper because I knew that I was going to use lots of liquid with my mixed media. I grabbed a regular bowl to help me mark my center and circumference with a white gel pen. By using a white gel pen, any marks can be easily covered. Once I’d made my circle, I removed the bowl and sprayed the center with Shimmeringz Goldie Lox to give it a bit of shimmer. 

After waiting for it to dry, I placed the bowl back on the background as close to the original marking as possible, and then gathered my other mists (they are listed below) to create the ombre look. I began spraying them from the bottom up slightly overlapping the mists to achieve a smooth transition. 

Waited about 5 minutes for the mists to dry a bit, and then repeated the process. I did this to ensure that my colors were nice and bright! Without waiting for it to dry, I poured a bit of white acrylic paint and water into a mini mister and sprayed the whole background. This technique gives the colors a marbled/crackled look.


 I then watered down some white and gold acrylic paint and splattered them along the whole background. Later, I removed the bowl and set the background aside to dry.

·        Caribbean Sunset (Spritz)
·        Cotton Candy (Spritz)
·        Lil’ Yellow School Bus (Coloringz)
·        Tuscan Sun (Spritz)
·        Princess (Vibez)
·        Rip Van Periwinkle (Vibez)


Flowers and Leaflets
               Since I knew that I’d be adding floral die cuts from Paige Evans’ Whimsical, Horizon and Truly Grateful collections, I decided to make some extra florals to make the wreath look fuller. To accomplish this, I grabbed some scrap white and kraft cardstock, gold acrylic paint, a floral Vicki Boutin stamp, and archival ink and lots of Shimmerz (listed below). I made gold, yellow, blue/violet and pink flowers, and green leaflets. For the gold flowers, I used the kraft cardstock which I covered with gold acrylic paint and splatters of Miner, Miner 49er an Old Yeller. The other flowers were made one white textured cardstock. Finally, I made some green splotches from I’d punch some leaflets once dry. Once everything was dry, I fussy cut the florals out.
·        Meet Me @ Sunset (Inklingz)
·        Bahama Mama (Inklingz)
·        Limoncello (Shimmerz)
·        Miner Miner 49er (Inklingz)
·        Hermit the Frog (Vibez)
·        Goldie Lox (Shimmeringz)
·        Rip Van Periwinkle (Vibez)
·        Cotton Candy (Spritz)
·        Caribbean Sunset (Spritz)
·        Lil Yellow School Bus (Coloringz)

Bringing it all together
               I placed my photo on some layers of patterned paper from Paige’s Truly Grateful collection, popped it on 3D tape and placed it in the center of the circle. Then I began layering and tucjing in the flowers and leaflets, letting the background by my guide. Some of the flowers are completely stuck down flat; others have their tips set on 3D tape, and still others are popped up completely on 3D tape. This is how I achieved the layered look. I sprinkled a couple of epoxy dots and hearts, and stickers from Truly Grateful. To marry everything together, I splattered a bit of Miner, Miner 49er throughout the completed layout. Added my journaling at the bottom with a white gel pen. Here's the layout once more and lots of close-ups!


I loved how this turned out, love the color scheme! If you liked any of the colors you saw me use, you can find them all @ Shimmerzpaints.com.


Want a freebie? Write my name in the comments section of your order to receive some free paint!

Thanks so much for looking and I hope you are inspired to create a layout like this!

-        Lorimar