Showing posts with label fussy cutting. Show all posts

Wednesday, November 18, 2020

Thankful for Every Little Moment | November Color Kitz | Cocoa Vanilla Studios Daydream

 Hello everyone!

We are just a week shy of Thanksgiving, and although the year has been on the crazy side, I'm sure there are still moments that are worth being thankful for.

Today's layout features all the goodness found in the November Color Kitz, and I've added in an extra challenge: make my own embellishments. Apart from the Color Kitz, I used mainly items from Cocoa Vanilla Studios Daydream collection. If you are interested in watching the process video, click here!
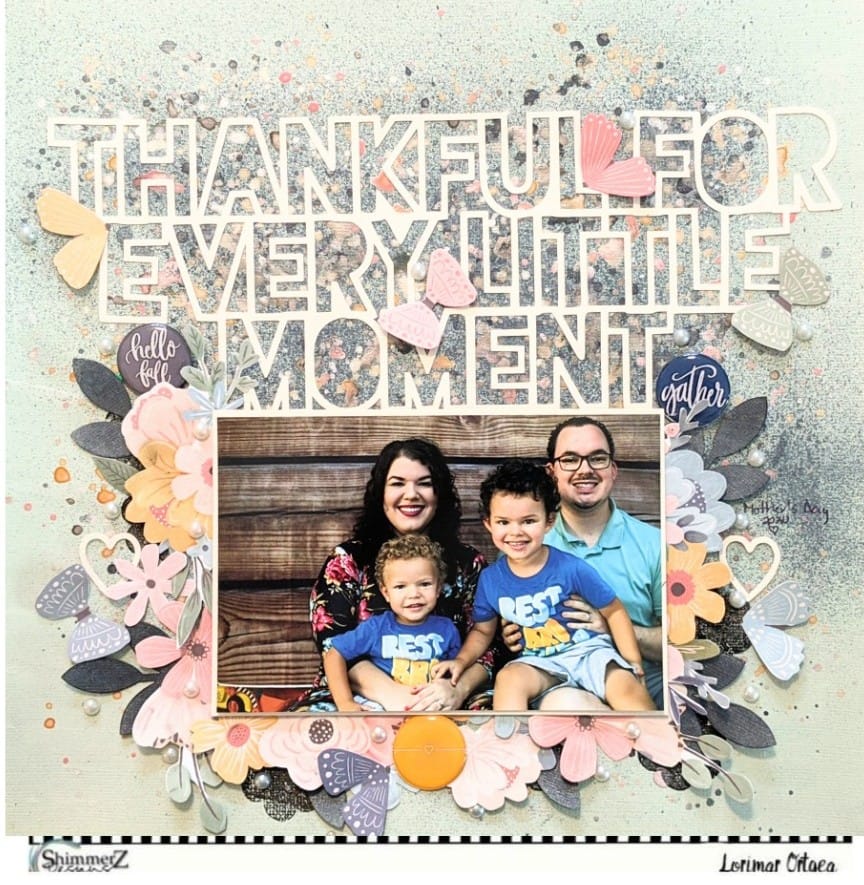

Let's begin! I selected a minty-green cardstock as my base and cut out the cutfile on beige cardstock. I went for muted and delicate colors as opposed to bold colors this time around to make my photo pop. After adding clear gesso to the base and letting it dry, I began adding my colors; I sprayed Don't Rain on My Parade lightly first and then began adding each of the other colors (from the Color Kitz) by splattering them unto the base. In my mind, I was going for a sort speckled egg look for my base.


While my base dried, I went to town fussy-cutting out florals and butterflies from a Cocoa Vanilla Studios patterned paper. I also punched out some leaflets which were colored with Don't Rain on My Parade in order to add a pop of that gorgeous dark blue. As soon as my base was dried, I stamped some flowers around where I'd be adding the rest of my florals in order to make it look fuller. I then glued the cutfile at the top of the layout right unto the base and added in my photo (a true 4x6) on craft foam right below it. Afterwards, I took my time fiddling with the placement of the fussy-cut florals and butterflies; the butterflies' wings were popped up on craft foam, as were some of the florals in order to add dimension. Popped the Dotz near my photo and, finally, I sprinkled some of the stickable pearls from the Color Kitz to add a pop of delicateness to the layout, and that's it!


The layout took awhile to assemble from start to finish, but I love the result! Remember to use my name (LORIMAR) in your next Shimmerz order so you can receive a freebie. Thank you so much for sticking around this far.

Stay safe and be grateful,
Lorimar


Thursday, February 20, 2020

A Sweet Date | Valentine's Day themed layout with process video

Hey everyone!

Here's another romantic layout which has some fussy-cutting and floral painting. Link to process video is at the end of this blog post.

Ever since I first saw that wreath paper from PinkFresh Studio, I knew that I wanted to fussy-cut it out and add it on some white cardstock and fill it out with more flowers.


But before doing that, I made a frame from a paper by Amy Tangerine and trimmed a white cardstock to 11.5 by 11.5. I then colored the cardstock by placing an overturned bowl in the center and spraying Jenni B Bleu, Cotton Candy and Granny Gray over it. By adding the bowl in the center, I created a whited-out section in the center and this further accentuates the circle look of the layout. Removed the bowl, waited for it dry before spraying some more Granny Gray all over the layout and splattered some Bumbly Bee as well.


Set it aside to dry and began to work on some fussy cut flowers I had previously worked on. They are also from a PinkFresh Studio patterned paper and they were white. To add more color to layout, I colored them using: Boogie Boarin' Blue, Ride the Tide, Jolly Green Giant, Bubble Gum Blast, Pink, Olive U Truly, and Dear John Letter. 


Once all my elements were dry, I added the cardstock unto the patterned paper frame, placed the wreath in center and popped it up on craft foam. Layered in the flowers into two clusters around my picture and a third in the upper left corner; the tips of these were popped up on craft foam for added dimension. Finished off the layout with some puffy heart stickers and pearls from my stash, added my journaling in light blue ink, and placed my title above the picture. Splashed some Old Yeller for a pop of gold.


And that's it! Love, love, love how it turned out! Hope I've inspired you to get crafty and get your story documented. Thanks for looking! Process video: https://youtu.be/mmW9NnehZXs 

Remember, you can get some free paint by writing my name in the comments section of your next Shimmerz order. 


With February ending in just 9 days, I'm gearing up to welcome the Spring sunshine and join in on the Shimmerz Spring Forward challenge! Join us as we create projects without ANY patterned paper.


- Lorimar


Sunday, September 29, 2019

Love That Smile

Summer is officially over, but before welcoming in Sweater Weather and warmer, cozier tones, I wanted to share this stash-bashing, "controlled" mixed media layout.


love stash bashing layouts! Add multi-colored fussy cut florals into the mix and I'm floored! A while back I went to a crop and colored and stamped 3 different backgrounds on some watercolor paper. For each, I simply added color with a wet brush and then used a palette knife to scrape, swatch and blend colors (below is the complete color list). Then I stamped images from Vicki Boutin's Color Kaleidoscope stamp set with black archival ink (Lawn Fawn). Afterwards, I went to town fussy cutting everything.

  • Marigold (Shimmerz) *no longer available
  • Just Peachy (Creameez) *no longer available
  • Oakie Bear Blue (Creameez)
  • Jeni B Blue (Vibez)
  • Pink Caviar (Shimmerz)
  • Pink (Shimmerz)
  • Meet Me @ Sunset (Creameez) *no longer available
  • Rip Van Periwinkle (Vibez)
  • Cotton Candy (Spritz)
  • Caribbean Sunset (Spritz)
  • Royal Purple (Shimmerz)
  • Peacock's Plume (Shimmerz)
  • Tickle Me Turquoise (Shimmerz)
  • Hermit the Frog (Vibez)
  • Pinin' for You (Creameez)
  • Honey Dew List (Creameez) *no longer available


For the layout, I merged 2 different patterned paper to form my base. With a honeycomb stencil (Vicki Boutin), I added Puttin' On the Glitz texture paste where the 2 papers met and spread it out about 1 1/2 to each side. Once dry, I added a string of bling to each side and then began layering in the leaflets and flowers. Matted my picture with yellow cardstock and added a bunch of embellishments from my stash. Tied everything together with splatters of Plum Crazy.


Hope you liked it, and are inspired to create something like this!

Remember, if you are interested in placing an order soon, be sure to mention my name in the comments section to receive free paint!!

Stay crafty and see you back soon!
- Lorimar


Wednesday, September 4, 2019

Happy Adventure

 Dark background and fussy cut florals? Yes, please! I love the look floral bunches as faux photo corners. Pair that with Shimmerz on dark patterned paper and you’ve got one gorgeous layout!

     I love using dark backgrounds because they make everything pop! I selected this dark blue paper from Paige Evans Horizon collection and added some Pixie Dust (Blingz) by using the packaging technique and splatters, focusing the mixed media slightly to the right side of the layout. Then I added the text paper (also from Paige Evan Horizon) and used the same techniques only with Caribbean Sunset. Afterwards, I tore an opening on the left side and back it with some of the text paper to add another cluster area.

     I set my background aside and got to making my florals. I love fussy cutting flowers and then layering them unto a layout because they just add so much in terms of color, texture and dimension. For these I used 3 different stamp sets and black archival ink; 2 by Altenew and 1 by Maggie Holmes. For my yellow flowers, I colored some white cardstock with Lil’ Yellow School Bus (Coloringz), Tuscan Sun (Spritz), Meet Me @ Sunset (Inklings), and Dandy Lion (Creameez). I made my blue butterflies by making brushstrokes of Boggie Boardin’ Blue (Creameez), Tickle Me Turquiose (Shimmerz), and Corney Flower Blue (Inklingz) on some light blue cardstock. I stamped some leaflets on some green cardstock that I colored with Green Goddess (Inklingz), Jilted Jade (Shimmerz), and Pinin’ For You (Creameez). Finally for my pink flowers, I used hot pink cardstock, stamped it with embossing ink, poured white embossing powder on top and then set it with my heat gun. Once everything was thoroughly dry, I went to town fussy-cutting.

Once my background and florals were dry and prepped, I backed my picture con some white cardstock and layered some patterned paper from Paige’s Horizon collection. I popped this paper cluster on some craft foam and placed slightly to the left of where the two patterned papers meet. Then I spent some time fiddling with the placement of the flowers and, once I was satisfied with the look, I began sticking everything down and popped certain embellishments and flowers on 3D tape. Mixed in a couple of florals, stickers, enamel hearts from the Horizon collection. Placed the chipboard title beneath my picture, added some sequins from Spiegel Mom Scraps (Freezin’ Season), and added a few splatters of Marigold (Shimmerz) to tie everything together.


I loved how this turned out!! If you liked any of the colors you saw me use, you can find them all @ www.shimmerzpaints.com.

Want a freebie? Write my name in the comments section of your order to receive some free paint!

Thank you so much for looking and I hope you are inspired to create a layout like this!

-        Lorimar