Showing posts with label Florals. Show all posts

Friday, May 7, 2021

Light Up My Life || Natalie Dill || May Color Kitz

 Hey friends! Natalie here using the May 2021 color kitz & they are FABULOUS! Here's my layout:


The May 2021 Color Kitz includes:

  • Sugar Plum Shimmerz 
  • *NEW* Rule of Plum Vibez
  • Daffodil Creameez
  • Lettuce Get Together Creameez
  • Meet Me @ Sunset Inklingz
  • 1 exclusive layered process "Blooming Ideazcut file created by Shimmerz Paints 
  • 1 set of Dotz
  • 1 package of Baby Rosez
For my layout, I used only the cut file outline of the light bulb. I cut it out in an eggplant cardstock. I then stamped some florals and fruits in versamark and embossed them in white atop watercolor paper. I then colored the florals and fruits with all Color Kitz colors.

Find the full process video on my channel!


I also used the Daffodil Creamez and Sugar Plum Shimmerz to dye the 3d roses in the kit.

I then stuck down all the floral and fruits within the bulb and added in some die cut foliage and the dyed roses.


I used a the Daffodil Creameez, Sugar Plum Shimmerz and a dash of Rule of Plum Vibez to create a bit of watercolor splotches outside the bulb area.

I also used them for a few splatters around the photo and title area.


I tucked the Dotz from the Color Kitz around the layout in a visually please triangular shape.


I love using Creameez to splatter because if you do not roll them up, they often dry raised so added texture is a plus!


I had so much fun creating this layout!

Make sure you grab your own May Color Kitz before they're gone.
Mention my name in the remarks of your purchase and receive a free goodie!

xoxo Natalie


Tuesday, October 29, 2019

Love My Life With You

Hello everyone!

   Have you tried out a new color for the Shimmerz Color Challenge this month? I previously chose Shimmerz Coffee since brown is one I rarely use as a focal color. My first layout was a masculine, "nature-y" layout, so for this layout I shifted my focus to a more feminine, floral theme.


   I started off by selecting a wood grain patterned paper (Simple Stories Fall Farmhouse) as my base. With a wet brush, make some brushstrokes with white acrylic paint along the center of the layout and then ran over them with my brayer. This techniques gives the mixed media more of a washed out look. I added some extra splatters of white acrylic paint and Coffee (Shimmerz) and Oakie Doakie (Creameez).


     The floral clusters were fussy cut out of a patterned paper from Vicki Boutin's Wild Flower and Honey collection. For extra layers and dimension, I made a swatch of Coffee (in brushstrokes) and Brass Knuckles (in splatters) on a scrap piece of kraft cardstock, and punched out some branches. My leaflets were punched out of plain kraft cardstock.


   Once I had everything, I placed my base (backed with navy cardstock) on my base and layered in the flowers, leaflets, and branches. Used a mix and match of thickers to make title and popped on some stickable pearls in beige. For a finishing touch, and to marry everything together, I splattered Coffee on the whole layout.

And that's it! Hope you are inspired to make a layout like this and to use those "scary and difficult" colors. Remember, if you write my name in the comments section of your next Shimmerz order, you'll receive some free paint!

- Lorimar

www.shimmerzpaints.com


Friday, September 13, 2019

September Color Kitz Inspiration & Process Video | Amanda Baldwin


Hi Shimmerz Friends & Fans! 

Amanda here, & I am so super excited to be sharing my layout & process video with the gorgeous new September Color Kitz! 
And oh my heart! The colors in this month's kit are just divine!!!
Here's a reminder of what the September Color Kitz look like....


Wow!!!

The Kit includes the following items:
  • 1 1oz bottle of Keep Palm Vibez
  • 1 1 oz bottle of the exclusive new color: Practice What You Peach Spritz
  • 1 package of exclusive Dotz "Gingham Greatness"
  • 1 jar of Wisteria Lane Shimmerz
  • 1 jar of In A Jam Creameez
Simply stunning! 
If you're super quick, and really lucky there might be one or two of these Color Kitz still in stock - visit the shop HERE. 

Here's what I created with them...

"Cherish"

Oh my! Cherish indeed!
There's no denying that the September Color Kitz are perfect for all your Fall theme projects!
Just stunning!

My pretty layout actually began as a quick wreath painting that I shared to the Shimmerz Paintz Sharez Facebook page a couple weeks ago - you might remember it? 


Isn't this a pretty approach to testing your colors? So much more lovely than a color swatch! 
And as I like to say, when in doubt wreath it out!
I used the gorgeous Vibez Palm Reader for the leaves, Creameez In A Jam for the rose, the all new exclusive Spritz Practice What You Peach for the smaller blooms, and an array of tiny dot flowers with Shimmerz Wisteria Lane. 

With such a gorgeous wreath on my desk, I felt inspired to create another...
This time I painted straight onto my pretty pattern paper & used the beautiful Creameez In A Jam for the foliage. The blooms were painted in Shimmerz Wisteria Lane, and I added a few splatters for good measure too!  


I fussy cut around the original wreath, and foam mounted it onto the newly painted one. This created both dimension & interest to the design and also added some depth to the combined wreaths as well. 
Between the layered wreaths, I tucked in two of the Gingham Greatness Dotz - LOVE!!!!


I embellish my photo cluster with fussy cut florals from the Jen Hadfield, Along The Way collection and add a good sprinkle of the SpiegelMom Scraps Summer Morn sequins. 


Such beauti-Fall details!!!

Interested in seeing how I painted those wreaths, and created this layout?
Please watch my video on the Shimmerz Paintz channel HERE. 


Thanks so much for watching!
I hope you enjoyed my video. 


Remember: Type AMANDA in the comments section of your Shimmerz Paints store order to receive a FREE paint! 


Thanks so much for visiting today!
til next time,


Wednesday, September 4, 2019

Happy Adventure

 Dark background and fussy cut florals? Yes, please! I love the look floral bunches as faux photo corners. Pair that with Shimmerz on dark patterned paper and you’ve got one gorgeous layout!

     I love using dark backgrounds because they make everything pop! I selected this dark blue paper from Paige Evans Horizon collection and added some Pixie Dust (Blingz) by using the packaging technique and splatters, focusing the mixed media slightly to the right side of the layout. Then I added the text paper (also from Paige Evan Horizon) and used the same techniques only with Caribbean Sunset. Afterwards, I tore an opening on the left side and back it with some of the text paper to add another cluster area.

     I set my background aside and got to making my florals. I love fussy cutting flowers and then layering them unto a layout because they just add so much in terms of color, texture and dimension. For these I used 3 different stamp sets and black archival ink; 2 by Altenew and 1 by Maggie Holmes. For my yellow flowers, I colored some white cardstock with Lil’ Yellow School Bus (Coloringz), Tuscan Sun (Spritz), Meet Me @ Sunset (Inklings), and Dandy Lion (Creameez). I made my blue butterflies by making brushstrokes of Boggie Boardin’ Blue (Creameez), Tickle Me Turquiose (Shimmerz), and Corney Flower Blue (Inklingz) on some light blue cardstock. I stamped some leaflets on some green cardstock that I colored with Green Goddess (Inklingz), Jilted Jade (Shimmerz), and Pinin’ For You (Creameez). Finally for my pink flowers, I used hot pink cardstock, stamped it with embossing ink, poured white embossing powder on top and then set it with my heat gun. Once everything was thoroughly dry, I went to town fussy-cutting.

Once my background and florals were dry and prepped, I backed my picture con some white cardstock and layered some patterned paper from Paige’s Horizon collection. I popped this paper cluster on some craft foam and placed slightly to the left of where the two patterned papers meet. Then I spent some time fiddling with the placement of the flowers and, once I was satisfied with the look, I began sticking everything down and popped certain embellishments and flowers on 3D tape. Mixed in a couple of florals, stickers, enamel hearts from the Horizon collection. Placed the chipboard title beneath my picture, added some sequins from Spiegel Mom Scraps (Freezin’ Season), and added a few splatters of Marigold (Shimmerz) to tie everything together.


I loved how this turned out!! If you liked any of the colors you saw me use, you can find them all @ www.shimmerzpaints.com.

Want a freebie? Write my name in the comments section of your order to receive some free paint!

Thank you so much for looking and I hope you are inspired to create a layout like this!

-        Lorimar


Monday, August 26, 2019

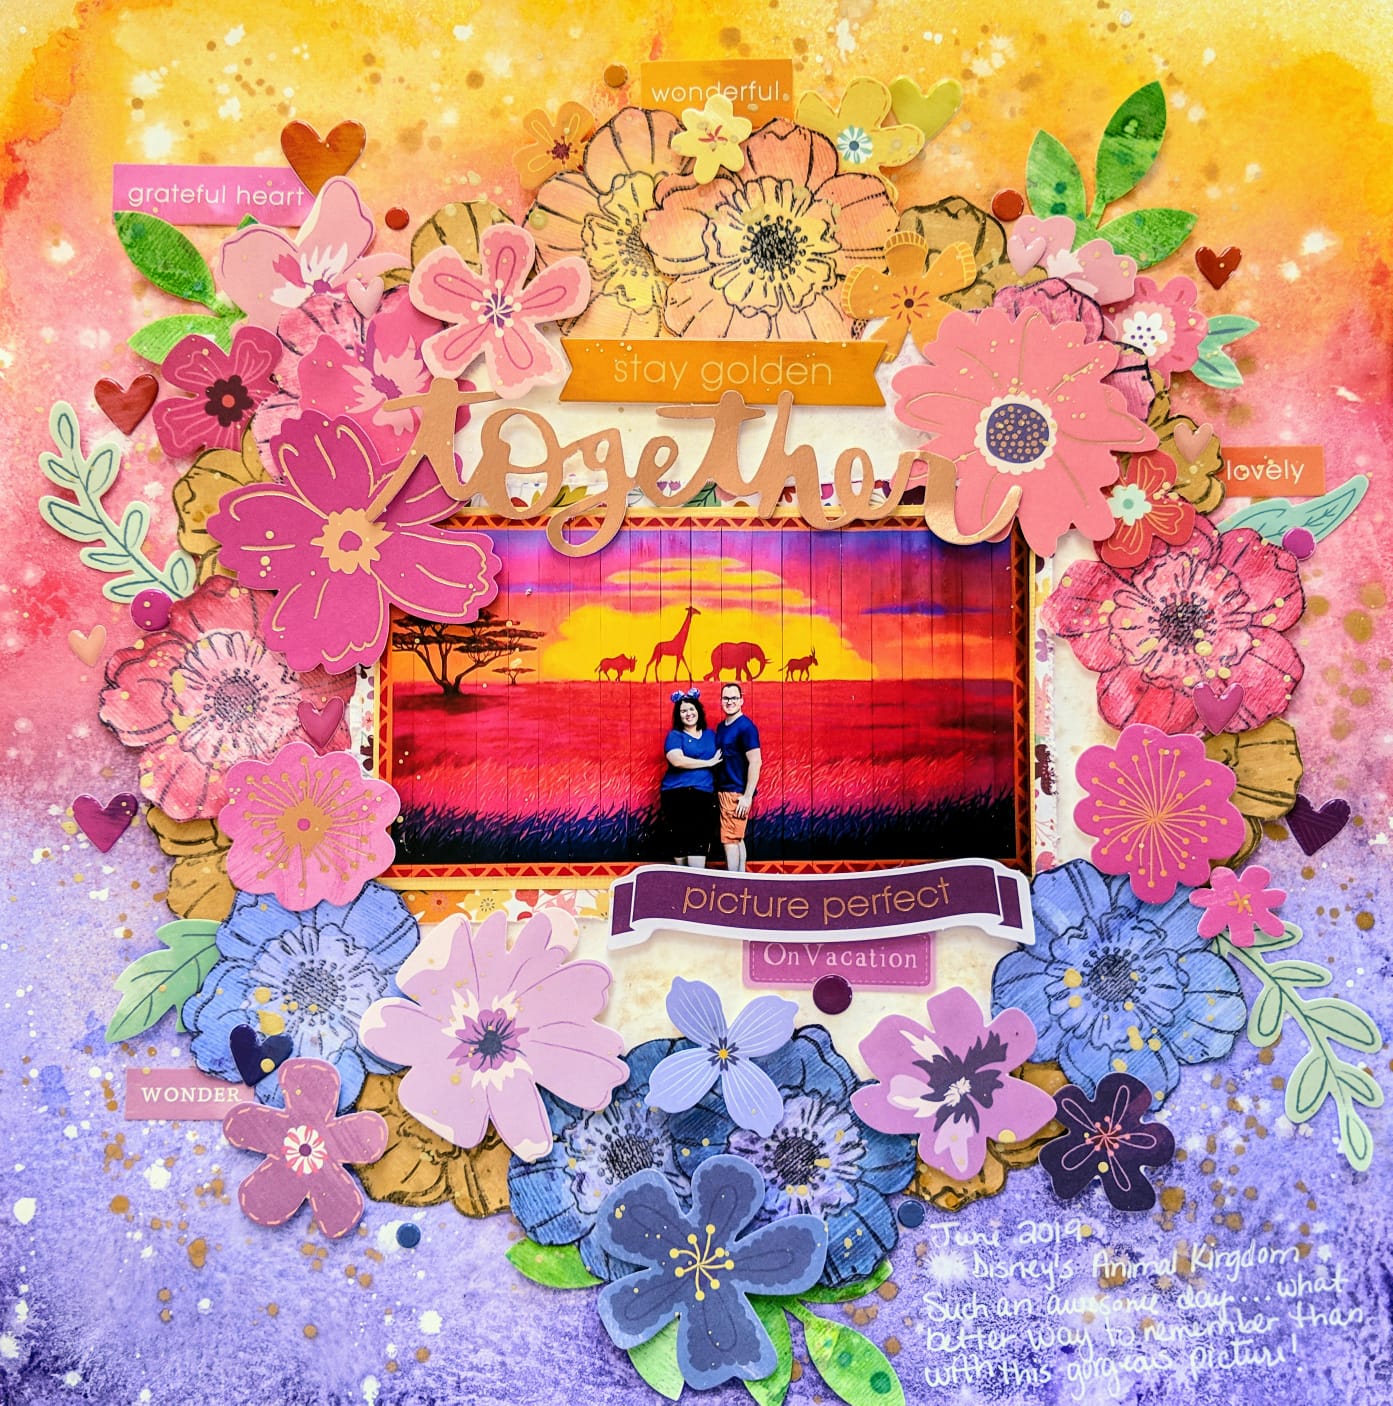
Together


Hey everyone! I’m up on the Shimmerz Blog sharing this gorgeous layout mixing florals with the ombre look. It’s no secret that I love using florals in my layouts because they add color, dimension and shimmer! My family and I recently went on vacation and, among the pictures we snapped there, we came back with this awesome, colorful picture! I just couldn’t wait to scrap it. Like my previous blog post for Shimmerz, I’ve divided the process of making layout into 3 sections: background, florals and leaflets, and bringing it all together.


Background-
               I used Vicki Boutin’s Foundations paper because I knew that I was going to use lots of liquid with my mixed media. I grabbed a regular bowl to help me mark my center and circumference with a white gel pen. By using a white gel pen, any marks can be easily covered. Once I’d made my circle, I removed the bowl and sprayed the center with Shimmeringz Goldie Lox to give it a bit of shimmer. 

After waiting for it to dry, I placed the bowl back on the background as close to the original marking as possible, and then gathered my other mists (they are listed below) to create the ombre look. I began spraying them from the bottom up slightly overlapping the mists to achieve a smooth transition. 

Waited about 5 minutes for the mists to dry a bit, and then repeated the process. I did this to ensure that my colors were nice and bright! Without waiting for it to dry, I poured a bit of white acrylic paint and water into a mini mister and sprayed the whole background. This technique gives the colors a marbled/crackled look.


 I then watered down some white and gold acrylic paint and splattered them along the whole background. Later, I removed the bowl and set the background aside to dry.

·        Caribbean Sunset (Spritz)
·        Cotton Candy (Spritz)
·        Lil’ Yellow School Bus (Coloringz)
·        Tuscan Sun (Spritz)
·        Princess (Vibez)
·        Rip Van Periwinkle (Vibez)


Flowers and Leaflets
               Since I knew that I’d be adding floral die cuts from Paige Evans’ Whimsical, Horizon and Truly Grateful collections, I decided to make some extra florals to make the wreath look fuller. To accomplish this, I grabbed some scrap white and kraft cardstock, gold acrylic paint, a floral Vicki Boutin stamp, and archival ink and lots of Shimmerz (listed below). I made gold, yellow, blue/violet and pink flowers, and green leaflets. For the gold flowers, I used the kraft cardstock which I covered with gold acrylic paint and splatters of Miner, Miner 49er an Old Yeller. The other flowers were made one white textured cardstock. Finally, I made some green splotches from I’d punch some leaflets once dry. Once everything was dry, I fussy cut the florals out.
·        Meet Me @ Sunset (Inklingz)
·        Bahama Mama (Inklingz)
·        Limoncello (Shimmerz)
·        Miner Miner 49er (Inklingz)
·        Hermit the Frog (Vibez)
·        Goldie Lox (Shimmeringz)
·        Rip Van Periwinkle (Vibez)
·        Cotton Candy (Spritz)
·        Caribbean Sunset (Spritz)
·        Lil Yellow School Bus (Coloringz)

Bringing it all together
               I placed my photo on some layers of patterned paper from Paige’s Truly Grateful collection, popped it on 3D tape and placed it in the center of the circle. Then I began layering and tucjing in the flowers and leaflets, letting the background by my guide. Some of the flowers are completely stuck down flat; others have their tips set on 3D tape, and still others are popped up completely on 3D tape. This is how I achieved the layered look. I sprinkled a couple of epoxy dots and hearts, and stickers from Truly Grateful. To marry everything together, I splattered a bit of Miner, Miner 49er throughout the completed layout. Added my journaling at the bottom with a white gel pen. Here's the layout once more and lots of close-ups!


I loved how this turned out, love the color scheme! If you liked any of the colors you saw me use, you can find them all @ Shimmerzpaints.com.


Want a freebie? Write my name in the comments section of your order to receive some free paint!

Thanks so much for looking and I hope you are inspired to create a layout like this!

-        Lorimar


Thursday, August 15, 2019

August Color Kitz Inspiration & Process Video | Amanda Baldwin

Hi Shimmerz Friends & Fans!

Amanda here, & today I am sharing a lil inspiration 
(complete with process video) 
with our gorgeous August Color Kitz!


This month's Color Kitz is absolutely stunning! 
Such pretty colors! &  just check out that exclusive ice cream cut file!!!
Colorz featured are:

 Vibez Hermit the Frog
Coloringz Heidi Ho Blue
Inklingz Sunkissed
Shimmerz Pink

Plus Sprinkle Time! sequins from our friends at SpiegelMomScraps.

If you're super quick, you *might* be able to snare one still before they completely sell out!


I couldn't wait to get creating with this beautiful kit! 
Here's what I came up with.....

"Bloom & Grow"


Oh my heart! Isn't this so pretty!
And before you ask about the ice cream cut file, let me tell you that my moody cutting machine ate every single one of those ice cream cones! I know, right?! So frustrating!
On the upside, digital files keep forever, & I'll try cutting it again after I've updated my software, lol!
I've also opted for a 'clean look' mixed media page - lots of controlled painting for this sweet page!
Here's a closer look at my layout.... 

Whoa! So.much.pretty!!!
Turns out you don't have to use the cut file to maximize the awesomeness of this kit! 

I began my layout by painting a bunch of blooms and leaves from the Cocoa Vanilla Studio "Sophisticated" pattern paper (Midnight collection) using ALL the colors! 
Where's the Heidi Ho Blue, I hear you ask? 
Well, to create those darker green leaves I mixed Coloringz Heidi Ho Blue with Vibez Hermit the Frog - so you kinda get a bonus 'extra' color in your kit ;)
Once dry, I fussy cut all the florals and arranged onto the 12 x 12 white cardstock base.


Next, I sprayed some scrap paper with pure Coloringz Heidi Ho Blue. 
With this newly created blue paper, I punched a few butterflies, and even backed it to my photograph for added interest. 
In keeping with the butterfly adornments, I just couldn't resist using the beautiful


Aren't they the perfect embellishment?! 
You can shop them HERE

Here's a closer look at them on my layout....


Beauties, indeed! 
The pretty yellow & lime butterfly coordinates perfectly with the Vibez Hermit the Frog painted leaves. Love it!


For finishing touches, I add my title Bloom & Grow also from the Cocoa Vanilla Studio Midnight collection, & end with scattering lots of Spinkle Time! sequins onto my page....


So many lovelies to look at!


Absolutely gorgeous!!! 
And such a 'clean' approach to using paints on your projects! 
Wanna see how it all came together?

Please watch my process video HERE


I hope you enjoyed watching my process video
& feel inspired to get creating with your August Color Kitz! 


Thanks so  much for visiting!

til next time,