Showing posts with label Rip Van Periwinkle. Show all posts

Tuesday, June 23, 2020

Shimmery Dragonfly | Ericka Strange


Hello Shimmerz fanz! Ericka here with a fun dragonfly card using some Shimmerz Vibez, Inklingz, and a new product coming soon called Foilz.


I love the gold look of the Foilz on the card. The color is amazing and it goes on super smooth, a pretty addition to any layout.


I started by spraying my background with Rip Van Periwinkle and Princess Vibez.  I let the layer dry and then applied the soon to be released Foilz through my stencil.


I stamped the dragonfly from the Visible Image Summer Wings on vellum and heat embossed it with WOW! Embossing Cloud 9 for a sparkly look. I then used Steely Blue Eyes and Honey Do List Inklingz to paint the dragonfly and give it some shimmer.


I cut the vellum dragonfly out and attached it to the background. I love that the vellum crinkled a little from the paint to give the wings even more texture.


I finished my card by stamping a sentiment from the Visible Image Happy Day set in black ink. Thanks for stopping by and feel free to check out my blog Strangely Creative for more information on the products I used. Happy crafting!


Don't forget, if you make a purchase, type in ERICKA in the comments and you'll receive a freebie with your order! Take care!

Saturday, April 11, 2020

Celebrate | Ericka Strange


I hope you are all doing well and staying healthy. Ericka here with a quick card I made using Vibez spray.


Like most of the country, I'm homeschooling my little ones along with doing all my other duties so it seems like I have very little time to create. I wanted to make a quick birthday card for a friend and so pulled out my Vibez in Seas the Day and Rip Van Periwinkle and Pink Stiletto Coloringz.


I took some leftover watercolor paper and sprayed several layers of each color. I let it dry and then sprayed them again to get a rich, bright color. I took a white card base and flicked the spray on to it as well.


Once my paper was dry, I attached the colors with foam tape to my card base. I die cut this Pinkfresh sentiment from black paper and vellum and attached it to the colors.


To finish off the card, I added a little Glorious Day Vibez. That completes my quick card for today.
Thanks for stopping by and I hope you stay safe and healthy. Take care!


If you make a purchase, type in ERICKA in the comments and you'll receive a freebie with your order!


Monday, August 26, 2019

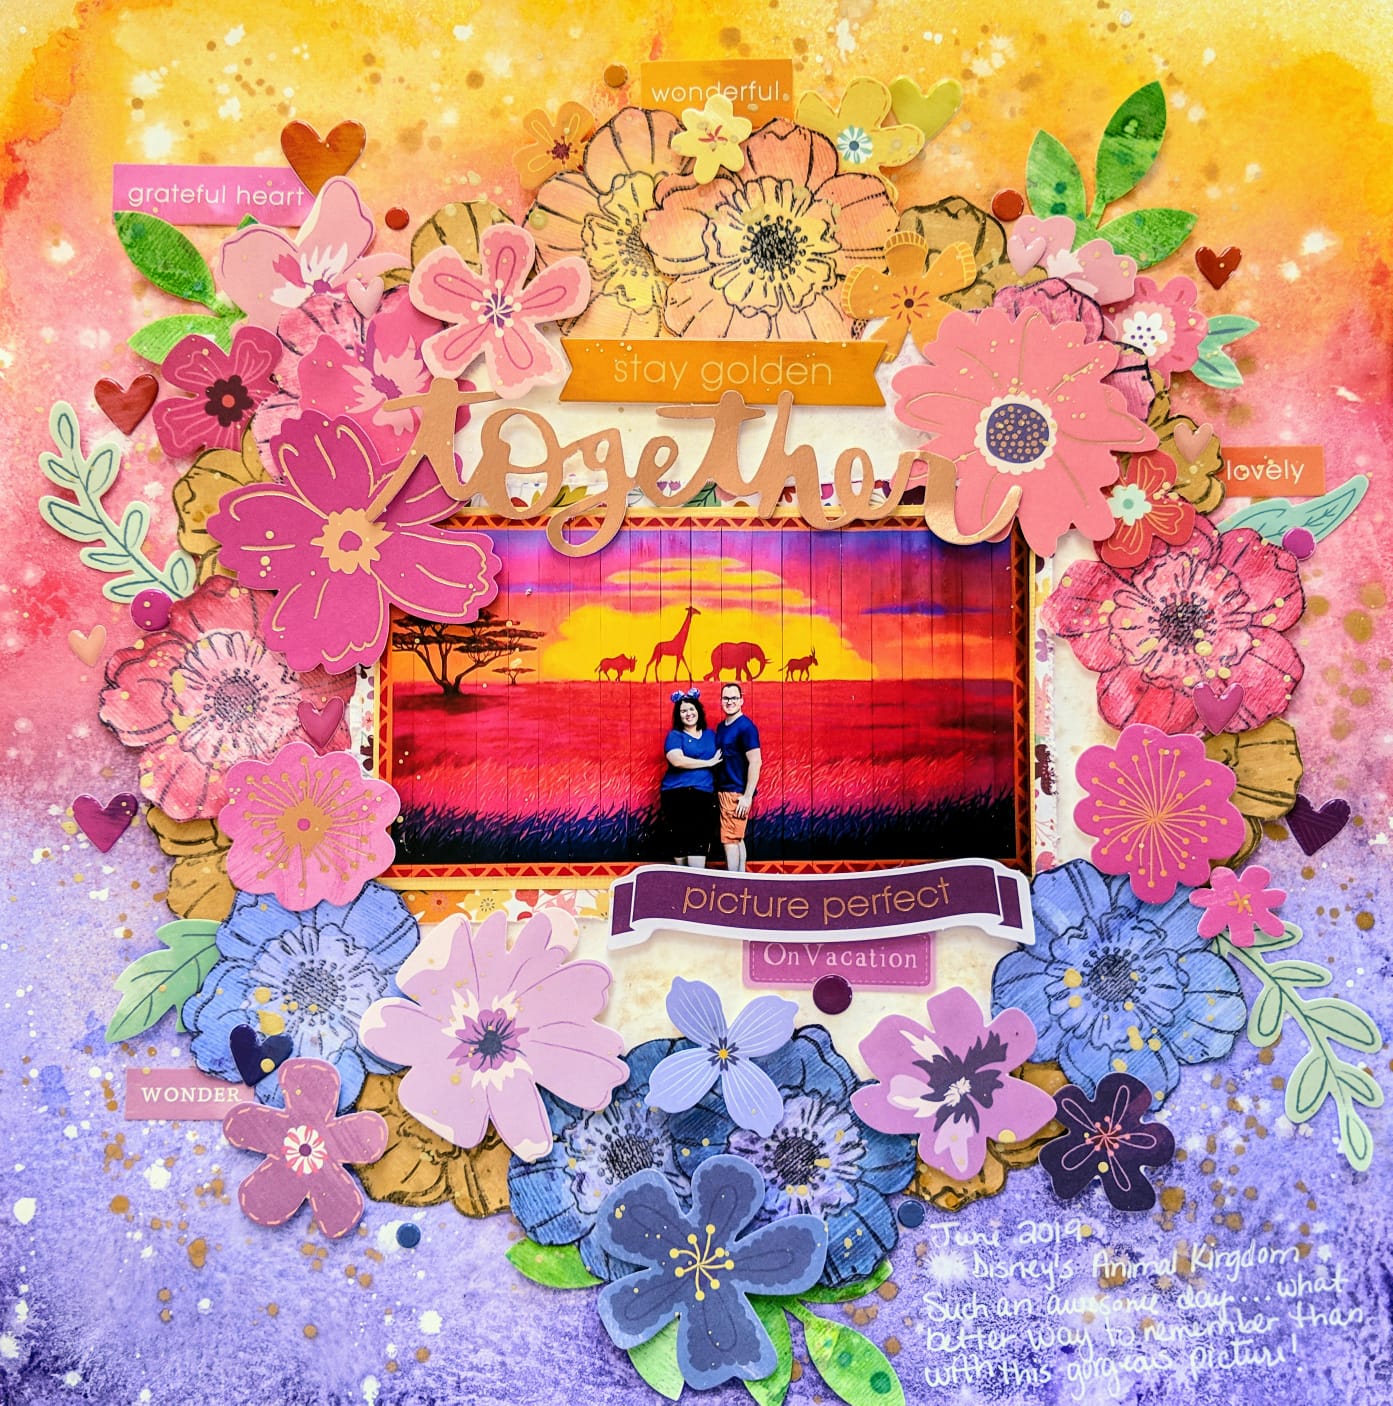
Together


Hey everyone! I’m up on the Shimmerz Blog sharing this gorgeous layout mixing florals with the ombre look. It’s no secret that I love using florals in my layouts because they add color, dimension and shimmer! My family and I recently went on vacation and, among the pictures we snapped there, we came back with this awesome, colorful picture! I just couldn’t wait to scrap it. Like my previous blog post for Shimmerz, I’ve divided the process of making layout into 3 sections: background, florals and leaflets, and bringing it all together.


Background-
               I used Vicki Boutin’s Foundations paper because I knew that I was going to use lots of liquid with my mixed media. I grabbed a regular bowl to help me mark my center and circumference with a white gel pen. By using a white gel pen, any marks can be easily covered. Once I’d made my circle, I removed the bowl and sprayed the center with Shimmeringz Goldie Lox to give it a bit of shimmer. 

After waiting for it to dry, I placed the bowl back on the background as close to the original marking as possible, and then gathered my other mists (they are listed below) to create the ombre look. I began spraying them from the bottom up slightly overlapping the mists to achieve a smooth transition. 

Waited about 5 minutes for the mists to dry a bit, and then repeated the process. I did this to ensure that my colors were nice and bright! Without waiting for it to dry, I poured a bit of white acrylic paint and water into a mini mister and sprayed the whole background. This technique gives the colors a marbled/crackled look.


 I then watered down some white and gold acrylic paint and splattered them along the whole background. Later, I removed the bowl and set the background aside to dry.

·        Caribbean Sunset (Spritz)
·        Cotton Candy (Spritz)
·        Lil’ Yellow School Bus (Coloringz)
·        Tuscan Sun (Spritz)
·        Princess (Vibez)
·        Rip Van Periwinkle (Vibez)


Flowers and Leaflets
               Since I knew that I’d be adding floral die cuts from Paige Evans’ Whimsical, Horizon and Truly Grateful collections, I decided to make some extra florals to make the wreath look fuller. To accomplish this, I grabbed some scrap white and kraft cardstock, gold acrylic paint, a floral Vicki Boutin stamp, and archival ink and lots of Shimmerz (listed below). I made gold, yellow, blue/violet and pink flowers, and green leaflets. For the gold flowers, I used the kraft cardstock which I covered with gold acrylic paint and splatters of Miner, Miner 49er an Old Yeller. The other flowers were made one white textured cardstock. Finally, I made some green splotches from I’d punch some leaflets once dry. Once everything was dry, I fussy cut the florals out.
·        Meet Me @ Sunset (Inklingz)
·        Bahama Mama (Inklingz)
·        Limoncello (Shimmerz)
·        Miner Miner 49er (Inklingz)
·        Hermit the Frog (Vibez)
·        Goldie Lox (Shimmeringz)
·        Rip Van Periwinkle (Vibez)
·        Cotton Candy (Spritz)
·        Caribbean Sunset (Spritz)
·        Lil Yellow School Bus (Coloringz)

Bringing it all together
               I placed my photo on some layers of patterned paper from Paige’s Truly Grateful collection, popped it on 3D tape and placed it in the center of the circle. Then I began layering and tucjing in the flowers and leaflets, letting the background by my guide. Some of the flowers are completely stuck down flat; others have their tips set on 3D tape, and still others are popped up completely on 3D tape. This is how I achieved the layered look. I sprinkled a couple of epoxy dots and hearts, and stickers from Truly Grateful. To marry everything together, I splattered a bit of Miner, Miner 49er throughout the completed layout. Added my journaling at the bottom with a white gel pen. Here's the layout once more and lots of close-ups!


I loved how this turned out, love the color scheme! If you liked any of the colors you saw me use, you can find them all @ Shimmerzpaints.com.


Want a freebie? Write my name in the comments section of your order to receive some free paint!

Thanks so much for looking and I hope you are inspired to create a layout like this!

-        Lorimar


Monday, August 19, 2019

Beautiful Kitty | Kelly Janes

Hey Shimmerz Paints fans! My name is Kelly Janes and I am so excited to share my first design team layout as part of the YouTube Education Team!


I started with a butterfly cut file from The Cut Shoppe and painted the butterflies with multiple Shimmerz Paints. My color choices were based off the Pinkfresh Studio Just a Little Lovely Collection, so I painted the butterflies in shades of blues, pinks and purples.


You definitely wouldn't need as many blues as I used to achieve this look. I had just received an order with new paints and was anxious to try them out! HA! 


I color grouped the butterflies together after they were painted, added a layer of vellum here and there, and then stitched them together down the center. I love the added dimension this give the layout!


I arranged the butterflies on my background, but I added a splash of color to the background using Cold As Ice Vibez, Cotton Candy Spritz and Princess Vibez before I adhered anything down. I then moved onto embellishing. I color blocked the embellishments; which is a really great way to embellish quickly. I added my title using a die cut, and white puffy alphas. I also added subtitles with my kittens names using a smaller puffy alpha set.


I created a process video that you can watch by clicking HERE.

Thanks so much for joining me today and I will be back again next month with a new layout and process video! Don't forget to mention my name in the comments at check-out at the Shimmerz Store to get a free gift!

-Kelly Janes