Hi! Irit here and I'm so excited to share my latest projects for Shimmerz! For the month of May I decided to play in my art journal. Here's what I created-
I started with AcriTonez in 3 Sheets to the Wind and Pinkadelic, and the rest of the mess was using Coloringz in Pink Stilettos, Pretty in Pink and No Yoking. You can see the entire process in the video tutorial I prepared!
Here are some close ups, and don't forget to mention my name when placing an order on the Shimmerz site to receive a freebie!
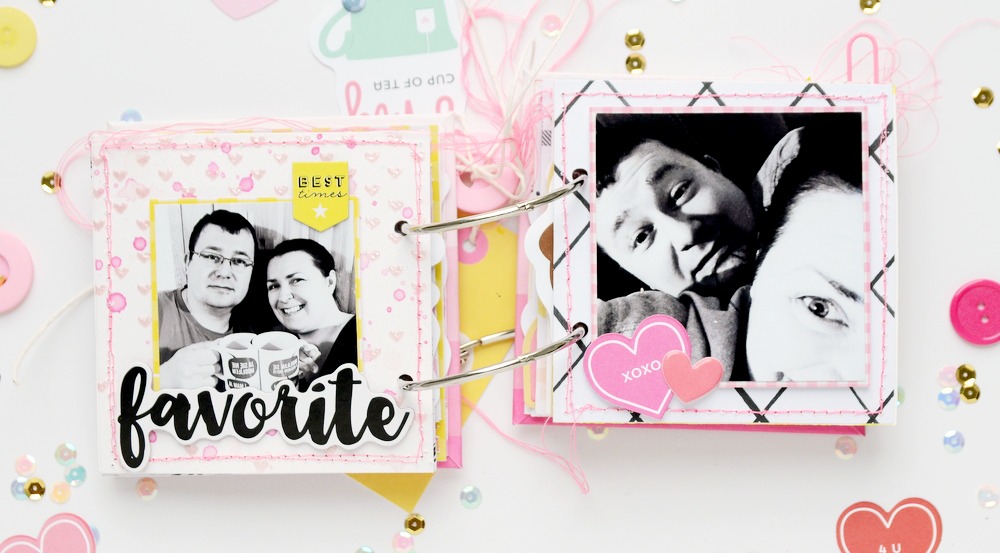
Hello Shimmerz fans. It's Anna here with a new project. I hope You like mini albums, because I have one for You. I made it as a gift for my hubby for our 10'th wedding anniversary. We will be celebrating next week and I really don't feel like a wife for 10 years. Time flies so fast. I chose few of our pictures and I must say to You - it was hard, because we almost don't have photos together. All I found was some silly selfies mostly. But it's also a part of our history together.
I mixed pattern paper with mixed media pages. You can watch all the process on the video below.
Video is quite long and I decided I don't need to include the embellishing process. You will just watch my usual steps during creating a mini album, along with making mixed media pages and connecting it all into the album.
My album is small. Pages are 4*4 inches. I decided to use pink and yellow color combo - one of my favorites. I wanted it to look a little bit messy so I didn't cut off the thread after sewing. I also added black splashes on the cover. I have a lot of big pictures there so I really didn't need much embellishments.
Now I must warn You - there will be a lot of pictures in this post :) Check for Shimmerz supplies at the end of the post.
I hope You made it through. Don't forget to mention my name while placing and order at Shimmerz shop. You will get one free mini product :)
Hello friends! Katty here to share a fun Art Journal Page. For this page, I just wanted to play with pretty spring colors. I wasn't sure exactly how this would turn out but I love how it did. I was inspired by a chipboard word from the Pink Paislee Fancy Free Collection. I pulled out colors that would match this collection. I am working in my Daler-Rowney Mixed Media Travelbook.
I began with a small experiment which didn't really work out too well. LOL. I used some gloss medium which I had put into a fineline bottle and added some clusters of dots on my page above my chipboard word. My thought was that it would act as a resist when I used the watercolors over it. In the end it didn't shown up too well. Next time I'll have to add bigger dots.
I started layering my colors directly on my page. I used several Creameez and one Coloringz. I began with the Coloringz in No Yoking and added color using the packaging technique and spread it out using my paint brush. Then I added my Creameez which have a pretty touch of Shimmer to them. I used Boogie Boardin Blue, Refresh Mint, Lettuce Get Together, Tripping' in the Tropics, Great Fruit, My Clementine, and Cheeky Pink. I made sure to spread the colors out as evenly as I could throughout my spread. I added in some small flowers which I had fussy cut from a Patterned paper from the Fancy Free collection.
I used the new Acritonez in 3 Sheets to the wind and added some white dots throughout as well as some black splatters. I added my Colorful chipboard word and some scallop half circles which I had used on a previous project. To add some additional detail, I added faux stitching around the Colorful word and the half circles. I also used a circle stencil and traced some small circles in black pen. I added a few Tim Holts tiny word stickers and I finished it off with a messy double line around the whole page. I love how it turned out.
There is a video on my channel if you'd like to watch:
Products Used:
Coloringz: No Yoking
Creameez: Boogie Boardin Blue, Refresh Mint, Lettuce Get Together, Tripping' in the Tropics, Great Fruit, My Clementine, Cheeky Pink
Acritonez: 3 Sheets to the Wind
Thanks for spending some time with me today and remember...
Hello Shimmer fans. It's Anna here with my next project created with fabulous paints and mists. To be honest - when I started creating this page, I didn't know how it will end. I had this cute picture of y daughter in the swimming pool and I had this cute mermaid from Crate Paper collection. All I knew is that I want them together on one page.
For my mermaid layout I needed to create whole sea of water. I used watercolor paper and sprayed it with mists. I used wet brush to blend them together.
I wanted bubbles so I added this fun bubble foil. I sew it with sewing machine but it can be tricky. Foil is stopping the step from moving. But there is a solution - put a piece of vellum on top of your foil, sew through it and after sewing is done - just tear off the vellum. I also made some bubbles on my background using Dazzlers and stencil.
To get more whimsical effect I painted seaweed using all sorts of green paints. All my underwater layout needed right now was a little of embellishing.
Thanks to paints and mists I created colorful and busy design with almost no patterned papers. This is what I love the most while working with paints. You can make any kind of design using any color scheme in just a minutes.
Hello friends. Katty here, back to share another layout with you all. I know we are all in Spring mode, however todays layout is all about Snow and Winter. I am scrapping this photo of my two boys playing in the snow. This was on our last Winter trip to Utah. Were from Miami, so any time we get to see snow is very exciting for us.
I pulled out the beautiful Simple Stories Winter Wonderland Collection. I used a scribble circle cut file and cut out two circles using one of the patterned papers from the collection. I arranged then in the center of the page.
I added lots of fun color using my Shimmerz Paints. I began with a some of my Coloringz in Well Blue Me Down and a mix of My Bleeding Heart and Mandarin Mai Tai, I was trying to get the pretty Orange from the collection. I added color using the packaging technique. I wanted the color to show through the cut file and around the photo.
I brought in an Aqua Huez in Blue Me Away (Aqua Huez are currently 50% off in the shop and will soon be discontinued) and will add some of the Mandarin Mai Tai to bring in some Yellow, it really brightened everything up.
I added my photo to the center of the page and added a few paper layers behind it. I added my tittle and a few embellishment clusters using the ephemera and stickers from the Winter Wonderland Collection.
I finished off the layout by adding some ink splatters using the same colors and a Spritz in Caribbean Sunset. I also added a mat around the whole layout using a dark brown patterned paper from the collection.
I love how this turned out. The paint truly made this layout extra special.
There is a video on my channel if you'd like to watch:
Products Used:
Coloring: Well Blue Me Down, My Bleeding Heart, Mandarin Mai Tai