Showing posts with label Miner Miner 49er. Show all posts

Friday, October 9, 2020

Wildflower | Stamping and Mixed Media | Lorimar Ortega

Hello everyone!

      Lorimar here, sharing this multi-mixed media-filled layout, inspired by a sketch I saw somewhere online. How do you feel about stamping and mixed media? For me, it's one of those neglected techniques which I'm trying to embrace once more. There's a lot of mixed media layers for this one, so let's get to it! 

Even though Kraft cardstock is one of those cardstock colors that I typically shy away from, I decided to use one as my base because it just felt right to do so. Instead of jumping to the mixed media, I began to play around with the placement of the picture and embellishments. I made a couple of marks with a pencil to guide to where I was going to be stamping my flowers and leaves. Took a quick picture of how I had arranged everything (to use as a guide) and began stamping, using archival ink to ensure that the color would stay clear even after I added my colors.

Then I began to add my colors using the packaging technique; I intentionally didn't fill in each of the stamped images because I wanted to keep the "messy, abstract" look. The flowers were mostly pink, the spaces in between the flowers were yellow, and the leaves were green. Here's the list of colors: Oh Say Can You Sea, Pink Moscato, Taupe of The Morning, Magenta, Pink Stilettos, Bubblegum Blast, Miner, Miner 49er, and Rollin' In The Hay. You can find there over at Shimmerz Paints.


Once my base was fully dry, I began to work in adding all the embellishments back in, popped my picture (a true 6x4) on craft foam for dimension, splattered some Miner, Miner 49er to try everything together, and added a bit of sparkle with some sequins from Spiegelmom Scraps. That's it! If you would like to see how it all came together, click here to watch the process video over on my personal channel.

Thank you so much for joining me today! There are some more close-ups down below. Remember, you can get some free paint by typing "LORIMAR" in the comments section of your next Shimmerz order.

Stay Safe and Shimmerz On!
- Lorimar


Tuesday, December 10, 2019

December 24, 2018 | Shimmerz Colors Overload Layout

Hello everyone!

Today's Christmas layout features lots and lots of gorgeous colors paired with an equally lovely cutfile and glitter gold acetate. I used a Vicki Boutin foundations paper as my base since I knew that my mixed media was going quite a lot. This sort of paper is a mix between a gessoed cardstock and a non-gesso background; it holds the color a bit (like a non-gessoed background), but gives up a few moments to blend or move colors around (like a gessoed cardstock). In all, it took me about 3 hours to make this layout, but most of it was spent creating the background (and allowing it to dry) and backing the cutfile.


Let's get started! I used the colors that were in the picture to inspire the color scheme for my layout; that called for lots of colors! For each of the colors that you see underneath the letters of the cutfile, I used the packaging technique to add the main color and then added a slightly different color by way of splatters. I would wait for each color section to completely dry before moving on to the next color in order to prevent getting muddled colors. Listed below are all the colors used divided up into which letter they are found under:

D - Moody Mauve; Gold-N-Roses

E - Honey Dew List; Hint of Mint
C - Hot Fudge; Penny 4 Your Thoughts
E - Marigold; Miner, Miner 49er
M - In Deep; Tickle Me Turquoise
B - Red Necking; Crimson Tide
E - Hi Ho Silver; Coal
R - Jolly Green Giant; Green Goddess

The cutfile was designed by Virginia Walker (COAPA Cutfiles) and, not wanting to cover up my base, I backed the letters with clear acetate with golden glittery accents. For the bow, I colored some scrap white cardstock with Pip Pip Cherry O and backed it with that. Did the same thing for the Holly (Hermit the Frog on some green cardstock; Goldie Lox on red cardstock) and candy cane (Goldie Lox on red cardstock; Misty Morning on white cardstock) and backed them once everything was dry. The entire cutfile is placed on craft foam for added dimension, and placed it to the left hand side of the base.


I matted my picture on white cardstock and added a few layers of Christmassy patterned paper, popped it up on craft foam and wedged it between the "C" and the "R". I lightly embellished so as not to take away from the picture, cutfile and base, and to not over crowd the overall layout. Next are some extra close-ups!


I hope I've inspired you to make a colorful layout such as this, and that you get your story documented. Remember, write my name down in the comments section of your next Shimmerz order to receive some free paint!

Stay crafty and I'll see you soon!
- Lorimar

Tuesday, November 26, 2019

A Picture Is Worth A Thousand Words | 12x12 layout featuring Jolly Green Giant and Rose Gold Red

Hello eveyone!
     I've got my mind on Christmas, and Christmas on my mind! This joyous, festive season is fast approaching and we are all busy preparing for it. This layout is not the exception! To make it, I used traditional Christmas colors to document a non-Christmas memory.


     This picture was taken earlier this month and I just had to document it ASAP! Used the colors within it as inspiration for the color scheme, and ended up using:

- Jolly Green Giant (Creameez) [From the November Color Kits]
- Honey Dew List (Creameez)
- Rose Gold Red (Vibez) [From the November Color Kits]

- Red Necking (Creameez)
- Before Dawn (Vibez)
- Miner, Miner 49er (Inklingz)

     Chose a "texty" paper as my base and faded out 3 areas (1 main and 2 smaller clusters) with white acrylic paint. Once dry, I sued a baby bottle cap (LOL!) and Before Dawn to make 4 circles, and added some splatters with it. Then I used the packaging technique to add in Jolly Green Giant and Rose Gold Red, and then splattered them accordingly. Set my base aside and began working on my layers.


     Trimmed my picture down to roughly 3x4, left a white border around it, and matted it with some red cardstock. Then began layering in patterned paper in blacks, reds and greens. For texture, I also layered in a small glassine bag. Added a strip of gold glitter cardstock in order to tie it in with the other gold elements that I would be adding to finish off the layout.


    For embellishments, I clustered 2 different flowers from Vicki Boutin's Color Kaleidoscope and Wild Flower and Honey collections. Colored the leaves and centers of the flowers with Rose Gold Red, Jolly Green Giant, and Honey Dew List, and splattered Miner, Miner 49er on them.


Finally, once everything was dry, I built my layout. Added extra dimension to my main cluster by placing the paper layers on some 3D craft foam. Balanced out the layout by adding some torn scraps of patterned paper to the other 2 cluster areas. Layered in the flowers and, to wrap it all up, placed some tiny word stickers in black, glued some gold enamels dots, and splattered Miner, Miner 49er all around the finished layout.

Here are some extra close-ups!


Hope your inspired to use traditional Christmas color in a non-Christmas layout, and really challenge yourself.

Remember, type my name in the comments section of your next Shimmerz order to receive some free paint!


Stay Crafty!
- Lorimar


Sunday, November 17, 2019

Shimmering Poinsettia

Hello All! 

With Christmas just 5 weeks away (can you believe it??), I have been making a lot of Christmas cards with this gorgeous poinsettia stamp from Sweet n Sassy Stamps.
This card was a bit of an experiment but I love the results.  Side note- there are so many layers of color and shimmer that make this card gorgeous, but also incredibly difficult to photograph.  Depending on the light and angle that the picture was taken, the colors look different in every picture. 


Here is what I did~
-Stamped the flower in Memento Tuxedo Black, using my MISTI, then painted a light layer of Miner Miner  49er Inklingz over the entire flower. 
-Once that was dry, I painted some Tickle Me Turquoise Shimmerz Paint at the base of each petal (approximately the first 1/3 of the petal).  
-While still wet, I blended out with Keep Palm Coloringz that I applied with a brush (approximate middle 1/3 of each of the petals).
-While that was still wet, I blended out with Miner Miner 49er Inklingz.  
-Once everything was dry, I decided that the Tickle Me Turquoise was too bold and needed to be toned down so I went over the top of it with Keep Palm Coloringz.  This was where the magic happened as the Tickle Me Turquoise still showed through but was much more subtle.  I wish you all could see this in real life!
-I worked each petal a bit more with the Keep Palm Coloringz and the Miner Miner 49er Inklingz


-Once I was happy with the layers of color, I decided to emboss the image so I put it back in my MISTI and stamped with Versamark ink and heat embossed with gold embossing powder. 
-Now all that was left was the background.  I used my Well Blue Me Down Coloringz and painted in on in layers, drying in between to get all of the hard edges. 


Thanks so much for stopping by!  Should you decide to do any Shimmerz Paints shopping, put my name, Lee Ann Barrett, in the comments section of your order and you will receive a free gift with your order! 

 
Happy Crafting!

Lee Ann

Wednesday, September 25, 2019

Shimmering Octobers

Hello!

It's Lee Ann here and despite the temps, it is officially fall and, can you believe it, October is right around the corner!  October is one of my favorite months. What's not to like- crisp air, colorful leaves, soup, and the pumpkin patch!  I have discovered a wonderful pumpkin patch in an Amish town in Illinois.  Blue skies, golden leaves and orange pumpkins!


I started out with water color paper and two of my favorite products, the first being Jeni B Bleu Vibez spray.  This spray has a pearl shimmer to it and is a beautiful aqua/turquoise color.  I also used Well Blue Me Down Coloringz, which is a pigmented spray without shimmer.  It is an aqua color with more green to it than the Jeni B Bleu.  Together, they are stunning! I used the packaging technique to add these two colors to my water color paper.  I dried in between layers.


My bottom layer is also water color paper with a wash of Creameez Dandy Lion.


Once I was done with these layers, I colored my adorable pumpkins and fussy cut them out.
Using my MISTI, I stamped the sentiment on both the top layer and the bottom layer, masking and separating it so the pumpkins ran through it.
I added a golden shimmer with some spattering of Miner Miner 49er Inklingz.


I love how this turned out and I hope you do too! 

I have a second card to share, a CAS one, born out of my first attempts with the card above.


I started with the two colors, the Jeni B Bleu and the Well Bleu Me Down.  I spritzed the colors on so did not get as much variation and texture that I wanted.  No worries, I had a plan to use the Widy Tidy Texturez paste.  I love this stuff; even after it dries it has a shine to it.  I added this in areas with a stencil over my blue panel, and then while still wet, I sprinkled some chunky gold embossing enamel and hit it with the heat tool. 
I loved the look, but it was not working with my pumpkins.  So it was abandoned for a bit and then because it was so pretty, I had to find a use for it.  I decided to die cut a leaf shape into my white cs and mount it on top of the blue, gold, and white textured panel.  I finished with a simple sentiment (going to a friend fighting cancer) and some score lines around the edges of the card.

  There are still a few of the September Color Kitz available, so grab them while you can!  

Should you decide to do any Shimmerz shopping, add my name, Lee Ann, in the comments when you check out to get a mini free gift! 


Thanks for stopping by!  

Lee Ann 

Monday, August 26, 2019

Together


Hey everyone! I’m up on the Shimmerz Blog sharing this 
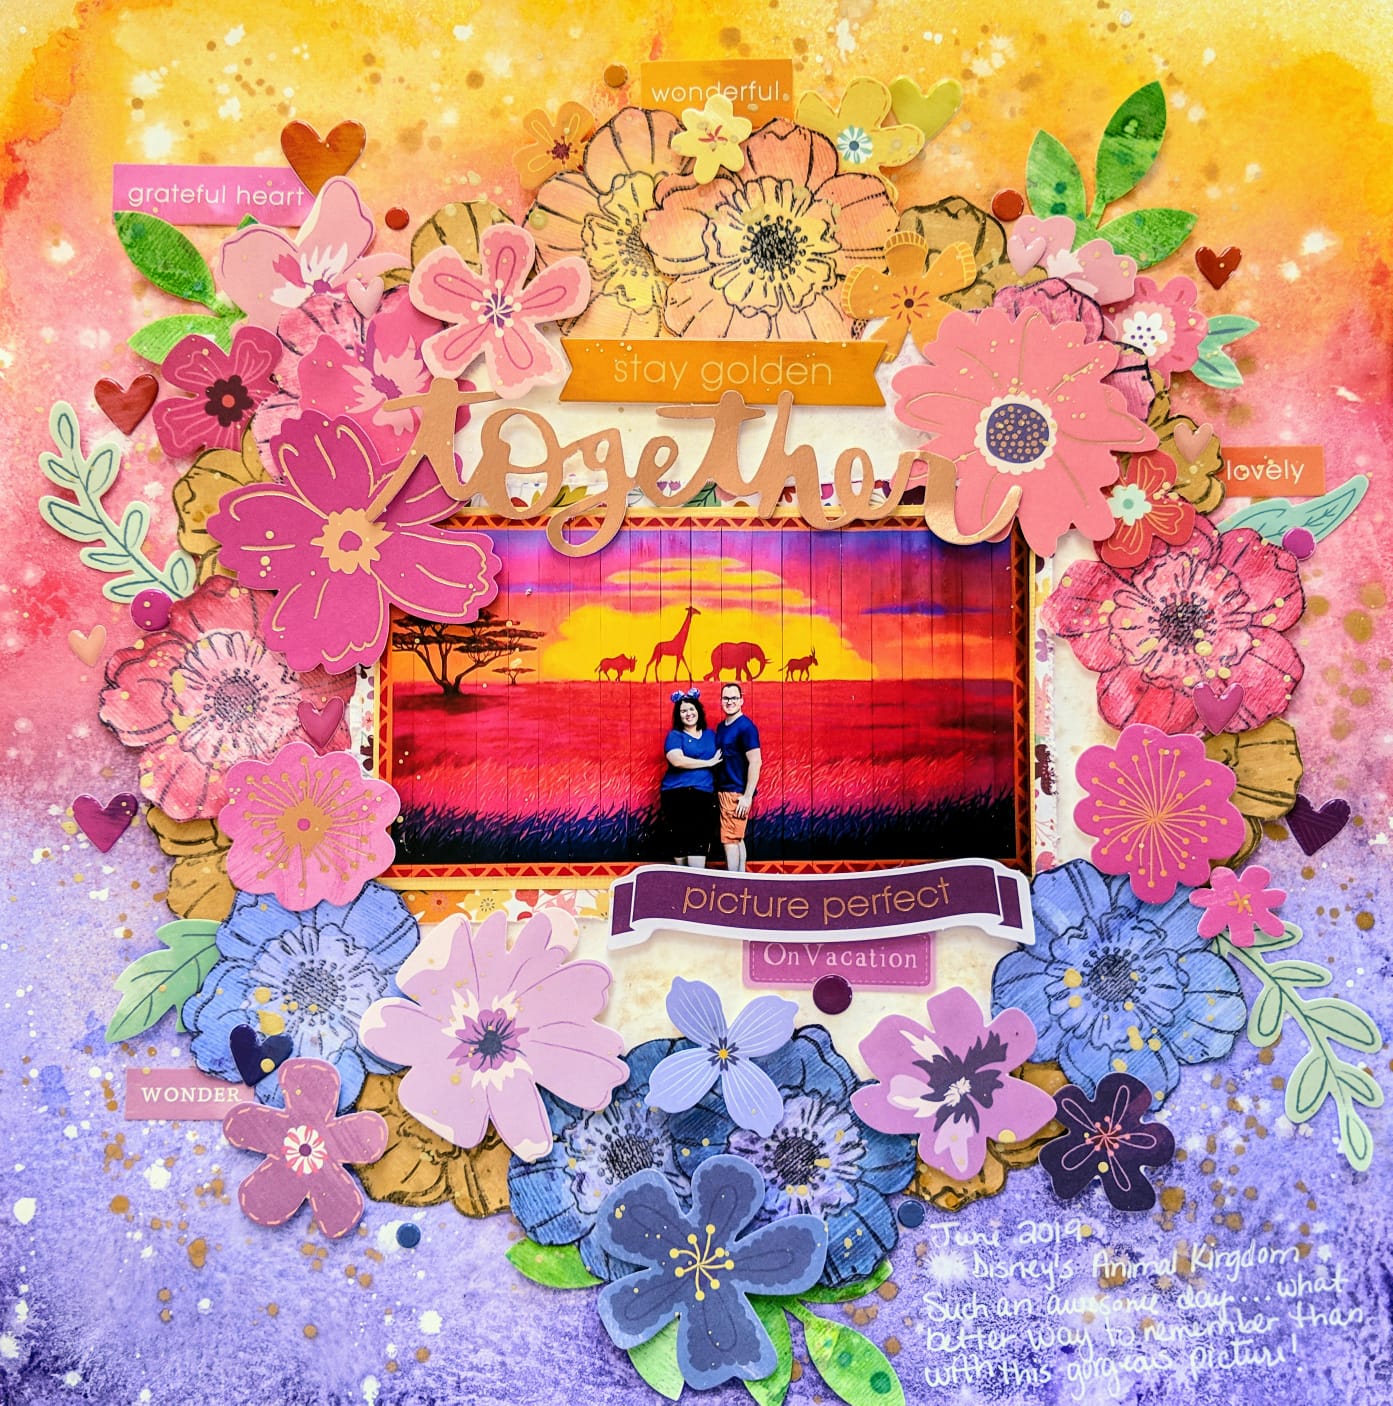
gorgeous layout mixing florals with the ombre look. It’s no secret that I love using florals in my layouts because they add color, dimension and shimmer! My family and I recently went on vacation and, among the pictures we snapped there, we came back with this awesome, colorful picture! I just couldn’t wait to scrap it. Like my previous blog post for Shimmerz, I’ve divided the process of making layout into 3 sections: background, florals and leaflets, and bringing it all together.


Background-
               I used Vicki Boutin’s Foundations paper because I knew that I was going to use lots of liquid with my mixed media. I grabbed a regular bowl to help me mark my center and circumference with a white gel pen. By using a white gel pen, any marks can be easily covered. Once I’d made my circle, I removed the bowl and sprayed the center with Shimmeringz Goldie Lox to give it a bit of shimmer. 

After waiting for it to dry, I placed the bowl back on the background as close to the original marking as possible, and then gathered my other mists (they are listed below) to create the ombre look. I began spraying them from the bottom up slightly overlapping the mists to achieve a smooth transition. 

Waited about 5 minutes for the mists to dry a bit, and then repeated the process. I did this to ensure that my colors were nice and bright! Without waiting for it to dry, I poured a bit of white acrylic paint and water into a mini mister and sprayed the whole background. This technique gives the colors a marbled/crackled look.


 I then watered down some white and gold acrylic paint and splattered them along the whole background. Later, I removed the bowl and set the background aside to dry.

·        Caribbean Sunset (Spritz)
·        Cotton Candy (Spritz)
·        Lil’ Yellow School Bus (Coloringz)
·        Tuscan Sun (Spritz)
·        Princess (Vibez)
·        Rip Van Periwinkle (Vibez)


Flowers and Leaflets
               Since I knew that I’d be adding floral die cuts from Paige Evans’ Whimsical, Horizon and Truly Grateful collections, I decided to make some extra florals to make the wreath look fuller. To accomplish this, I grabbed some scrap white and kraft cardstock, gold acrylic paint, a floral Vicki Boutin stamp, and archival ink and lots of Shimmerz (listed below). I made gold, yellow, blue/violet and pink flowers, and green leaflets. For the gold flowers, I used the kraft cardstock which I covered with gold acrylic paint and splatters of Miner, Miner 49er an Old Yeller. The other flowers were made one white textured cardstock. Finally, I made some green splotches from I’d punch some leaflets once dry. Once everything was dry, I fussy cut the florals out.
·        Meet Me @ Sunset (Inklingz)
·        Bahama Mama (Inklingz)
·        Limoncello (Shimmerz)
·        Miner Miner 49er (Inklingz)
·        Hermit the Frog (Vibez)
·        Goldie Lox (Shimmeringz)
·        Rip Van Periwinkle (Vibez)
·        Cotton Candy (Spritz)
·        Caribbean Sunset (Spritz)
·        Lil Yellow School Bus (Coloringz)

Bringing it all together
               I placed my photo on some layers of patterned paper from Paige’s Truly Grateful collection, popped it on 3D tape and placed it in the center of the circle. Then I began layering and tucjing in the flowers and leaflets, letting the background by my guide. Some of the flowers are completely stuck down flat; others have their tips set on 3D tape, and still others are popped up completely on 3D tape. This is how I achieved the layered look. I sprinkled a couple of epoxy dots and hearts, and stickers from Truly Grateful. To marry everything together, I splattered a bit of Miner, Miner 49er throughout the completed layout. Added my journaling at the bottom with a white gel pen. Here's the layout once more and lots of close-ups!


I loved how this turned out, love the color scheme! If you liked any of the colors you saw me use, you can find them all @ Shimmerzpaints.com.


Want a freebie? Write my name in the comments section of your order to receive some free paint!

Thanks so much for looking and I hope you are inspired to create a layout like this!

-        Lorimar


Monday, August 19, 2019

Beautiful Kitty | Kelly Janes

Hey Shimmerz Paints fans! My name is Kelly Janes and I am so excited to share my first design team layout as part of the YouTube Education Team!


I started with a butterfly cut file from The Cut Shoppe and painted the butterflies with multiple Shimmerz Paints. My color choices were based off the Pinkfresh Studio Just a Little Lovely Collection, so I painted the butterflies in shades of blues, pinks and purples.


You definitely wouldn't need as many blues as I used to achieve this look. I had just received an order with new paints and was anxious to try them out! HA! 


I color grouped the butterflies together after they were painted, added a layer of vellum here and there, and then stitched them together down the center. I love the added dimension this give the layout!


I arranged the butterflies on my background, but I added a splash of color to the background using Cold As Ice Vibez, Cotton Candy Spritz and Princess Vibez before I adhered anything down. I then moved onto embellishing. I color blocked the embellishments; which is a really great way to embellish quickly. I added my title using a die cut, and white puffy alphas. I also added subtitles with my kittens names using a smaller puffy alpha set.


I created a process video that you can watch by clicking HERE.

Thanks so much for joining me today and I will be back again next month with a new layout and process video! Don't forget to mention my name in the comments at check-out at the Shimmerz Store to get a free gift!

-Kelly Janes