Showing posts with label Pink Stilettos Coloringz. Show all posts

Saturday, April 11, 2020

Celebrate | Ericka Strange


I hope you are all doing well and staying healthy. Ericka here with a quick card I made using Vibez spray.


Like most of the country, I'm homeschooling my little ones along with doing all my other duties so it seems like I have very little time to create. I wanted to make a quick birthday card for a friend and so pulled out my Vibez in Seas the Day and Rip Van Periwinkle and Pink Stiletto Coloringz.


I took some leftover watercolor paper and sprayed several layers of each color. I let it dry and then sprayed them again to get a rich, bright color. I took a white card base and flicked the spray on to it as well.


Once my paper was dry, I attached the colors with foam tape to my card base. I die cut this Pinkfresh sentiment from black paper and vellum and attached it to the colors.


To finish off the card, I added a little Glorious Day Vibez. That completes my quick card for today.
Thanks for stopping by and I hope you stay safe and healthy. Take care!


If you make a purchase, type in ERICKA in the comments and you'll receive a freebie with your order!


Wednesday, February 26, 2020

Rainbow Cupcakes | Ericka Stange

Hello everyone, Ericka here with a fun rainbow cupcake card I made using lots of vibrant Coloringz and Spritz.

I love all these gorgeous rainbow of colors. I started by stamping the Visible Image cupcakes on Bristol Smooth paper and heat embossing them with some clear sparkle. Then I had fun spraying the cupcakes with several layers of color using the following sprays:
Coloringz - Lil' Yellow Skool Bus and Pink Stilettos
Spritz - 4 Leaf Clover, Sapphire, and Cotton Candy


I fussy cut out each of the cupcakes and added then to my stenciled background with foam tape.


I added the Visible Image Happy Birthday sentiment and heat embossed it with WOW Blue Glitz for some more shine.

As a finishing touch, I added these adorable clay polymer Wildflowers from Miss Ink. They are so tiny and adorable!

Thanks for stopping by and check out my blog Strangely Creative for more information on the products I used. Also don't forget we have a Spring Forward Challenge coming up in March! Join us as we create projects without ANY patterned paper.

If you make a purchase, type in ERICKA in the comments and you'll receive a freebie with your order! Have a wonderful day!

Saturday, December 21, 2019

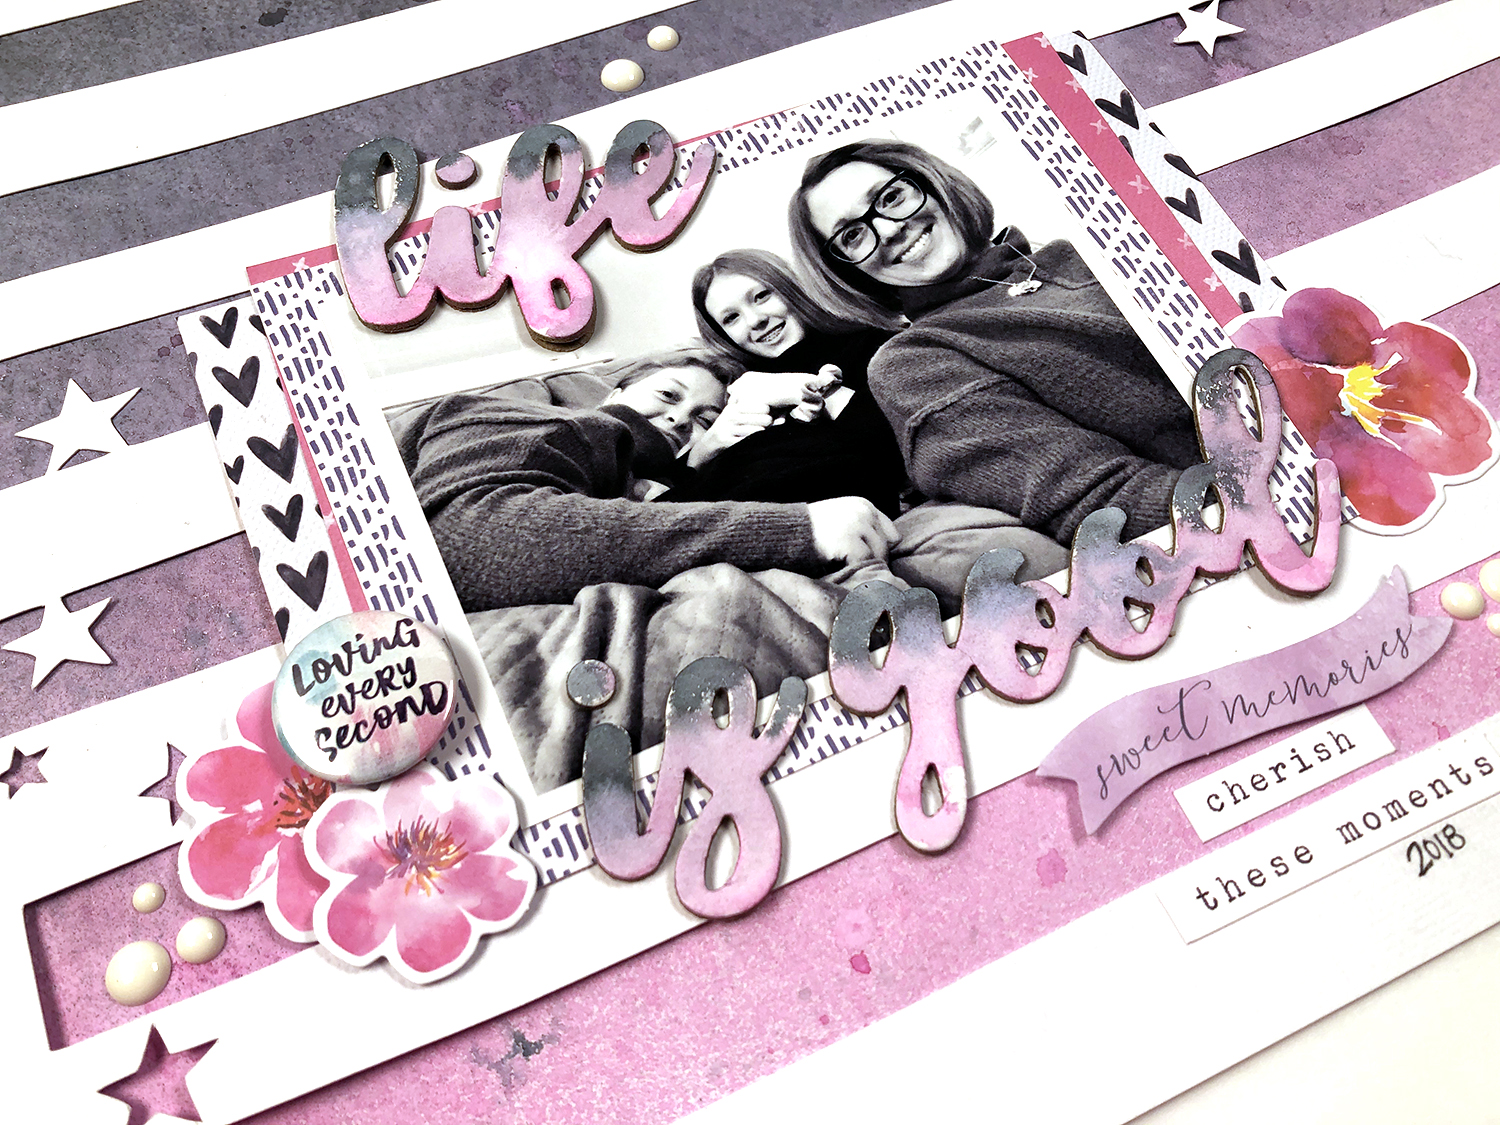
Life is Good | Jen McMurtrey

Hey Shimmerz friends!

It's Jen today with a layout using beautiful Shimmerz Coloringz in hues that are sure to brighten your day. With all of the holiday projects I've been making lately, I thought it would be nice to take a break and create something with a spring-like color palette. 

For this project I used the following Shimmerz Coloringz.


Here is a look at the layout.


To create the background, I sprayed the Coloringz onto white cardstock and blotted the excess with a paper towel. I love the gradient look of the colors - they are so vivid against the white.

Next, I used another piece of white cardstock with a cut file from Whimsey Fox Crafts and placed it on top of the painted background


Along with the beautiful Shimmerz Coloringz, I pulled patterned papers, die cuts, and stickers from my Cocoa Vanilla Studio Stash to match the background. 


The title was also sprayed with the Coloringz to mimic the background gradient colors.


The colors all go so well together and I used a black and white photo, which really pops against the bright hues. To finish, I added white enamel dots for a bit more texture. 


Be sure to visit the Shimmerz Shop to pick up these amazing Shimmerz Coloringz. Remember to type JENNIFER in the comments at checkout to receive a freebie with your order.


I hope you have a blessed holiday and new year!

Jen

Friday, November 29, 2019

Vintage St Nick

Hello All! 

Anyone else in full blown Christmas mode?  Yep, less than a month away.  That means Christmas cards need to get done. 
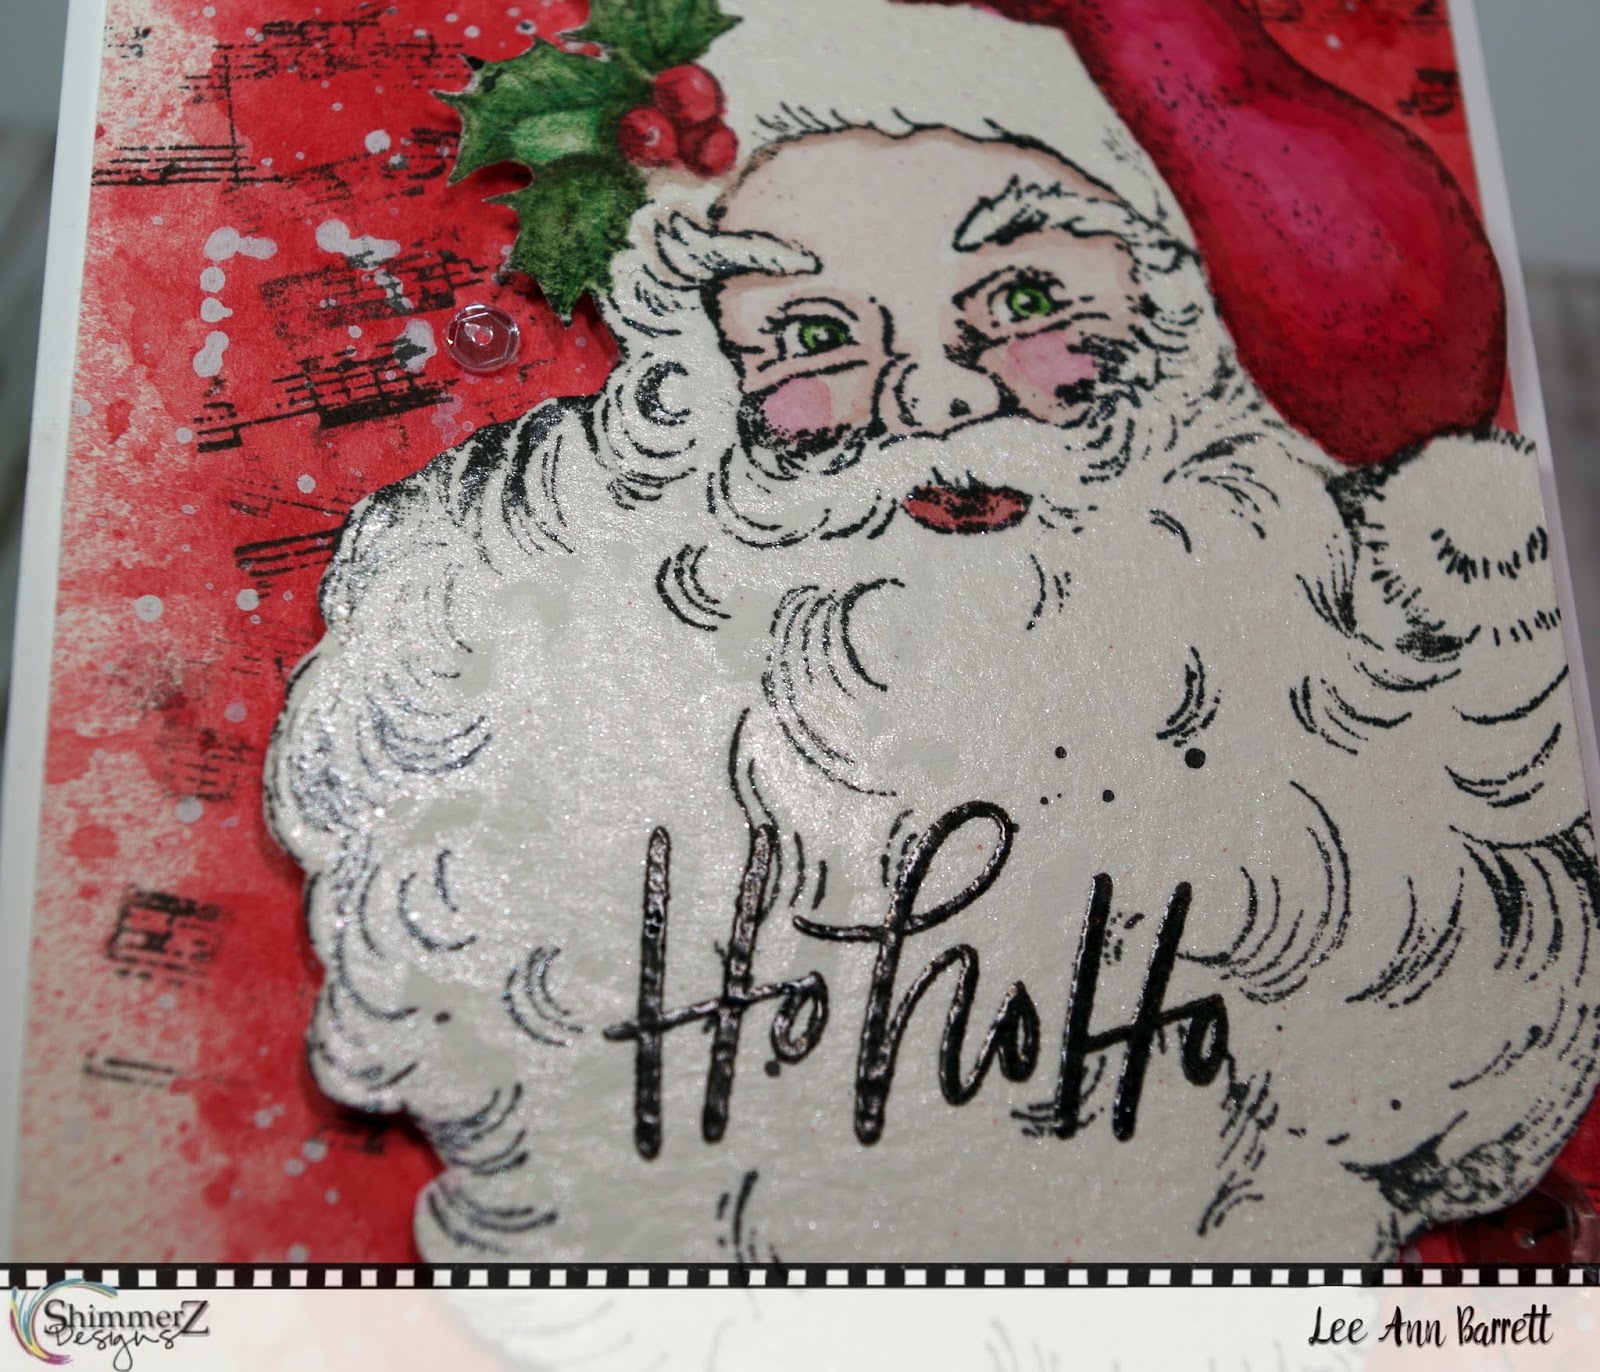
I wanted to use this gorgeous vintage Santa from Stampendous.  When I think Santa, this is what is in my head!


Now I am going to date myself here.  Ages ago, I had 12 x 12 vintage Christmas scrapbook paper from Daisy D's.  I was going for a similar look as this paper, seen below~


I stamped my Santa in Inkon 3 ink and then colored the hat with Scarlet's Fever Coloringz and Pink Stilettos Coloringz.  I also used Keep Palm mixed with the Scarlet's Fever to create a brownish grey for shadows.  The mix of the pink and the red give it a nice vibrant color.  The holly was painted with  Keep Palm Coloringz.


At this point, I decided I would like the image better with a black outline, so I stamped over it with Versafine Black ink.  I then used the same colors- Stiletto Pink Coloringz, Keep Palm Coloringz and Scarlet's Fever Coloringz for the face.  Yep, using color theory, the mixture of these colors yields perfect colors for shadows.  Santa's beard is all sorts of shiny as I used Angel Wings Shimmerz


After fussy cutting Santa out, I worked on the background using the packaging technique.  In the end, I found that the best tool for applying the Scarlet's Fever Coloringz for the look I wanted was my finger! 
Once dry, I added white acrylic paint spatters.  For added texture and depth, I stamped some music with a texture stamp from Sweet n Sassy Stamps.  I added a smidge of detail on the holly with colored pencils, the heat embossed the sentiment onto the beard.  Santa is popped up on dimensionals and a few sequins were added to finish it off. 


So what do you think?  Did I succeed in making a card in the style of the Daisy D's scrapbook paper?  Would love to hear your thoughts! 
That's it for me!  Happy shopping if you are braving the crowds today.  Don't forget to shop at Shimmerz Paints today!  Today ONLY, you get 30% in the WHOLE shop!
 If you choose to stay home and craft (raising hand here), happy crafting!


Lee Ann 

Wednesday, February 13, 2019

"Yes!" ~ a wedding layout with Sandi Clarkson

Hello, scrappy friends! 
Tomorrow is Valentine's Day. So, how about a sweet wedding layout to celebrate?
It's Sandi here today touting the beauty of the Shimmerz Paints products! 


I love how this layout featuring one of my nieces turned out. After starting with a coat of clear gesso, I played around with my design and planned where my elements would be. 

Next I heat embossed my chipboard piece and assembled my paper layers. I marked where they belonged and then got busy adding my color.


and ...


This time instead of using my tried and true" transfer" technique, I went back to basics and just painted my color on with a small paintbrush and then sprayed my strokes with water from a misting bottle. After applying the water, I just moved my paper around and let the watercolor effect emerge! Sometimes, I added more water and at other times, I added back in some more of the color.

Based on my chosen patterned paper from Blue Fern Studios, I used Coloringz Pink StilettosVibez Palm Reader and Vibez Glorious Day.


Here are some close-ups:


I was so pleased with how the color and shimmer turned out! 
It really draws the eye to the photo.

Thanks for coming by today. 
I hope you've been inspired to create.

Today's post will be my last for Shimmerz Paints for this term. 
I thank Stacey and Sami so very much for having me here. 
It's a very bittersweet kind of day but I've so enjoyed my time here as part of this team. 


Sandi


Shimmerz products used: 

Tuesday, February 12, 2019

Hello Card | Julee Tilman

Hi Shimmerz Friendz! It's Julee Tilman popping in to share a shimmery card with you. My hubby's birthday is this week and in the mail he got a card from a company of which we're frequent customers. It was just a plain card with three brushstrokes of paint and a black and white sentiment, but it got the wheels in my head spinning.


I headed up to my studio to try to do my own spin on it. I reached for Freshly Squeezed, Well Blue Me Down and Pink Stilettos, knowing that the pink stilettos would blend well with the other two colors if I used it as the middle swash of paint. I sprayed a bit of each color on my palette and then used a wide wet brush to make the blue and orange swashes, leaving room in between for the pink. When these were dry, I painted in the pink stilettos, overlapping the other two colors.

I then set this aside and pulled out the Petite Poppies Stampz set. I wanted to stick to this same color palette, so chose the blue for the flower, orange for the center of the flower and then mixed the blue and orange together for the stem and leaf. Once everything was dry, I coated with a layer of Angel Wings Shimmerz for that shine we all love, then did a few accents with a white gel pen and fussy cut.


The brick Scrapaholics chipboard piece is coated with gesso so that it would pick up the true color when I sprayed it with the pink stilettos.  When the spray was dry, I pounced on Tidy Widy Texturez in random places to give some depth.  I used some alphabet stamps for the sentiment, then layered it all together and finished with some paint splatters with Burnished Buckle Inklingz.


I hope this project inspires you to take a look at your sprays and experiment with how they'll blend together. The translucency of these sprays make them so fun to layer!

Thanks so much for stopping by today! Don't forget, if you place an order in the Shimmerz Shop, be sure to mention my name (Julee Tilman) in the comment section when you place your order for a freebie!

Friday, January 4, 2019

Let it Snow Layout | Lorilei Murphy

Hello! Lorilei here today with my first post as part of the Shimmerz team! I am very happy to be able to share my creations with you! I have been collecting Shimmerz colors for a couple years and love the artsy feeling they bring to layouts!


Today I made a wintery page featuring Snow & Cocoa by Crate Paper. I chose five sprays to co-ordinate with the collection. I started my page by prepping white card stock with clear gesso. I used the packaging technique to add a big pool of Oh Say Can You Sea and Deep Blue Sea to the area I knew my photo would be.


I made sure the teal colors were very dry before adding the pinks. I didn't want any mixing of these contrasting colors! Using the cap and tube I splattered Pink Stilettos, Caribbean Sunset and Sweet Heart around the teal area and extended the splatters out to the right side of the page. I love how the little sprinkles look through the acetate die cut, just like colorful snowflakes!


Once all the paint was dry I added my photo and embellishments. The addition of the Snow and Cocoa glitter snowflakes really brought out the Shimmerz splatters!


Thanks so much for joining me today. I look forward to sharing my pages with you!

Shimmerz Products Used: Deep Blue Sea - VibezOh Say Can You Sea - Coloringz / Pink Stilettos - Coloringz / Caribbean Sunset - Spritz / Sweet Heart - Vibez

* Type LORILEI in the comments section of your Shimmerz Paints Store order to receive a FREE paint!

Monday, November 12, 2018

"Bay Area Crop" Scrapbooking Layout | Simone Schermann


Hi Shimmerz friends, it's Simone again with another 12x12 layout. This month for the Shimmerz color challenge I picked Shimmerz "Pink-O de Mayo". I love the light pink tone of this shimmerz and also that it would work so great for cold, snowy winter layouts. However, here in the San Francisco Bay Area it cools down, but never enough for snow. So I decided to scrapbook something else instead. In September I went to my first scrapbooking crop and met some of my online friends for the very first time. I had such a great time and this layout tries to capture that feeling. I love how it turned out!


I prepped my background with white gesso and then used the Dazzlerz "Foiled Again" and a stencil by Tim Holtz to create a textured background behind the area of my photo. Look how amazing this looks. The "Foiled Again" is so sparkly, I just love it! On top of that I added the my colors and I have to admit, I just couldn't use only ONE color. I had to add some Coloringz "Pink Stiletto" as well as Shimmerz "Teal the end of time"- I just love when I can use two or more colors and create so many different shades. That's what makes using mixed media so much fun. I used a brush and the trusty packaging technique to add my color and then created the layout on top of that.


In some areas, I went back in with a brush and the paint to add even more color after I had created all the different layers in my layout. But somehow it still felt flat. I decided to just accept that when I stumbled across phrase stamps while I was grabbing my date stamp. Well, that was just the answer and when I saw the phrase "be adventurous", I grabbed my ink pad and added stamping to the background. Don't you think that it rounds off the layout perfectly?


Here is a link to my process video on youtube. If you place an order in the Shimmerz Store, don't forget to mention my name Simone in the comments at checkout to receive a free mini surprise product! Thanks for stopping by today!

SUPPLIES:
Shimmerz - PINK-O DE MAYO, Teal the end of time
Coloringz - Pink Stilettos
Dazzlerz - Foiled Again

Monday, September 24, 2018

"Eighth Grade Details" Scrapbooking Process | Simone Schermann


Are you scrapbooking first day of school pictures of your kids? I did for my oldest this year and made a purple and pink boy layout using some of my favorite Shimmerzpaints mists. It looks like I can't let go of the colors since I used them on last month's project as well with the different outcome, if you haven't seen it yet, here is a link to the blogpost. For this layout, I went with a horizontal design using mixed media in the background and then placing my photos on the right and adding a wood veneer word as a big title on the left. I kept the embellishments and layers very minimal as I loved the contrast of the photos and background and didn't want to distract from it.


I stamped part of the title and made sure that the words nestled nicely in between the gaps of my wood veneer word. When combining different fonts for titles I try to pick very different fonts: narrow and skinny with a wide and cursive font for example. Even though they are so different, this ensures the readability of the title.


To add even more texture to the background I stamped several patterns where my title and photos were going to be. I chose inks that were close in color to the mists I used on the background but not the same. To ensure the stamps wouldn't float on the page, I stamped them to be partially covered by my photos or embellishments.


Here is a link to my process video on youtube. If you place an order in the Shimmerz Store, don't forget to mention my name Simone in the comments at checkout to receive a free mini surprise product! Thanks for stopping by today!

SUPPLIES:
Vibez - Grape Soda, Blue Jeans< Glorious Days
Coloringz - Pink Stilettos

Saturday, November 25, 2017

Journal With Irit- Fast & Easy Art Journal Tutorial

Hi! Irit here with my monthly project, and this time I have a super fast and easy, but oh so pretty art journal spread to share with you! 


I loved making this, because using Coloringz sprays just made the entire process so so easy. I used my favorite colors, Pink Stilettos, Pretty in Pink, No Yoking, Don't Citron me, and Oh Say Can You Sea. After the first layer was dry, I added some pen doodles and watercolors, but using a brush and dipping it straight into the bottle of Coloringz would work just as well. 


Check out the video tutorial I created for this month!


Don't forget to mention my name when placing an order, you'll receive a freebie!!


Thanks for stopping by and have a lovely day!