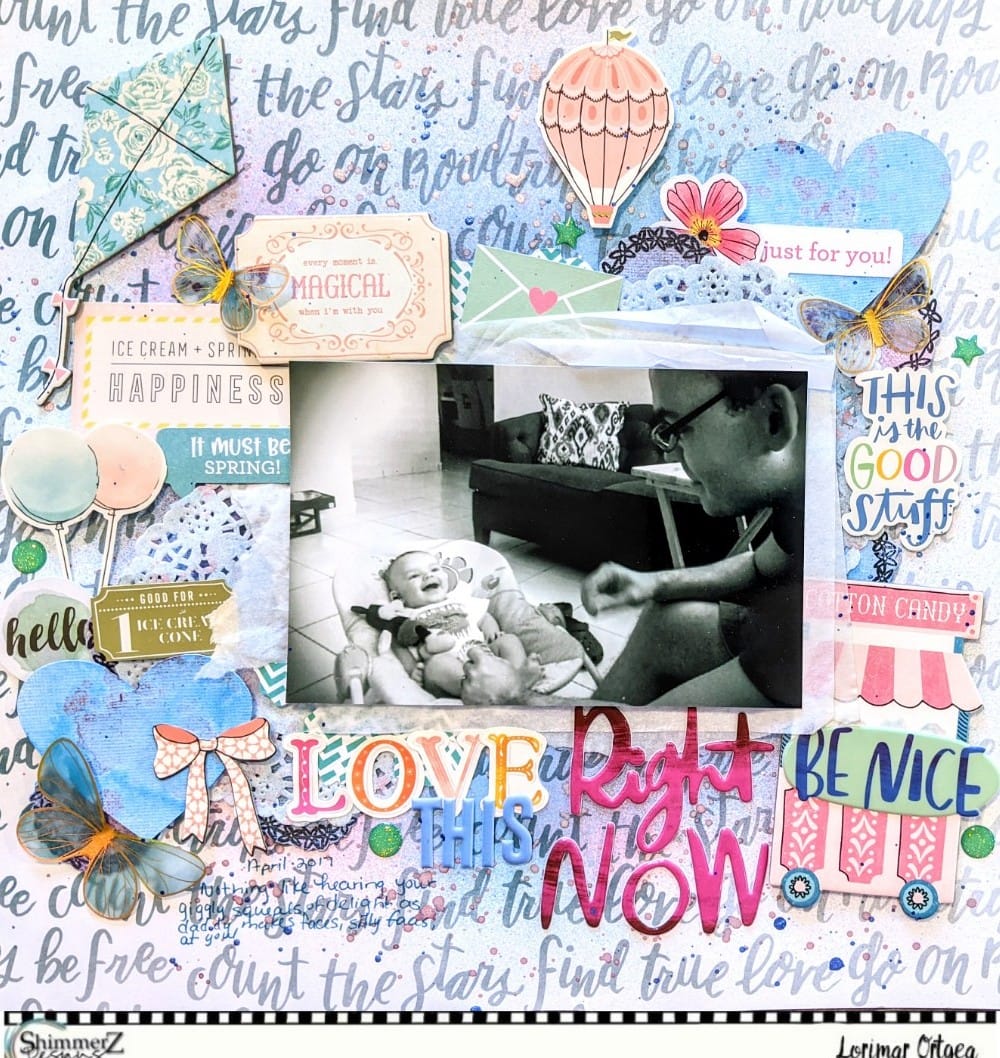
Popping by to share this Shimmerz-filled 12x12 layout in which I documented a sweet, endearing picture of my son giggling with my husband. I've also bashed a lot of leftover embellishments from my stash. Process Video: https://youtu.be/3l4AAXsYRYQ
Now, let's get started!
I first began with my base. I selected a patterned paper with a light blue scripty pattern on it and sprayed the center of it with Heidi Ho Blue (Coloringz), Jeni B Bleu (Vibez), Cotton Candy (Spritz), and Razzledazzle Berry (Vibez). My blue "cloud" is more predominant because I just wanted pops of pink throughout the layout.
Since I already had my mists with me, I went ahead and colored two doilies (Jeni B Bleu with splatters of Cotton Candy) and 2 cardstocks hearts (Heidi Ho Blue with splatters for Razzledazzle Berry).
Finally, once everything was dry, I began to assemble my layout. I added in my two doilies diagonal to each other, added my picture (backed with tissue paper and craft foam) on top, and then began to layer in all the other embellishments, making sure to balance out the pink embellishments all around the layout.
And that's it! Thank you so much for looking and reading along. Remember, you can receive a freebie by typing my name (Lorimar) in comments section of your next Shimmerz order.
I sincerely hope that you and your families are doing well as we manuever through these unchartered waters. As a teacher, I am home for six weeks but truly wishing I were back in the classroom with my students. However, since I'm not, I have been spending a lot of time in my craft room creating. I suppose I'll suffer through it.
Today, I want to share a layout I created using the following Shimmerz products:
To create the background, I quite literally poured small amounts of the paints onto a mat and smeared a bit of the Dazzlerz in random places. Next, I took a piece of Vicki Boutin mixed media paper and pressed it onto the mat several times and in several places.
The next step was to paint the same colors in different areas to add more saturated color. Once the background was completely dry (this took a while), I used some Elle's Studio stamps to add sentiments on top of the paints. After stamping the sentiments, I used a stencil with black ink to add the triangle shapes.
With the background done, I went to work layering papers and embellishments from Carta Bella's Family Night collection around the photo. I have to say that the quality of my picture is not the best, but it captures my kiddos perfectly.
I added the title using Thickers as well as enamel dots from the same collection.
I love how the background looks with the bright colors of the papers and embellishments.
Here's one last look at the completed layout.
Remember, if you need supplies, stop by the Shimmerz Shop! Type JENNIFER in the comments at checkout to receive a freebie with your order!
Thank you so much for stopping by today - I hope you are inspired to create.
Hey y'all! Brianna here with a fun Summery layout using the August Edition Color Kitz! This Kit is absolutely beautiful and is perfect to document your Summer moments! They are $15.95 and here's what's included in it:
Shimmerz Exclusive Ice Cream Crazy Cut File SpiegelMom Scraps Sprinkle Time Sequin Mix 1 oz bottle of Heidi Ho Blue Coloringz 1 oz bottle of Hermit the Frog Vibez Pink Shimmerz Sunkissed Inklingz
As soon as I saw the cut file, I knew I wanted to create a shaker with the popsicle. I cut the cut file out on some white cardstock in my stash and added a transparency to create the window. I added some foam tape on top of it, added the sequins and backed it with some vellum. I love how it turned out and love how the sequin mix looks in the popsicle. So fun!
I painted each inside piece of the ice cream cones using the colors in the Kit. The bright colors in this kit are so pretty and they really do look like ice cream!
For my background, I wanted to use the same colors that I used on my ice cream cones. So I added gesso to another piece of plain white cardstock and applied each color separately on the page. I sprayed some clean water to help the colors blend and move.
I added my title using some Thickers and some puffy alpha stickers and added some ephemera pieces around my page.
The colors really pop in this kit and they really compliment each other. The original Shimmerz has so much shimmer and shine, I love that my ice cream cone is so sparkly!
I hope that I've inspired you today! Check out the Color Kitz if you haven't had a chance to. They really are a great deal and it's so much fun to have all of the colors already picked out for you on top of the extras that you get in each Kit. Thank you so much for stopping by and we will see you in the next one!
Here's my process video showing how I created this fun Summer layout!
Sandi Clarkson here with you today sharing my latest project .. an altered furnace control board!
The back story here is that our heat went out late Christmas Eve and was not restored until January 2nd! It was a very long, miserable week to say the least. So, when the repairmen handed me this burned out control board, I knew I had to alter it and memorialize that we survived! Thank goodness for electricity and that Lowe's had plenty of space heaters.
The second back story is that when I get a new shipment of product from Shimmerz, I always open it as soon as I possibly can and sit down and spray (or brush) them all out on the "nearest to me" sheet of white paper! Maybe even a paper towel. So, I wanted my project to sort of replicate that habit. Since rainbow patterns are popular in crafting, I went with that!
My first step was to paint the control board white using some glass bead texture paste. Once that was dry, I began to spray from left to right. My colors used were the following:
To amp up that glorious texture created by the object itself, I added some like-colored glass beads here and there.
Then I added my flower and mechanical light bulb.
Here's another angle of what and my hubby and I are calling our little city! Haha!
My title is from 7 Dots and is sort of another tongue in cheek gimmick!
Yes, I am trying to make the best of our adventure.
It could have been soooo much worse!
Here you can see the netting I added under the florals.
The chicken wire is solely for photographing.
Trying to show you a close-up of the beads.
One last photo and I guess I'm done!
I hope you are inspired.
This was one of those fun, cathartic projects.
Just aim and spray to your hearts content!
Loving my Shimmerz Paints!
Remember if you place an order, use the code SANDI for a free paint.
Hello there, it's Simone once again. I recently flipped through my albums and came across some layouts that I had made when I first started scrapbooking. They were horrible, not because of the papers I used but more so because I hadn't found my own scrapbooking voice yet. I had just started out and tried to find out what worked for me and what didn't. Two of the layouts I completely took apart and only saved the photos for quick entries into my traveler's notebook. But the third one was different, the only thing that was wrong with it was the Kraft cardstock that I had used as a background. And even right after the layout was done, I knew exactly that Kraft colored backgrounds just weren't for me.
So I carefully took the layout apart and salvaged all the things that I liked from the original and redid it. This time with patterned paper and my favorite Shimmerz colors and the packaging technique. I colored the wooden alphabet using the Shimmerz "Tickle me Turquoise" to match it to the overall color scheme. And instead of adding it to the bottom of the photo strip, I made sure the letters spelling the word "Kindermuseum" (German for Children's Museum) touched all the different layers and was part of the layout.
I kept the overall look and design idea of the original layout, I just chose to use more of my signature techniques to make it more me. The "make magic" screen print, for example just hovered above the photo strip in the original layout, whereas I love when elements touch an connect and guide you through the layout. The original layout had a vertical strip and a horizontal photo strip layered on top of each other, I still tried to emphasize that vertical space but instead of choosing white cardstock I went with mixed media and less defined lines. If you know me, these are all techniques and conscious design elements I use to make a layout more readable, more appealing to the eye and that make a layout look like me.
To get back to the beginning of this blogpost and me ditching three of my old layouts, did you ever do that? Let me tell you why I scrapbook and then you'll know why I didn't have a problem getting rid of the layouts. I scrapbook to tell a story all the while creating something with my hands, I want the reader to be pulled into the layout and read the journaling. And at the same time I want each layout to feel like this is me. I want the art to reflect my personality so that once my kids go through these albums, they see me, when they read their story. Here is a link to my process video on youtube. If you place an order in the Shimmerz Store, don't forget to mention my name Simone in the comments at checkout to receive a free mini surprise product! Thanks for stopping by today!
SUPPLIES: Shimmerz - It's Mint to Be, Tickle Me Turquoise Vibez - Jeni B Blue Coloringz - Heidi Ho Blue
Hi! Irit here and I'm happy to share a new project with you today! I will show you how to create a super fun and easy rainbow background, using one stencil and a lovely selection of Coloringz. Here's the finished layout-
I used a Dina Wakley stencil called mini favorites and Coloringz in Pink Stilettos, Pretty in Pink, Scarlet's Fever, Don't Citron Me, Well Blue Me Down, Heidi Ho Blue and Sunset Strip Vibez to create the background. This is such an easy and effective way of creating a lovely colorful background for your layouts, cards or art journal. Don't forget to watch the video tutorial I created and see exactly how I made this!
Mention my name when placing an order on the Shimmerz website and receive a freebie!
Hello Crafty friends! Katty here to share a scrapbooking layout with you all. I had this photo of my cousins baby from a few years back. He was the cutest baby. I decided to create a monochromatic layout using shades of blue.
I began with white cardstock and a stencil with a small square pattern. I angled the stencil to create two triangles on either side of the page. I used one of my favorite of the Paste-eez, Puttin on the Glitz. My though was that the Paste-eez would create a resist effect when I add color on top.
Once dry I used some of my favorite shades of blues and aquas. I used a Spritz in the color Saphire and three Coloringz in the colors Well Blue me Down, Heidi Ho Blue and Mamma Sings the Blues.
I used a paint brush to add the colors, blending them together over the stenciled triangles. I also added some splatters using Mama Sings the Blues.
I placed my photo in the center and added a few layers of patterned paper behind it. I added my tittle and used a few embellishments, all in shades of blue to keep with the monochromatic look.
I love how it turned out!
Supplies Used:
Paste-eez: Puttin on the Glitz
Spritz: Sapphire
Coloringz: Well Blue me Down, Heidi Ho Blue, Mamma Sings the Blues
Hello friends! Katty here to share a fun Art Journal Page. I wanted to create something summer related. I actually haven't been creating as much as i'd like lately so I wanted to capture the Summer Vibes before Summer is over. LOL. I decided a fun Art Journal Page would be perfect.
I began by ripping up some washi tape into strips and using several sizes going diagonally throughout the page. The washi tape acts like a mask. I then used some of my favorite color mists and sprayed directly over the tape. I used Colorigz in Pink Stilettos, Don't Citron Me, No Yoking and Heido Ho Blue. I also used a Vibez in Sweetheart I was sure to spread the colors around so that I would have them spread out evenly throughout the page.
Once I added all of my colors I carefully peeled off the washi tape strips to reveal the diagonal pattern. I used a textured paper towel to blot the paint and that created some fun texture too.
I added some fun Summer themed puffy stickers from Paperhouse Productions in a cluster in the center of the spread. Lastly I used a circle stencil and added a border around the whole spread using the amazing Dazzlerz in Pucker up Pink.
That added the perfect finishing touch. I love how this turned out. Thanks so much for stopping by!
Products Used:
Coloringz: Pink Stilettos, Don't Citron Me, No Yoking, Heidi Ho Blue
Hi crafty friends, Here is my first layout for this month. I wanted to make something bright.
I used Jeni B Bleu Vibez, Hermit the Frog Vibez and Heidi Ho Blue Coloringz to create my background. I added a lot of stencilling work with modeling paste, along with glass beads and micro beads to add a lot of texture.
I used Jelly Bean Green Dazzelers to color my Blue Fern Studioschipboard title.