Showing posts with label sea foam. Show all posts

Tuesday, June 18, 2013

Shimmerz and Project Life.

Hi there.  
I have another Project life to share.  
I used a few colours of Shimmerz Paints.
Sea Foam Spritz, Tickle me turquoise Shimmerz and My Bleeding Heart Coloringz


I used a Crafters Workshop (Mini Chevron Arrows) template and some Sequin Waste with some Distress Ink.  I love mixing a little paint into my Project life.  Lots of fun.

So Use some Shimmerz Paints in a project soon!  Remember the June Challenge if you would like to be a Guest Designer for a month on the Shimmerz Blog.  Load your Projects to the Shimmerz Paints Face Book Page by June 30.


Sunday, November 11, 2012

Adding some texture to the background.

Hello it's Naomi here. I hope you all are having a lovely weekend.

This is the Layout that I'd like to share today.


I have used:
Spritz Sea Foam
Spritz 4 Leaf Clover

After I made my own backgroud using scraps of paper, I sprayed above products using some template and also coloured some of the leaves.
For a finishing touch, I splattered them on the background.

I love these green-ish, blue-ish colours.

Thank you for visiting and I am wishing you all a happy day!

xx Naomi

Saturday, August 18, 2012

passport photos?

Hello! It's Naomi here and I'd like to share this page today.
I had to take a passport photo for my son as his first ever passport is now expired. (5 years gone!)
None was good. Definately not the one with the tiger mask!


products used:

Spritz Sea Foam
Vibez Sea Monkey
Vibez Hot Fudge

for the background.

and I used Shimmerz Coffee to paint on some of the falling leaves.

(I have used the Color room #124 palette for this LO, too)

Thank you for stopping by and hope eveyone is having a good weekend.

x Naomi

Saturday, June 2, 2012

I am the luckiest MAMA in the world.

Hello hello.
It's Naomi here and today I'd like to share an LO with a picture which I took on Mother's day last month.
As most of us (mothers) are the photographers (and the chefs and the cleaners, ect..) in everyday life, we don't get to be in pictures as often as we SHOULD.
I am glad I made an effort to take some shots of the children and myself on Mother's day with a self timer. (how clever are you, Self timer!!)
It's not a perfect one but "I"am in it with the kids and that's what counts, right?

Here is the LO.


For the background, I firstly applied gesso all over the patterned paper very lightly so that the pattern is still visible not completely hidden.
For the texture, I glued some strips of old dressmaking paper
Then I applied the products below to create interesting new pattern along with the original pattern underneath.
  • VIBEZ Fiery Fiesta
  • VIBEZ Rusty Bottom
  • COLORINGZ No Yoking
  •  VIBEZ Sea Monkey
  • SHIMMERZ Coffee
For the canvas butterfly, I painted it with
  • SPRITZ Sea Form
  • SHIMMERZ Coffee
  • VIBEZ Hermit the Frog
  • COLORINGZ Heidi-Ho-Blue
  • VIBEZ Sea Monkey
  • COLORINGZ Mama sings the Blue
and for the finishing shinny touch, I applied
  • ENAMELZ Sparklicious


I have to say I LOVE how the butterfly turned out using shimmerz.

Thank you for stopping by.
I hope you are all having a lovely weekend!

Naomi xx

Saturday, March 17, 2012

Using Spring Set and more!

Hello. It's Naomi here.
Today I'd like to share an LO using the latest Shimmerz set!
Here are the beautiful spring colours!


Now they are offering "FREE DOMESTIC SHIPPING and 1/2 OFF INTERNATIONAL SHIPPING" till April 15th.
So be quick and grab a set before the time runs out!

You can order yours here.

And this is my layout using these colours ( I especially love Coloringz Heidi-Ho-Blue)
and also
Coloringz No Yorking
Coloringz Lime in da Coconut
Vibez Sea Monkey


I also used crayons and markers to give it some different textures.

Thank you for your visit and I hope you get this spring set while they are offering the "FREE DOMESTIC SHIPPING and 1/2 OFF INTERNATIONAL SHIPPING" !!


Don't misss this opportunity!

Love Naomi

Monday, April 5, 2010

Masking with Shimmerz is so much fun

My use of Shimmerz is very simple on this layout but it creates a major effect. I used a doily I found in the kitchen the other day to create my background using Spritz in Licorice. Then I used Vibez Razzle Dazzle Berry, and Sea Foam Spritz to create the paint splatter look.

Here I used Treasured Hymn to change the pretty Prima flower to match the other embellishments.


So go dig in your kitchen drawers and find something to use as a mask and create something with your Shimmerz Paints.
Thanks ladies and happy scrapping!!!

Sunday, February 21, 2010

Stamping with Shimmerz


I have been using these large background rubber stamps for my cards lately. I spray the stamps with Shimmerz Spritz and I wanted to show you how I do that.
These stamps are large enough to cover a standard size card. Spray the stamp with Red-y or Not Shimmerz Vibez. Lay the card on top of the stamp and rub with your hand. I like to do it this way because I can see where I position the paper, especially here where there are straight lines.
This is what it looks like after you remove the paper.
For the second layer I used patterned paper and stamped it with the same stamp two times. Once using Licorice Shimmerz Spritz and then with Red-y or not Shimmerz Vibez.
The next two cards are done the same way. I used Sea Foam Shimmerz Spritz for both mixed with a little Licorice Shimmerz Spritz. Once I have the stamp out I spray and stamp several pieces at once, that way I have something to use later and it is dry and ready to go.

Friday, February 19, 2010

Painting with Shimmerz


Shimmerz Paints will create the most shimmery, glowing, watercolor effect when used on a Prima Paintable. I love the amazing, translucent quality here!!

I started by painting the swirl with Jilted Jade And Sunny Shimmerz, blending the colors together.

Then misted over the painting with Cotton Candy Spritz. While it was still damp, I opened the bottle of Sea Foam Spritz and painted the edges with a brush, like a watercolor wash.

As a finishing touch I painted the butterflies and flower centers with Bubble Gum and Sugar Plum Shimmerz.


A shot to show some of the dimension I put into this piece.

My daughter paid me the highest compliment when she saw this project.....it is hanging in her room, at her request.

Hope you have a Shimmery day!
Lucy

Friday, January 15, 2010

Celebrating with Pearlz

Hello! Christine here, and this is my very first post as one of the new design team members with Shimmerz! Hasn't this been an exciting week with all of the new product announcements and gorgeous projects by my fellow design team members? It certainly has been for me, and I can't tell you how giddy I am to be able to share another project with you using the fabulous products from Shimmerz including some of the new Pearlz!

This is a birthday set that I created using a combination of Shimmerz, Spritz, and Pearlz:

For the card, I added some Angel Wings Shimmerz to the flower trim as well as on the embroidery on the lace. This gave both of the trims some interest. I also added a touch of Ballet Slipper Pearlz to the center of the flowers on the trim for added color. The beautiful Prima flower was originally white and aqua, but I wanted it to coordinate with the rest of the projects in this set so I painted it with Ballet Slipper Pearlz. To my delight, it gave it a nice pearlescent touch as well!

Next is the crown fit for celebrating an occasion like a birthday. I used a water brush to add a layer of Ballet Slipper Pearlz to the pink patterned paper. I added two layers of the Pearlz to it, and I love the results! There are hints of shimmer throughout the paper now that are suble and not too "over-the-top".

Finally, we come to the wand...I had so much fun creating this! Starting with the doily, I sprayed it with Baby's Breath Spritz. Once dry, I used a paint brush to add Morning Mist Pearlz along the border of the doily as well as on selected flowers. On top of the doily is a layer of vintage dictionary paper that I sprayed with Bed of Roses Spritz. These two layers are adhere to the paper mache star which I painted with white acrylic paint and stamped and embossed with a damask design using Versamark ink and iridescent embossing powder. Next I sprayed the star with Sea Foam Spritz and wiped off the excess so that the embossed image would show. I did this step twice until I got the color that I desired. The edges of the star have been sprinkled with Martha Stewart mica glitter. Finally, I cut the word "create" using my Cricut and Sure Cuts A Lot from white cardstock four times and adhered all four layers on top of one another. I painted the word with three layers of Ballet Slipper Pearlz for an opaque effect, painted Bed of Roses Spritz along the edges of the word for shadowing, and then added a bit of ultrafine glitter around it using a Zig glue pen to adhere it.


I hope you enjoyed seeing these projects as much as I enjoyed creating them with Shimmerz, Spritz, and the NEW Pearlz!

Saturday, December 12, 2009

Lots of Shimmery Goodness!

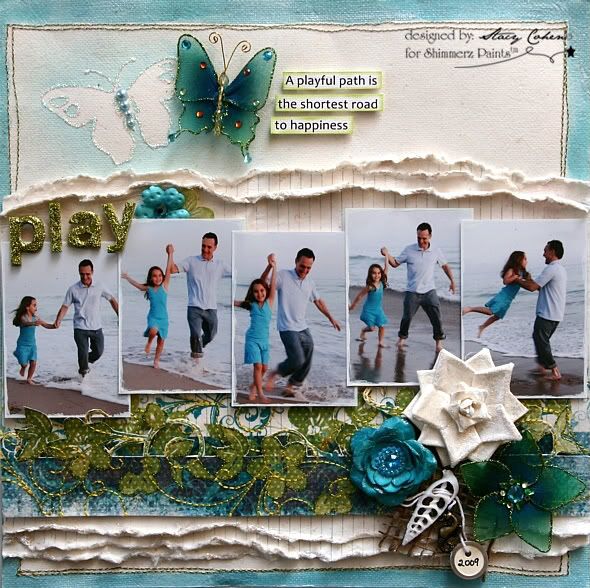
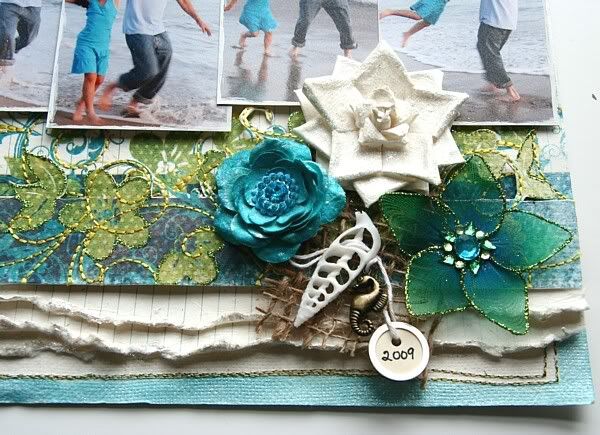
Here's a layout I made using Prima's stitched papers and lots of Shimmerz, Blingz and Spritz. Shimmerz products look so pretty on Prima's thick mulberry papers.

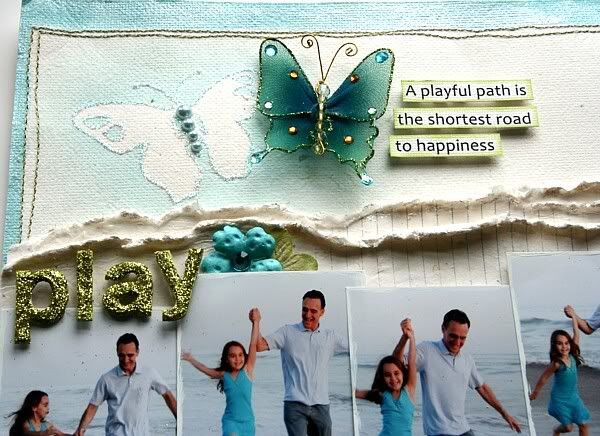
I love these pictures of my husband and daughter at play on the beach during one of our annual family photo shoots.


I went to town with Shimmerz on this page. I painted the edge of the stitched paper with Tickle-Me-Turquoise Shimmerz. I used Pixie Dust Blingz on the torn paper "waves" and on the white Prima flower.


And what beach page would be complete without Sea Foam Spritz?? I used the Prima butterfly as a mask and sprayed Sea Foam Spritz over it.


Thanks for stopping by!
-Stacy Cohen

Tuesday, December 1, 2009

Double Masking Technique


Hello everyone!! I am so excited to share with you this technique. It was supposed to be a video, but my little guy got hold of my video camera one day. I took it and hid it from him and forgot where I put it! I found it after the fact, thank goodness...hiding in plain site--LOL!


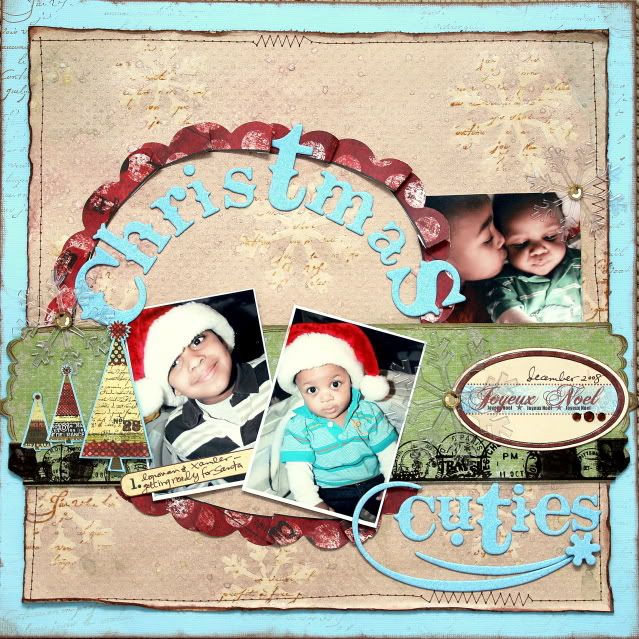
I did, however manage to take step-by-step pictures of my technique. I hope you'll enjoy it and try it out for yourself! I created this layout of my little cuties using the gorgeous December Kit from Timeless Daydreams. I really wish you could see this in person! The sparkles are so beautiful, it would make your eyes water! I even spritzed the Prima package insert with baby's breath shimmerz!
This layout was created using a Sketchy Thursdays sketch.


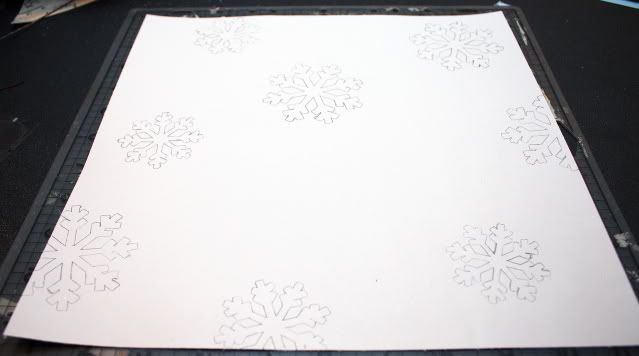
To create the first part of the mask, I started out with a plain piece of white paper trimmed to the same size as my background; in this case 11x11. (NOTE: use a cheap piece of paper for this, instead of cardstock. I used one of the inserts from an album protector sheet.)


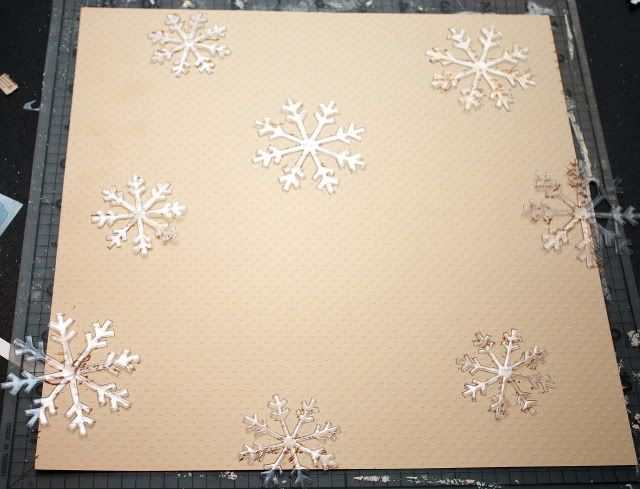
I sporadically placed Heidi Swapp acetate snowflakes on the paper and traced them.

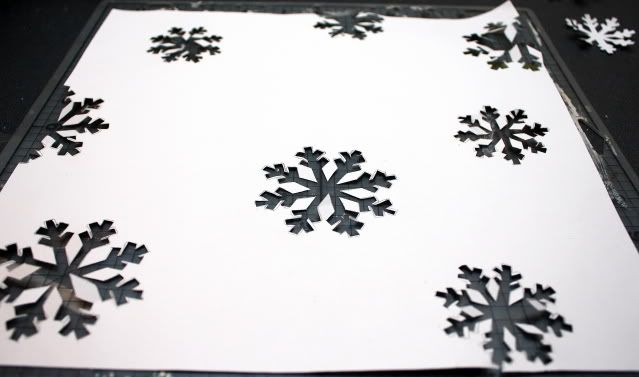
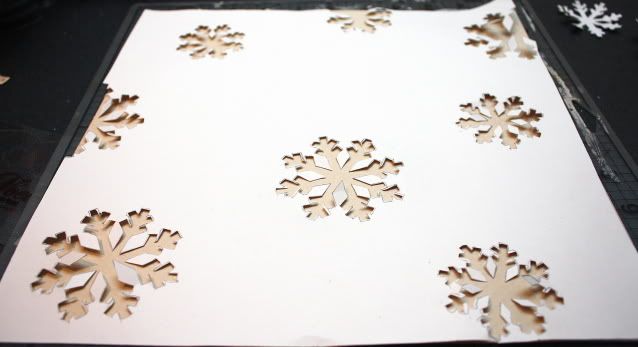
Using a craft knife and a pair of microtip scissors, I very carefully cut the snowflakes from the paper. This is going to serve as a mask for the stamping portion of the technique.

I then placed my mask over my 11x11 piece of background paper. I used Bazzill Swiss dot because it adds a little extra texture.

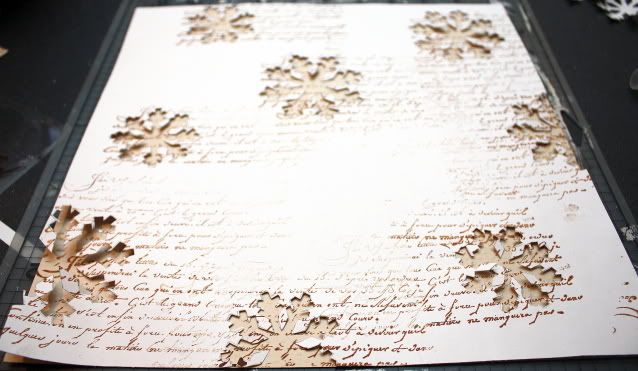
Next, I stamped the french script image across the negative snowflakes. You could use any small image for this part.

I then removed the white paper and placed the acetate snowflakes over the stamped images. This is for the second part of the masking technique.
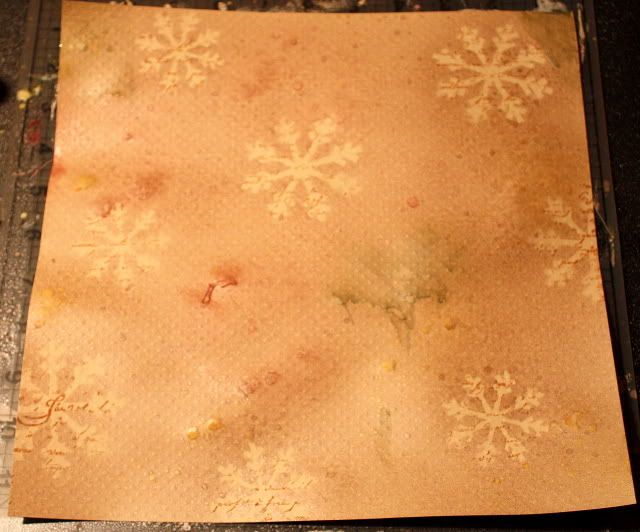
Next, I spritzed mudpie, olive branch, and barn door Shimmerz Spritz across the entire background. (NOTE: the reason that I used acetate snowflakes is because Shimmerz cleans up really easily. I just wiped them off with a piece of paper towel. )
When I removed the snowflakes, this is the result. I used my heat gun to dry the background. Shimmerz normally dries really evenly, but I found that by concentrating a heat gun over the larger drops, gives you the splattered look.

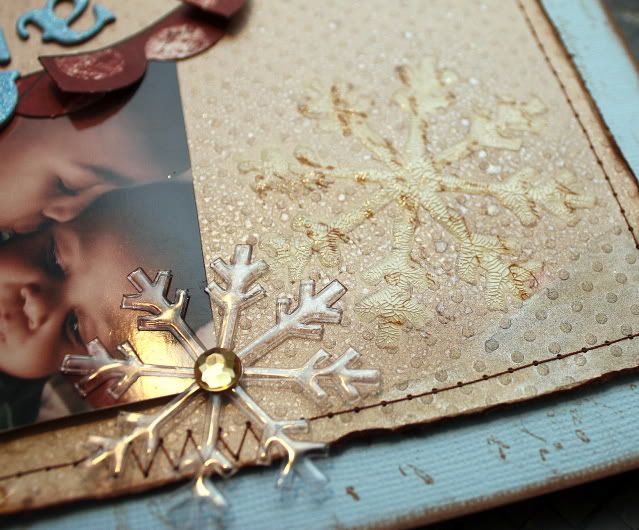
Here's a close-up of the snowflake. At this point, you can highlight your snowflakes, if you chose, with a pen, hand stitching, stickles, etc... I chose to to use Ranger's crackle accents and I just love the added texture it creates. The crackling also adds to the vintage feel of the layout as well!
The acetate snowflake seen here is one of the same ones I spritzed over. Just a little wipe and the spritz is gone...easy peasey!

I loved creating this technique; but to tell the truth, when I do it again, I'm going to use a shape with a little less detail, like a circle or something. The snowflakes were a little tedious, however, I did get a second use out of them.
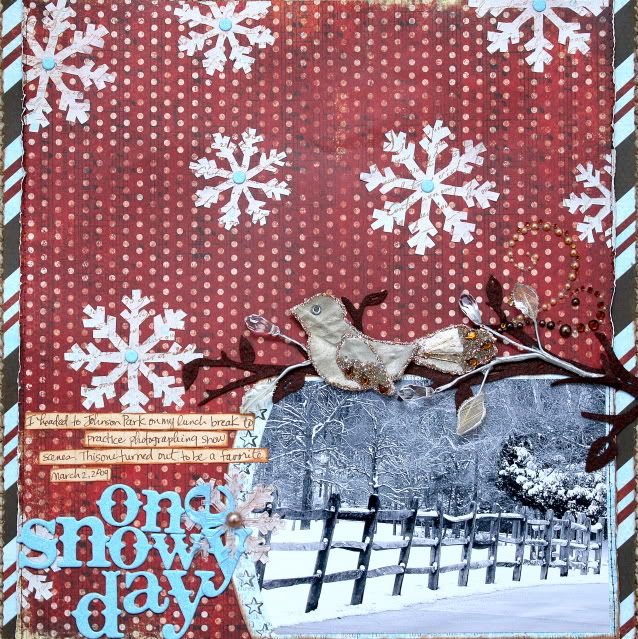
All of the snowflakes that I carefully cut from the paper (in step 1 of the technique) were used on this next layout. I lightly spritzed them with seafoam, treasured hymn, and mudpie Shimmerz spritz and then stamped with the same french script stamp (one of my faves).

here's a close-up of a snowflake

I hope this post has inspired you to head out and grab some Shimmerz! There's no right or wrong way to use them!!!