Thanksgiving is just around the corner and, while I know that things have been a bit different lately, there's always something to be thankful for.
Today's layout is mostly focused on making one's own background and piling on the embellishments. If you'd like to see how it's made, click here.
I began with a cream cardstock as my base and began spraying my base with Bamboo Leaf, Moody Mauve, Glorious Day, Cotton Candy and Hot Fudge. I didn't add any gesso this time around because I didn't want my colors to blend too much. After spraying the colors, I added a couple of splatters of Hot Fudge.
I fussy-cut some tags and icon squares from the collection (Simple Stories Cozy Days) to add to the embellishment clusters that would hang tight around each of the pictures.
My embellishment clusters contain a mix of stickers, ephemera, foam stickers, and chipboard stickers to really play with the dimension on the layout. Each picture is popped up on some craft foam, and each has a tag as a layering piece beneath them. Once I was done with everything, I splashed a bit of Moody Mauve and Glorious Day around my layout to add some more Shimmerz goodness!
That's it! It was a super simple and quick layout to make, and I hope I've inspired you to get your stories documented while playing around with your Shimmerz Paints. Remember, you can always receive a freebie in your next Shimmerz order if you type LORIMAR in the comments section when placing it.
Thank you so much for joining me today! Stay safe and happy Thanksgiving!
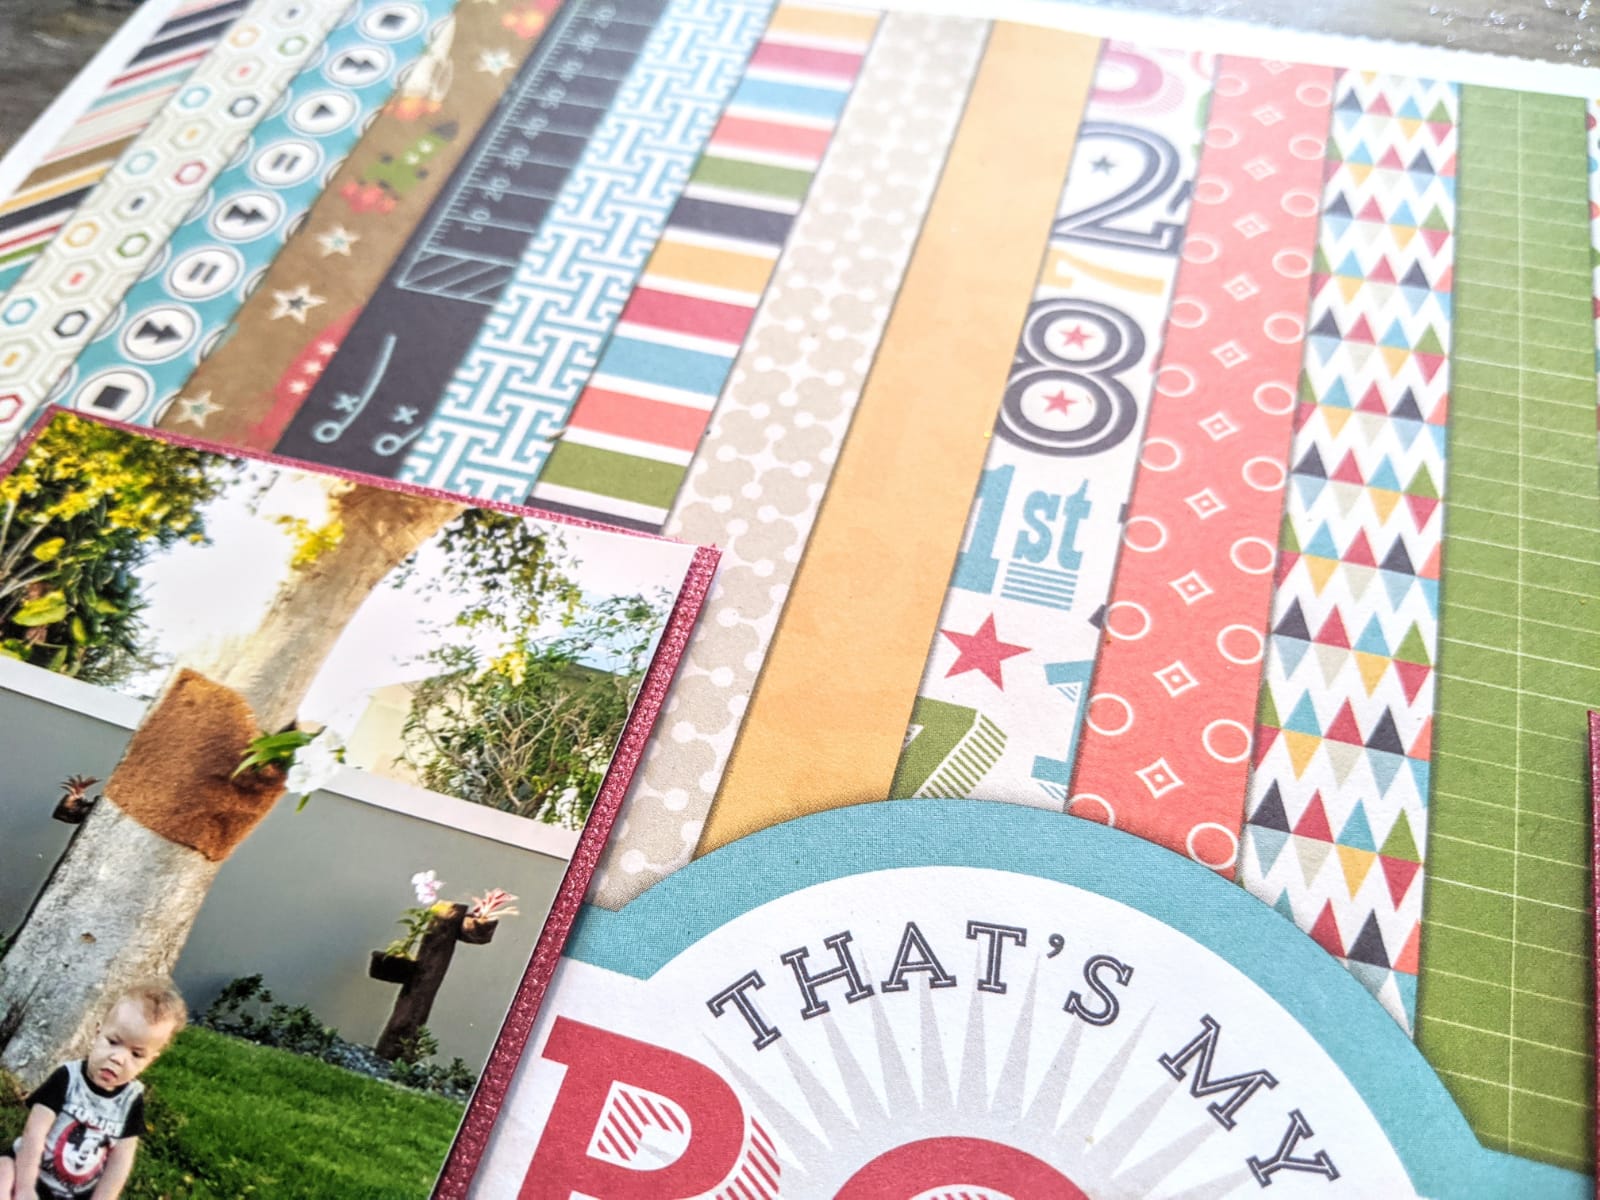
It's Lorimar, sharing this lovely "color-melting" layout with you today. I used a patterned paper from Echo Park's That's My Boy collection as an inspiration for layout as I wanted to make a colorful layout without going down rainbow road (LOL). I'll list all the colors I used in here (so it's easier to walk you through it): Oakie Dokie, Butter Cream, Bamboo Leaf, Keep Palm, Mustard Seed, Pumpkin, Anchors Away, Peacock's Plume, Ultra Marine, Gold Glimmer, and Pool Me Closer.
Here's what I did: as I rummaged through my stash, I found a patterned paper from Echo Park that featured a lot of color and patterns. It's actually the "cover page" from the collection; they are typically printed on shiny glossy paper, but this one was actually the A Side to the 3x4 Journaling cards. I fussy-cut around the hexagons and left the logo in to serve as my title. My idea was to use the colors from the paper and create a layout that looked like the color had melted down; and that's exactly what I did!
Using a Vicki Boutin foundations paper, I added water to the bottom of the paper (so my colors to blend and spread better) and began adding in each of the colors. I specifically used Butter Cream in between the bolder colors so the blending came out more fluid. Towards the bottoms of each of the color strips, I splashed a bit of each of the colors.
Once it was dried, it was all a matter of adding in my pictures (matted on red metallic cardstock, popped up on craft foam and placed on either side of the title) and sprinkle in a few embellishments (so as not to cover up to much of the mixed media.
And that's it! Thank you so much for joining me today, and I hope I've inspired you to make a colorful layout such as this. Remember, if you type my name, LORIMAR, in the comments sections of your next Shimmerz order, you'll be able to receive some free paint!
Take care and stay safe,
- Lorimar
PS. - If you're interested in watching the whole process, click here.
Hi Shimmerz friends! It's Julee Tilman popping in to share a fun little card using a super easy watercolor background technique.
I've created a short sped up process video if you'd like to see how this card was made, you can watch it below or on my Youtube Channel.
Whenever I'm feeling like I just don't know where to start on a card, this is one of my go to techniques. Just plopping watercolors on a page. Here I used Walking a Tight Heliotrope Spritz and Grape Escape Vibez to create the background, finishing off with some splatters in the same colors and a bit of Shimmeringz Goldie Lox.
Next I stamped the flower and quickly watercolored with the same colors, adding some Bamboo Leaf Spritz and Palm Reader Vibez in for the leaves. Once I was done with this I fussy cut the image and added some extra shimmer with Angel Wings Shimmerz. The sentiment was stamped directly onto the watercolor background panel and I matted with black cardstock and an A2 card base.
Thanks so much for stopping by today! I hope your day sparkles.
Hello Shimmerz fans. It's Anna here with my next project created with gorgeous Shimmerz paints and mists. Today I want to share with you a floral page with pretty cut file. The color palette I chose for this page is not typical for me. I usually prefer much brighter shaded with a lot of pink and yellow :)
I was inspired by the picture of my daughter wearing a blue T shirt having all the flowers and trees in the background.
I stared with creating a background using mists and paints applied directly to the paper without adding any gesso. I also added a fun layer of glittery Pasteez through the stencil.
Using mists like paints by applying them with brush is my favorite way of spreading my supplies. You can easily mix Spritz and Vibez with Inklingz and Creameez and you will get pretty watercolor effects.
As always I have a process video for you. You can follow me and recreate this page.
It's me, Joyce! Glad you followed my Shimmerz Siren to bring you here today
to share a little book I’ve been working on.It’s a small book about three and one-half inch by five inches when
closed.Because it’s small ,it’s calling
out for more details which means I may be working on this little project for
some time. In the meantime, I wanted to
share my progress with you.
I’m a student of Laly Mille’s and am currently enrolled in
her Little Whisper book course, and this is my interpretation of the
course.The fabrics, laces, papers and
textures are neutral colors, and I added some lovely soft hues of Shimmerz
Paints Bamboo Leaf Spritz, Penny 4 Your Thoughts Inklingz, and Coral Reef
Inklingz. If you would like to make something similar, I strongly recommend you have some of these Shimmerz neutral products in your art arsenal.
Here are a few folio pages which include some additional mini pages that I have used for
journaling. Some pages I have left blank for some personal journaling:
On the page below, I put a few drops of water in the little pot
of Penny 4 Your Thoughts and let it sit a few minutes to thicken. Then I added
some to coffee, stirred the mixture up and dipped fiber papers, glassine bags and fabrics in the
mixture to age them. You can’t really see it in the photos but some of the
edges of the journaling and fiber papers have a lovely soft shimmer on them from
Penny 4 Your Thoughts. I love that! I
also added Penny 4 Your Thoughts to the button which then revealed the pattern
on the button.More texture…who doesn’t
love that!
I open up the button flap in the picture below so that you can see some hidden work and journaling too:
Below is the full folio:
Coral Reef Inklingz was applied over the glassine bag in the photo below to add
a subtle color to match the shell and bead charm I made.Under each of the layered pieces of paper are
hidden journaling with more dabs of Coral Ree. The glassine bag was also treated with the
Penny 4 Your Thoughts and coffee mixture, then crumbled up to let dry
naturally. I like the aged look it reveals.
A full folio page below:
Here's one of my fav pages using Bamboo Leaf Spritz over the layered papers and a few droplets too. The original tag was white and I covered it with the Penny 4 Your Thoughts and coffee mixture, then added layered papers, and some stamp work too. I used an old make up sponge and applied the Bamboo Leaf Spritz to the edges of the journal page that contains some lacy bits. Inside the glassine bag are more hidden tags.
A full folio page:
Another folio page to share with you below. Notice the little "pull" lacy piece?
If you pull on the lacy piece, it reveals some more journaling:
I hope I have inspired you to use your Shimmerz Paints too! I derived so much joy in making this little book, some journaling made me cry, some made me laugh, and it all touched my soul. As Iwork through the details on other pages, I will share them with you in
the future. Thanks for letting me share this project with you.
Hello Shimmerz fans. It's Anna here with my next project created with gorgeous Shimmerz products.
Today I want to share with You a layout full of hand painted flowers. I've gone wild with drawing, painting and fussy cutting many florals. I had so much of them, that I didn't need to add a lot more embellishments to my page :)
There is also a process video for You.
I am not a watercolor artist, I didn't take any classes, I am no expert at all. I just love flowers and decided to give them a try. I watched few YT videos about painting flowers. I also checked some flower sketches to get some ideas about shapes and forms. I sketched my own flowers. They are not the copy of real flowers - just a variation.
I used a lot of Aqua Huez and Creameez to color my sketches but I also used mists as a liquid watercolors. I mixed colors to get new shades. I chose two small pictures of me and my little girls because, after all that work, I didn't want to cover the background.
I used a hot glue to attach the flowers. It helps to add dimension to the page without using 3D foam squares. Just be careful with You fingers. I lost my thumb prints long time ago :D
I like using multiply colors so I painted flowers using blue, pink, red and purple. Leaves and twigs combine all the flowers together creating this "wildflower bouquet" effect.
I really love how this page turned out. It's quite thick - perfect for framing and hanging on the wall.
Remember - if You want to get a free product while shopping at Simmerz store, don't forget to mention my name.
XO
Anna
Tuesday, November 24, 2015
Hey there it's Beck BT here today to share with you another of my cards using the divine Shimmerz products. I really wanted to focus more on the sprays for today's cards so I had lots of fun with the Vibes Sprays to create this oh so sweet card!
I used the sprays to colour up the divine Spellbinders die cuts as well as the pretty flowers that started their life out as white flowers before they met the 'Vibes' sprays!
For my card today I used the follwoing Shimmerz products:
Shimmerz Vibes in Egg Noggin
Shimmerz Spritz in Truffle, Cotton Candy and Bamboo leaf
Thanks so much for heading over to the blog today to check out my project! I hope I've inspired you and shown you how lovely a little Shimmerz Paints can take your card to the next level! If you'd like, to head on over to my blog HERE for full tutorial shots and complete products lists used and you can see a little more detail on where I used the divine sprays!
Hello lovely Shimmerz Fans! I'm really excited to share with you a home decor design I made on a 12" x 24" canvas. I often get asked how I come up with some of the ideas I make.....this one is not one I came up with myself. I saw this wonderful canvas with a vase attached on Pinterest and thought about how nicely this would work with some new stencils I designed for The Crafter's Workshop (Moving Vines 12"x12" stencil, and Organic Matter 6"x 6" stencil).....so I contacted the lovely lady (Vicki Chrisman) that designed the one I saw and she kindly gave me permission to use her canvas as inspiration.
The Crafter's Workshop Stencils used in this project, designed by me :)
Shimmerz Paint Products used in this project:
~ Olive Branch Spritz
~ Bamboo Leaf Spritz
~ Glorious Day Vibez
Here is a very brief video tutorial I made up to show how I made this project! Enjoy! ....
I hope you enjoyed my little tutorial and that I've inspired you to get playing with your Shimmerz Paints. Here are a couple of close-ups of my project....
I used the darker colors like Olive Branch on the outer edges of the canvas, fading into the lighter colors like Bamboo Leaf on the inside....using Glorious Day for little hits of layered color in a few key spots.
I added extra layers of the darker spritz over the stenciled areas, allowing the to pool in the cavities and cracks. The bottle I wired through the canvas using a piece of cardboard in the back of the canvas to make a strong backing for the vase.
Thanks so much for stopping by the Shimmerz blog today, and REMEMBER! If you are looking to order Shimmerz products, be sure to get your FREE/Bonus Shimmerz product in the color of your choice by mentioning my name 'Gabrielle' in the 'Instructions to Merchant/seller' part of your order! xo
Hello friends! It's Gabrielle here with you today to share an art journal cover I recently made using beautiful Shimmerz Paints, Dusty Attic chipboard and a variety of new stencils I designed for The Crafter's Workshop. The Stencils I used were 'Tuscan Wall', 'Moving Vines' and 'Organic Matter'. Because I was going for the warm colors of Tuscany, I went with yellows, blues and greens with a hint of sepia. Here are the Shimmerz Paints colors/products I used for this project...
Shimmerz Products Used:
~ Heidi Ho Blue Coloringz
~ Glorious Day Vibez
~ Chocolate Brownie Coloringz
~ Taupe of the World Vibez
~ Bamboo Leaf Spritz
~ Olive Branch Spritz
~ Emerald City Inklingz
~ Artichoked Texturez
~ Pumpkin Shimmerz
I did a video recording, a sort of step by step of the making of this journal cover (front and back) if anyone wants to recreate the look. So take a break from the hassles of your day and let creativity flow your way! Enjoy!
This was so much fun to make, I hope you enjoyed watching my video tutorial as much as I enjoyed creating this project! Here are a few close-ups, that you can check out at your leisure....
Here's a view of the back and front cover. I was going for a kind of aged, sun-warmed Tuscan doorway look. I began by adding lots of textures using my stencils, and then just started layering on the paint colors starting with the lightest (Glorious Day Vibez) to the darkest.(Taupe of the World Vibez).
For the door, I brushed the Heidi Ho Blue on with a paint brush rather than spritzing it on, so that I would get streaks in the chipboard resembling woodgrain. Then I lightly dry brushed some of my white Gesso over it to give the blue a more sun-bleached look. I finished the aged look by using a stamp I designed for The Scrapbook Diaries called Crackle Textures....I used the crackle paint stamp on the door and the peeled paint design on the walls.
For my vine corner, first I used my TCW 'Moving Vines' stencil with some texture paste, the began to layer on my greens (Bamboo Leaf and Olive Branch Vibez). For the chipboard I used the Chocolate Brownie Coloringz for the 'wood frame' and Emerald City Inklingz for the leaves.
For the Ivy vine, I used my all-time favorite color of Texturez called Artichoked on the Ivy cut out on my Tuscan Walls stencil. And finally I used a very light brushing of Pumpkin Shimmerz for my cracked brick design.
NOTE: Don't forget to get your FREE/BONUS Shimmerz product in the color of your choice with your next Shimmerz Paints order....Just mention my name 'Gabrielle' in the 'Instructions to Merchant/Seller' part of your order, and presto! Stacey will bestow an extra Shimmerz product upon you! Perfect if you're like me and have a hard time narrowing down the colors you NEED! :P
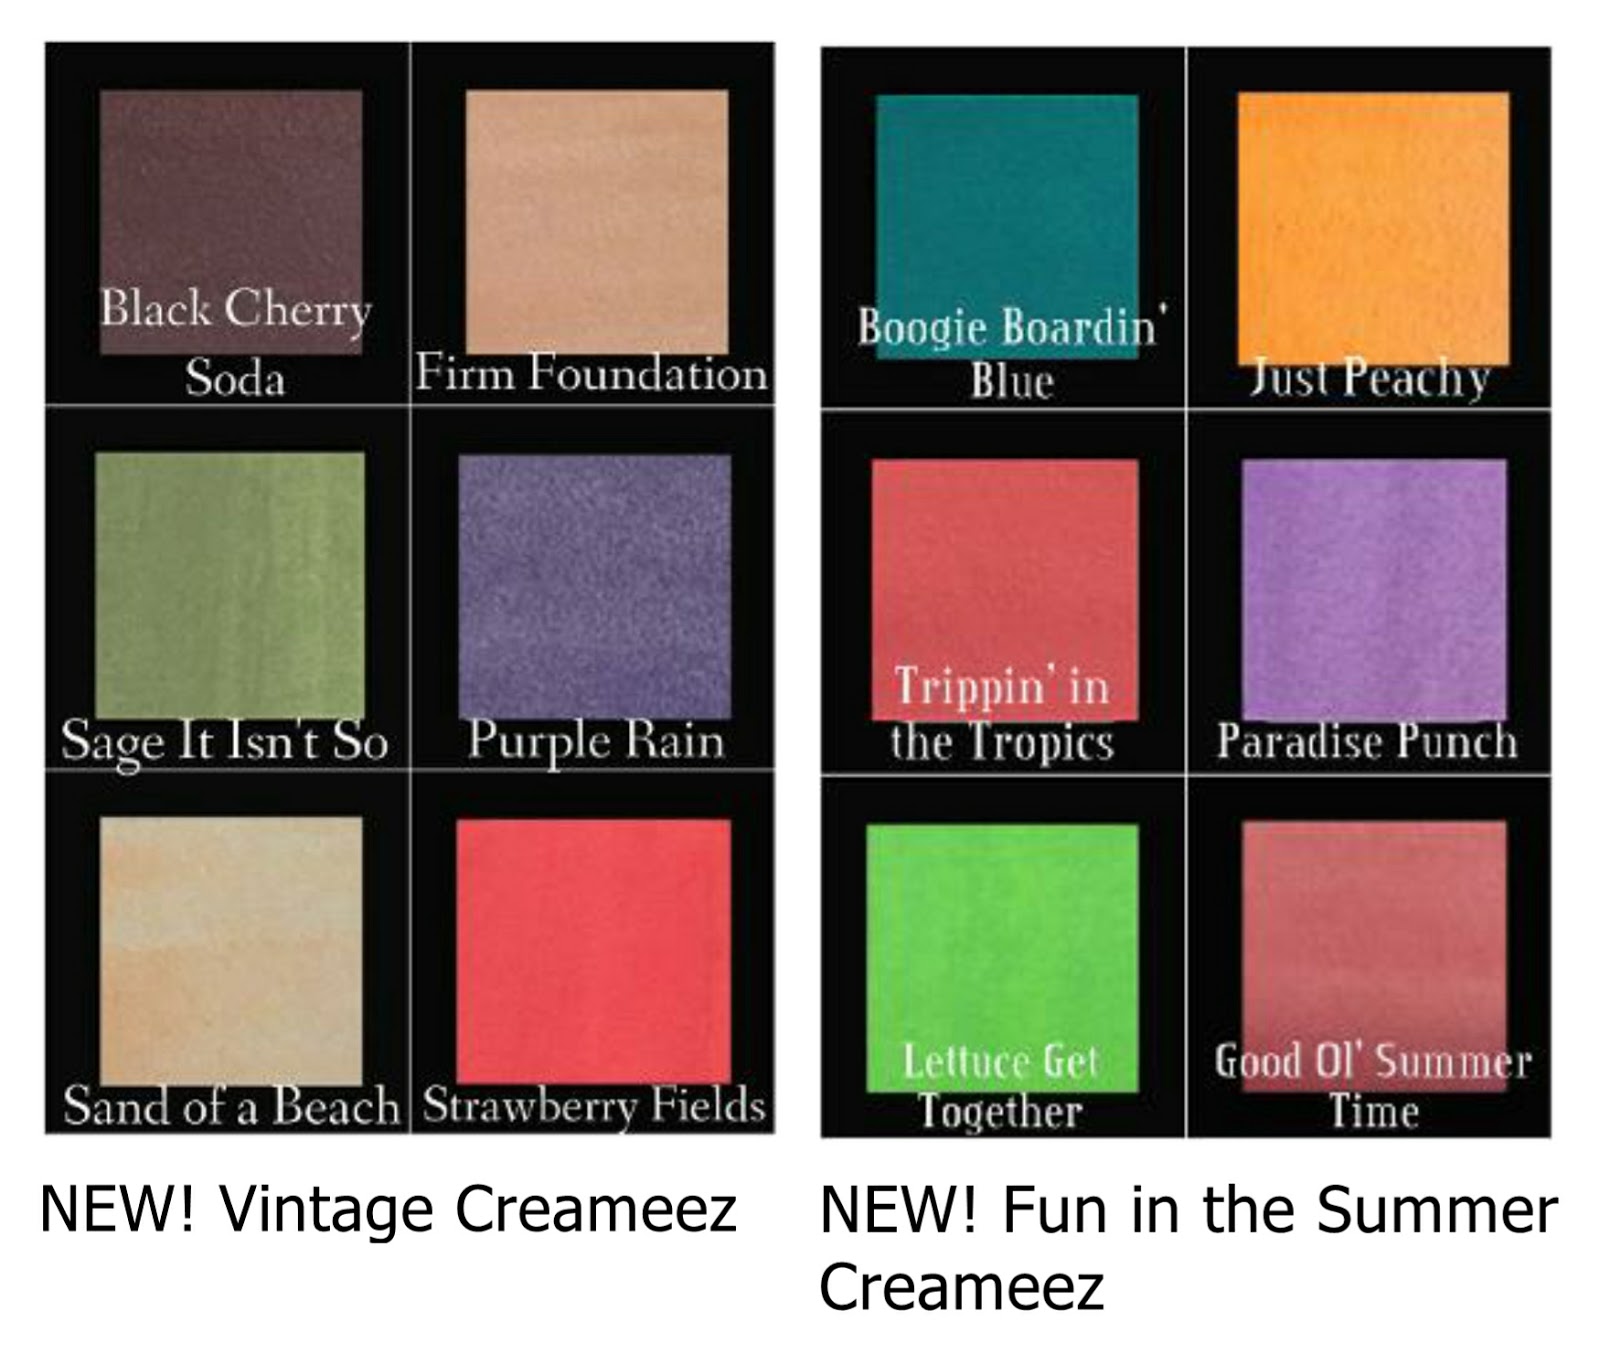
....AND....If you haven't heard the exciting news yet, Shimmerz has brought out a whole bunch of gorgeous new colors for their summer release! I'm super excited to give these lovely colors a go! I recently have been playing a little more with the Creameez paints and I just love the matte watercolor look they can give to a project!...I sat here trying to pick some favorite colors, but it's so hard to do, they are all so yummy! (Firm Foundation, Sage It Isn't So, Good Ol' Summer Time...seriously, how cute are those names too!). What's your favorite?