Hello Shimmerz fans. It's Anna here with my first Shimmerz based project in 2018. I am tired of making winter / Christmas projects and I was so happy to be able to come back to my favourite pink and other girly colors.
I was inspired by the cut file. I even had a perfect picture to go with it. Background is created entirely with gorgeous Shimmerz products. I mixed mist with white acrylic paint to get some new, fun shade.
I also added colorfyl flowers under the cut file using sparkly Shimmerz.
Bruskstrokes created with Dazzlerz are also a great idea to add texture and shimmer to your pages.
As always, you can watch whole process in the video below:
An the last thing: if you are placing an order in the Shimmerz store, don't forget to mention "ANNA" to get a free mini product. Yay! Who wouldn't want that.
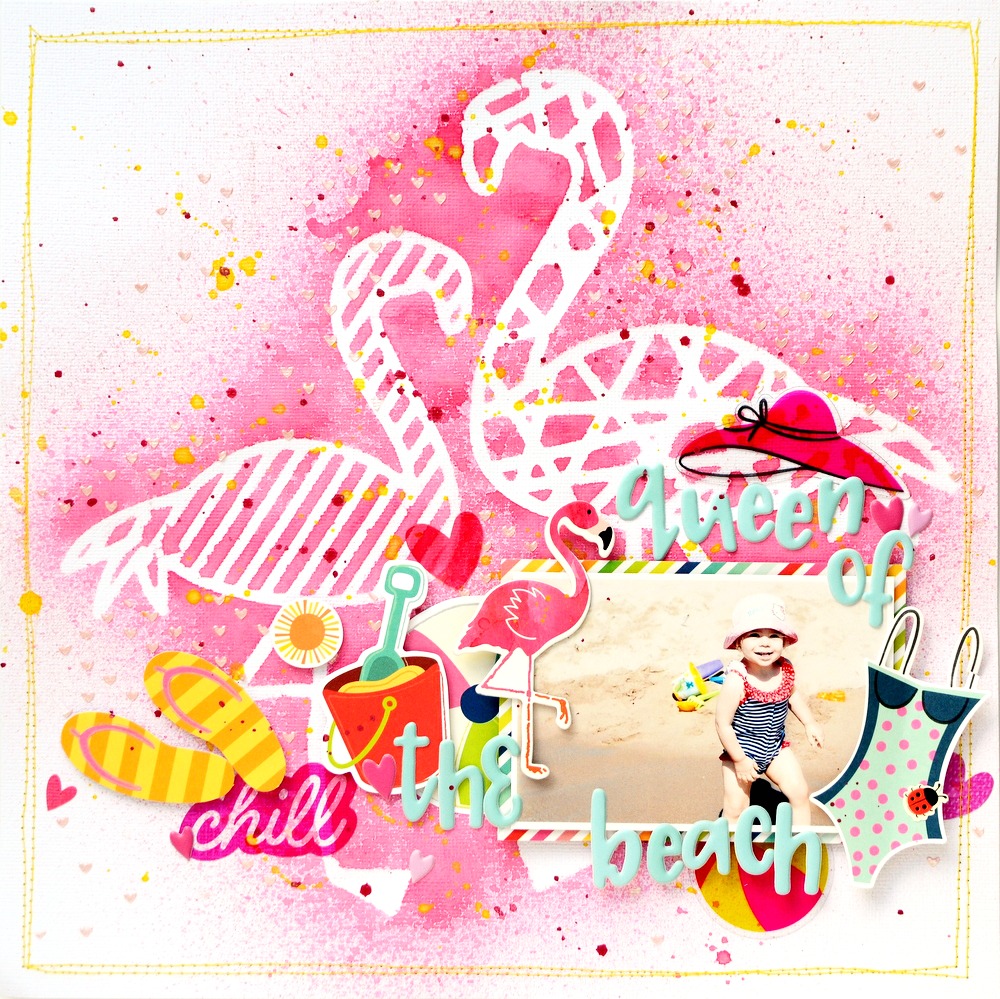
Hello everyone. It's Anna here with my August project and process video. Summer is my favourite season and I love creating summery, colorful pages. I am also a big fan of latest flamingo, pineapple and cacti trend. I do not travel to the very exotic places but still I like to use them on my pages.
Today I went crazy with pink and flamingos and I created a whole flamingo background.
I used Silhouette Cameo cut outs as my stencil. It's a really fun way to extend your possibilities. You can use a whole background stencil or just a small elements. This kind of stencil won't last long but let's be honest - how often do you use the same stencil? And I can still use the flamingos in second project :)
With those pretty birdies in the background I had to minimize the composition around my picture. I didin't want to cover too much. I use only small scrap of paper as a frame for my picture and some smaller die cuts to embellish page a little.
I also added some little hearts using a stencil and a Dazzlerz paste. It works perfect with details and I love how shiny it is. It looks like cotton candy. I also add yellow splatters using Shimmerz paint.
As always I have a video for you. The page is very easy and simple to make so the video isn't long. I hope it will inspire you to play with your mists and stencils.
That's all for today. Thank you for stopping by and see you in September with another project and video.
Hello Shimmerz fans. It's Anna here with my newest project. I want to show You today how to make colorful page without pattern papers. All You need is Shimmerz paints or mists and time.
I like floral backgrounds but they are usually very busy or the flowers are too big. Creating Your own background in perfect color combo is a great solution for that. You can use it right away or scan it and print it later as many times as You need. I love watercolors and the messy effects they create. I wanted to paint this kind of washy flowers in blue and pink shades.
When You work with a lot of water - You have to use thick watercolor paper. It can handle all the moisture without tearing.
I had some leftover frames from one of Crate Paper collections so I decided to use them all on one page. So pattern papers - only stickers. To be honest - I fussy cut the roses and butterflies from papers, but it doesn't count, right? :)
As always, I have a process video for You. Enjoy watching.
Don't forget to mention my name while placing an order at Shimmerz Store. You will get free mini product :)
Hello Shimmerz fans. It's Anna here with my next project created with gorgeous Shimmerz products.
Today I want to share with You a layout full of hand painted flowers. I've gone wild with drawing, painting and fussy cutting many florals. I had so much of them, that I didn't need to add a lot more embellishments to my page :)
There is also a process video for You.
I am not a watercolor artist, I didn't take any classes, I am no expert at all. I just love flowers and decided to give them a try. I watched few YT videos about painting flowers. I also checked some flower sketches to get some ideas about shapes and forms. I sketched my own flowers. They are not the copy of real flowers - just a variation.
I used a lot of Aqua Huez and Creameez to color my sketches but I also used mists as a liquid watercolors. I mixed colors to get new shades. I chose two small pictures of me and my little girls because, after all that work, I didn't want to cover the background.
I used a hot glue to attach the flowers. It helps to add dimension to the page without using 3D foam squares. Just be careful with You fingers. I lost my thumb prints long time ago :D
I like using multiply colors so I painted flowers using blue, pink, red and purple. Leaves and twigs combine all the flowers together creating this "wildflower bouquet" effect.
I really love how this page turned out. It's quite thick - perfect for framing and hanging on the wall.
Hello Shimmerz fans. I am so excited because today is my first post for Shimmerz along with the process video.
We are in the middle of the winter on the northern hemisphere. It's cold, dark and depressing. The only bright thing during the winter is snow. World looks much better under the snowy blanket. I had few fun pictures from one of our winter walks and I wanted to scrap it.
As You can see I didn't use any patterned paper on this page. I created my own background using variety of Shimmerz products.
I also used a foiled snowflakes that I made by my own using Minc and Silhouette Cameo. I got my Minc for Christmas and I just love the effects You can achieve.
I was trying to kill my "Snow and cocoa" kit leftovers but in the end I didn't want to cover too much of my background.
You can create Your own background in different colors and use it for many other, not winter related projects.
Watch my process video:
Don't forget to mention my name while placing Your order in Shimmerz Store to get free product.
Hi! Irit here, and I'm excited to share a new project I created. It's my take on a holiday themed scrapbook layout, and I had to use my favorite colors, even though they are not the traditional holiday colors. Here's my finished project-
I used the following sprays to created this background- Vibez in Razzle Dazzle, Blushing Bride, Snow Storm and Egg Noggin', Coloringz in No Yoking and Mandarin Mai Tai.
You can see exactly how I made this in the video tutorial I created (keep on scrolling to see).
I used some Pretty Little Studio goodies to embellish my layout.
Adding details with black pen is a great way to add some definition and interest to the final piece.
Here's the video-
Don't forget to mention my name and get a free product of your choice when you place an order!
Thanks for stopping by and have a wonderful new year!
Hello Shimmerz fans! I'm here today sharing a simple layout that I created using a variety of Vibez and Coloringz spray inks!
Using spray inks are my favorite way to add color to my layouts. I started by choosing some really bright and vivid colors for my page and took the nozzle out so I could create some very simple and basic multicolored circles on the white cardstock that I chose to use for my background design. I just dipped the end of the nozzle piece into the ink bottle and created circles with it.
After the ink dried, I placed some Dear Lizzy Black Varnish stickers on top of the painted circles so they would really pop off of the page. I layered two faux photo strips of my daughter and I to the right side and added a couple of Hip Kit Club die cuts around the strips for added color and dimension.
I added my title by using a cut file cut out of black cardstock and another Hip Kit Club die cut to finish off my page. I also added a few heart-shaped Dear Lizzy Black Varnish stickers to draw the eye around my page and to my title.
Shimmerz Paints Used: Coloringz - Don't Citron Me, No Yoking, Mandarin Mai Tai, Punked Up Purple; Vibez - Cold As Ice, Razzledazzle Berry
I love how fun and colorful this layout turned out to be just by using some colorful Shimmerz ink and a simple design!
Thanks for joining me today and I hope you have a very colorful and creative day!
So I printed off this dramatic gorgeous gown photo over a year ago (an image I got off of Pinterest) and had meant to do a page with rich colors and textures for quite some time now. Finally got around to doing it (as I still had so much family pics to scrap!). Sometimes it's fun to do a page 'just because', know what I mean?
These are the Shimmerz Paints products I used for this project....as you will see in the video tutorial, each of these products has it's own unique quality whether it be the smooth thick texture of the Dazzlerz, the deep rich tones in the Coloringz and Vibez or the incredible shimmer of the Inklingz.
NOTE: You can purchase your Shimmerz Paints HERE.Be sure to mention my name "Gabrielle" in the Instructions to Merchant part of your order to get your FREE/Bonus Shimmerz paint product in the color of your choice with your next Shimmerz Paints order!
As always, a project is not complete for me unless I have a nice selection of Dusty Attic Chipboard in them. Above are the Dusty Attic Chipboard pieces I used for my project: Ornamental Trim Set (brand new product), Word Pack #14, Lacey Heart Frame Set.....and I used a NEW Dusty Attic Stencil design called Fans.
So it's time to give yourself a little break, grab your favourite beverage and hope you enjoy watching my little video tutorial on how to make this page....Enjoy!
Hope you had fun watching my tutorial. Here are a few close-ups you can view at your leisure....
I should note that after I filmed my tutorial, I felt my design needed a little more color in the bottom right section so I added a couple more spritzes of paint and some swirls of fibre threads (from a package I got from my local dollar store).
I've had these Prima jewelled leaves sitting in my stash forever! When I was choosing my embellishing products I totally had to use these as I thought they were a good match for the colors I was using in the layout!
I'm really loving the new stencil designs from Dusty Attic, in the top right corner you can see some of the texture and design I got onto the page using the Fan stencil from Dusty Attic with my Homemade Texture Paste and some Shimmerz Paints sprays and Inkingz.
The pink and black butterflies were cut from one of my favorite Bo Bunny collections called Primrose (I used the paper called Bliss). I also used a fun BoBunny Stamp on this page called 'Butterflies'. TIP: Many of you ask what to do when your paper buckles from wetting or spritzing your paper with paints and water. One of my favorite things to do is use my hair flattening iron on the paper, its a quick and easy fix!
So I hope you enjoyed todays post and hope I've given you some inspiration to get out your scrapping/mixed media products and Shimmerz Paints and play!