Today's layout features some lovely neutrals with only a few pops of color. I know, totally different than from I'm used to, but it's always fun to craft outside the box from time to time. This layout came together in under 30 minutes and it's super simple to make.
Begin first with a base of white textured cardstock. I didn't add gesso to it because I wasn't going to add a whole lot of mixed media. Start by spraying Taupe of The Morning and Glorious Day, followed by splatters of Granny Gray and Before Dawn. This should dry nearly instantly if you didn't used any gesso.
I dove into my stash for my embellishments, and tried to stay on the down-low with the colors since my goal was to highlight the picture. You can use items from your stash or from a particular collection; the possibilities are endless! The general placement of the layout was to make a sort of "shelf" with all the embellishments kind of "falling out" beneath the picture. I used a mixture of thickers, chipboard thickers, ephemera pieces, veneer buttons, and stickers. I also used a leftover word from the Sun, Sea, Fun Cutfile by COAPA Cutfiles. Added my journaling in gold ink at the bottom, doodled some lines around the border and splattered some Glorious Day to tie everything together, and done!
Simple things are sometimes the best things, and that applies to today's layout. Thank you so much for joining me today! Be sure to drop by the Shimmerz Paints shop and write my name (Lorimar) in the comments section of your next order to get a freebie!
Lorimar here, sharing this multi-mixed media-filled layout, inspired by a sketch I saw somewhere online. How do you feel about stamping and mixed media? For me, it's one of those neglected techniques which I'm trying to embrace once more. There's a lot of mixed media layers for this one, so let's get to it!
Even though Kraft cardstock is one of those cardstock colors that I typically shy away from, I decided to use one as my base because it just felt right to do so. Instead of jumping to the mixed media, I began to play around with the placement of the picture and embellishments. I made a couple of marks with a pencil to guide to where I was going to be stamping my flowers and leaves. Took a quick picture of how I had arranged everything (to use as a guide) and began stamping, using archival ink to ensure that the color would stay clear even after I added my colors.
Then I began to add my colors using the packaging technique; I intentionally didn't fill in each of the stamped images because I wanted to keep the "messy, abstract" look. The flowers were mostly pink, the spaces in between the flowers were yellow, and the leaves were green. Here's the list of colors: Oh Say Can You Sea, Pink Moscato, Taupe of The Morning, Magenta, Pink Stilettos, Bubblegum Blast, Miner, Miner 49er, and Rollin' In The Hay. You can find there over at Shimmerz Paints.
Once my base was fully dry, I began to work in adding all the embellishments back in, popped my picture (a true 6x4) on craft foam for dimension, splattered some Miner, Miner 49er to try everything together, and added a bit of sparkle with some sequins from Spiegelmom Scraps. That's it! If you would like to see how it all came together, click here to watch the process video over on my personal channel.
Thank you so much for joining me today! There are some more close-ups down below. Remember, you can get some free paint by typing "LORIMAR" in the comments section of your next Shimmerz order.
This photo I found on Pinterest reminded me of my young spirited niece.
She can't get enough knowledge and is spellbound when learning something she really enjoys.
I enjoyed pinking up some Blue Fern Studios gear and compositional chipboard pieces.
Simply gesso, and spray Shimmerz Paints on the compositional piece,
then apply a thick coating of your favorite gel medium,
let it dry a little bit,
then apply a heat gun and let the product bubble up.
When all is dry,
lightly go over the raised areas with a shimmering paint,
like Shimmerz Inklingz Spotlight White with your fingertips.
The photo above features a chipboard gear with Spritz Bed of Roses applied with a paint brush, and when paint is dry, lightly mark up the chipboard with a fine black marker.
The background in the above photo was created with gesso, Spritz Bed of Roses, Shimmerz Heavy Metal, Spritz Taupe of The World, and Spritz Cotton Candy.
I hope I have "captured" your attention to create something arty using Shimmerz Paints.
See you next time....
Hi Everyone, it is Beck BT here again this week. I'm still trying to encourage Spring weather to hit us down in Melbourne with a love of sharing spring inspired projects. I'm hoping it might work something like a rain dance because gee the weather has been so cold windy and wet so far this season. This week I am sharing with you a card with a cool wood veneer altering technique using Shimmerz products of course!!
I've created a video so you can see how I altered the wood veneer as well as how my card came together.
Shimmerz Products used:
Texturez paste in Patina
Vibes Sprays in 'Taupe of the mornin'
Here are some step pictures getting you nice and up close to that wood veneer altering process.
The process:
Add Texturez paste to the wood veneer piece liberally.
Apply a heat gun to the area allowing the paste to bubble up and then shrink back down
Apply a spray of the Shimmerz Vibes spray in a contrasting color
Wipe over very gently with a wet wipe to remove some of the vibes spray and allow the paste color to show through
Add as a beautiful embellishment to your project as seen on this card
It was so much fun creating this card, so I can't help but share more pictures. I adore how the wood veneer pieces came. They made the perfect accent to the sweet florals on the card.
What do you get inspired by? Maybe you can find some inspiration from your local weather!
Thanks so much for heading over to the blog today to check out my project! Don't forget to mention my name when you order for some free product! WOOT!
Hello friends! It's Gabrielle here with you today to share an art journal cover I recently made using beautiful Shimmerz Paints, Dusty Attic chipboard and a variety of new stencils I designed for The Crafter's Workshop. The Stencils I used were 'Tuscan Wall', 'Moving Vines' and 'Organic Matter'. Because I was going for the warm colors of Tuscany, I went with yellows, blues and greens with a hint of sepia. Here are the Shimmerz Paints colors/products I used for this project...
Shimmerz Products Used:
~ Heidi Ho Blue Coloringz
~ Glorious Day Vibez
~ Chocolate Brownie Coloringz
~ Taupe of the World Vibez
~ Bamboo Leaf Spritz
~ Olive Branch Spritz
~ Emerald City Inklingz
~ Artichoked Texturez
~ Pumpkin Shimmerz
I did a video recording, a sort of step by step of the making of this journal cover (front and back) if anyone wants to recreate the look. So take a break from the hassles of your day and let creativity flow your way! Enjoy!
This was so much fun to make, I hope you enjoyed watching my video tutorial as much as I enjoyed creating this project! Here are a few close-ups, that you can check out at your leisure....
Here's a view of the back and front cover. I was going for a kind of aged, sun-warmed Tuscan doorway look. I began by adding lots of textures using my stencils, and then just started layering on the paint colors starting with the lightest (Glorious Day Vibez) to the darkest.(Taupe of the World Vibez).
For the door, I brushed the Heidi Ho Blue on with a paint brush rather than spritzing it on, so that I would get streaks in the chipboard resembling woodgrain. Then I lightly dry brushed some of my white Gesso over it to give the blue a more sun-bleached look. I finished the aged look by using a stamp I designed for The Scrapbook Diaries called Crackle Textures....I used the crackle paint stamp on the door and the peeled paint design on the walls.
For my vine corner, first I used my TCW 'Moving Vines' stencil with some texture paste, the began to layer on my greens (Bamboo Leaf and Olive Branch Vibez). For the chipboard I used the Chocolate Brownie Coloringz for the 'wood frame' and Emerald City Inklingz for the leaves.
For the Ivy vine, I used my all-time favorite color of Texturez called Artichoked on the Ivy cut out on my Tuscan Walls stencil. And finally I used a very light brushing of Pumpkin Shimmerz for my cracked brick design.
NOTE: Don't forget to get your FREE/BONUS Shimmerz product in the color of your choice with your next Shimmerz Paints order....Just mention my name 'Gabrielle' in the 'Instructions to Merchant/Seller' part of your order, and presto! Stacey will bestow an extra Shimmerz product upon you! Perfect if you're like me and have a hard time narrowing down the colors you NEED! :P
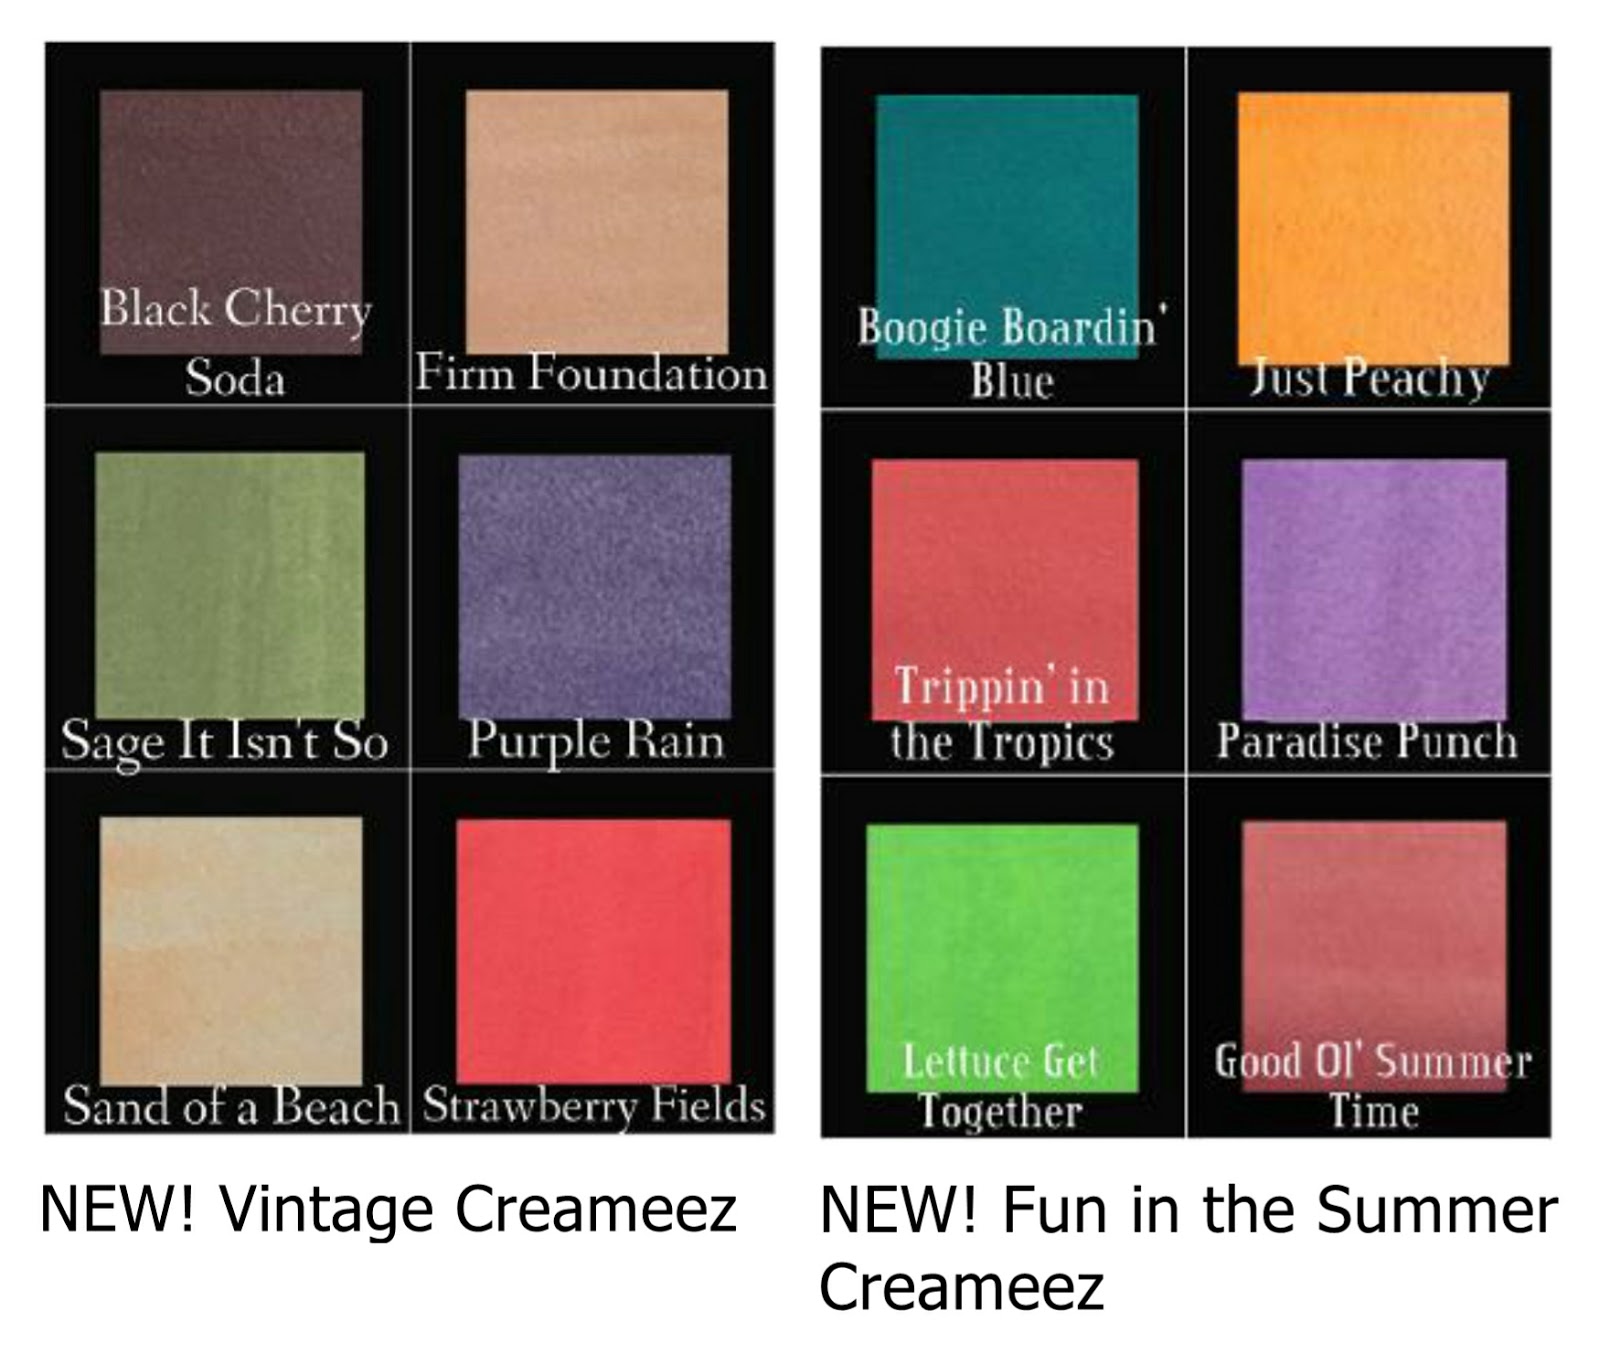
....AND....If you haven't heard the exciting news yet, Shimmerz has brought out a whole bunch of gorgeous new colors for their summer release! I'm super excited to give these lovely colors a go! I recently have been playing a little more with the Creameez paints and I just love the matte watercolor look they can give to a project!...I sat here trying to pick some favorite colors, but it's so hard to do, they are all so yummy! (Firm Foundation, Sage It Isn't So, Good Ol' Summer Time...seriously, how cute are those names too!). What's your favorite?
Hi all! It's been crazy with the weather here in Canada! Just when I think the summer weather is finally here, we get another cold spell! But I'm not letting that stop me from having some warm summery fun making up a beach style canvas! I recently renovated my laundry room and now am at the decorating stage. The colors I chose were in the soft aquas (kind of beachy/Cape Cod look). So I wanted to create some art work for my walls. So I gathered together some of my favorite Shimmerz paints products and got to playing!
Shimmerz Paints Products used in this video:
~ Taupe of the World Spritz
~ Don't Be Suede Coloringz
~ Glorious Day Vibez
~Jeni B Bleu Vibez
~ Oh Say Can U Sea Coloringz
~ Lime Shimmerz
~ Olive Green Shimmerz
~ Golden Wheat Shimmerz
As always I created a video tutorial so that you can watch step by step how I created this canvas. So grab yourself an iced tea, sit back, relax and enjoy! xo
I hope you enjoyed watching this project come together. Here are some of the close-ups that you can view at your leisure (the video doesn't give you a long time to look :) ....
I made some of the embellishments with some Martha Stewart air dry clay (starfish, barnacles).
All the chipboard accents are from Dusty Attic Designs. I love the effect the Shimmerz paints give the crooked fence design, the little bits of mica in the paint helps add that aged texture to the chipboard.
I also added some glass seed beads to the canvas for added texture.
I was really happy with the way the Taupe of the World Spritz looked on my chipboard anchor, I think it gives it a nice iron look!
Thanks so much for stopping by the Shimmerz blog today. I hope I've inspired you to get playing with your Shimmerz products! NOTE: If you'd like a FREE/Bonus Shimmerz product with your next order, be sure to mention my name 'Gabrielle' in the 'Instructions to Merchant/Seller' part of your order, to get bonus Shimmerz product in the color of your choice!


.jpeg)