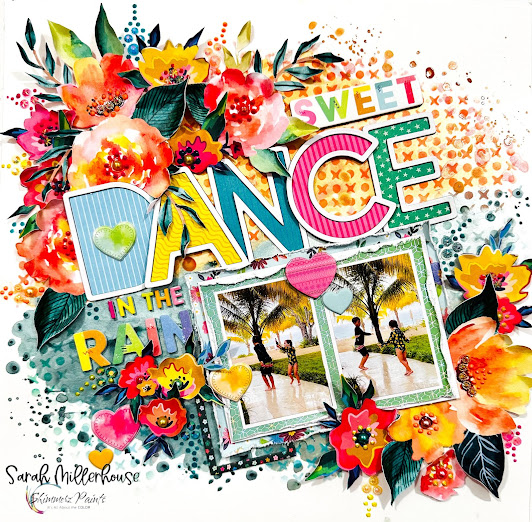
Hello! I am happy to be with you today to share my next layout using the July Color Kitz! I love the color combination in the Kitz this month, and I absolutely love the patterned paper in the Paper Kitz! I combined the paints and patterned paper with the Blooming Wild collection by Paige Evans.
I used four of the five colors in the July Color Kitz on the background of this layout. On the top half, I added the Inklingz - French Toast. I absolutely love this color! It is a beautiful light orange with a hint of pink! When it was almost dry, I added in splatters of the Vibez - Tangerine Dream.
On the bottom half of the layout, I did a combination of the Inklingz- Pistachio and Inklingz - Blue Spruce. I added the colors side by side and let them blend and bleed into one another. I love how those colors look together!
Once the background dried, I added distress ink through an XO stencil by Vicki Boutin. On top of that, I layered on my large letter and small letter combined title, using letters from the Blooming Wild collection.
I created three floral clusters using flowers from the July Paper Color Kitz that I fussy cut from patterned paper and flowers from Blooming Wild patterned paper that I fussy cut. I love how the colors and floral patterns speak to each other so well!
I added a few more embellishments from the Blooming Wild collection and finished the layout by adding some shiny bits and dots of Pops of Color.
I enjoyed every minute of creating this layout and hope it inspires you in some way! Remember to add my name to your Shimmerz Paints order to receive a free gift!
Hey everyone, Niki here with you today with a festive layout using lots of fun Shimmerz Paints!
There is a process video for this layout that can be viewed at the end of this blog post.
I started off by using a stencil and applying Tutti Fruitti Dazzlerz texture paste onto my white background. I left that to dry and then started applying a mixture of Inklingz and Creameez paints.
I tried to apply them using the packaging technique but this didn't really work because of the texture paste already on the background. I therefore used a paintbrush and added the colour that way. I then sprayed water directly onto the layout and let it run.
I added splatters and left my background to dry. I then coloured some white die cuts. I put Jolly Green Giant and Blue Lagoon onto a craft sheet and added water. I then dipped the tree die cuts into the liquid paint. I did the same with the houses but with Pink a Boo and Strawberry Fields.
I then assembled my layout with my photos and all the die cuts. I doodled around the die cut trees ad also doodled aroumd some of the texture paste snowflakes in the background.
I cut a big chunk out of the right side of the layout and added some patterned paper behind it. I also added pink pom pom trim which I stitched in place using my sewing machine. I also stitched through my title to keep the letters in place.
Here's another look at the finished layout:
Thank you so much for joining me today, I hope you have enjoyed my layout and you can also see the process video below.
Don't forget that if you place an order via the Shimmerz Store, put my name in the comments to receive a freebie!
Meet out special delivery, ( and a lil early) Christmas present - our new mini Dachshund puppy!
Isn't he just adorable?!! Puppy Love!
& talk about a one color wonder!
Texturez Patina is just sensational!!! A perfect color for all your Christmas creations!
I've applied it around the border of my white cardstock base, using a repeat snowflake pattern and palette knife. Once dry, I then add two larger snowflake stencils with the pretty light green Patina color. LOVE!!!
Texturez paints are just incredible!
They boast the sheen of our Dazzlerz paints with an added textural element.
Think Dazzlerz with a coarse, sand like substance within them.
Hey there Shimmerz Fanz! It's Niki back with you today and I am sharing a very busy and colourful layout. I started by cutting a Sunburst cut file (available in the Silhouette Design Store and it's by Paige Evans) which I cut into a sheet of 12x12, and layered over another sheet of 12x12 and then I used it as a stencil.
I added lots of colours of Dazzlers and Textures, mixing some of them together to create new colours, and also mixing with some Vibes sprays too for even MORE colours! I also sprayed directly onto my stencil with Vibez in some places too. As soon as my stencil had been covered, I removed it straight away before it dried too much, I needed to lift it away while it was still wet so it didn't get stuck.
My stencil was only made from cardstock so I didn't expect the finished result to be perfect but it wasn't bad! There was only bleeding in a few places, mainly where I had sprayed with Vibez, rather than had used the pastes. I left my background to dry and did some fussy cutting of a sheet of hearts paper while I was waiting.
Once dry I added more colour using my Vibes sprays and the packaging technique. I smooshed some more colour on over on the left side of the sunburst to add a water colour look and to act as an area to put my photo stack. I then added all those fussy cut hearts, around the circle, pretty much all raised up on foam pads.
I'd added some splatters with my Vibes but had a few stray marks where I didn't want them (D'oh, dont' you hate it when that happens!) so went looking for something to cover them up and found a big gold doily - perfect! I added a few layers behind my photo and added more hearts and embellishments.
I then went totally crazy on embellishments, more hearts and sequins and finished off with a small amount of journaling. What a crazy layout! I had such fun making it!
See my process video below:
The products I've used are:
Dazzlerz: Sea U in the Mornin', Sour Apple, Foiled Again, Tutti Frutti, Lemon Drop
Texturez: Crushed Coral, Gold Mine, The Tide that Binds
Spritz: Cotton Candy
Vibez: Jeni B Blue, Pop Art Pink, Deep Blue Sea, Sweet Heart, Snow Way Man.
If you are placing an order via the Shimmerz Website then put my name in the comments box and you will recieve a free gift!
Thanks so much for joining me today and happy scrapping xx
Hi Everyone, Beck Beattie today with a fun background to a sweet card I created using the my Shimmerz sprays to contrast against neutral tones of the pattern papers, florals and die cuts.
To create the colorful contrasting background I first layered up the three colors of Shimmerz sprays overlapping some of the colors in areas. I then dried off this layer before adding and additional layer using a stencil. I used the stencil by spraying the 'Pop Art Pink' onto the stencil and then stamped with it over the now colored cardstock.
To create the contrast I then added a number of die cuts in a neutral tone (Grey) and adhered them cutting off the excess before adding this onto my card with pattern paper and florals and embellishments.
The Shimmers sprayed color really pops against the grey die cuts and the effect looks so wonderful!
Here are some more pics so you can get up close to my project today :)
Hello everyone! Happy Superbowl Sunday Katty here! I hope you are all having a wonderful day!
I am back today to share another 12x12 layout.
Today I will be working with the new Paste-eez, these are the smooth dimensional pastes with a flat finish that we released last month. They are so fun to play with. I used two colors on this layout, Raspberry Sherbert and Hold the Mustard. I used them through a Prima Stencil. I layered the stenciled Paste-eez and some scallop shaped patterned papers on the bottom half of my layout.
The top portion was plain white. I wanted to add some color so I used a Coloringz in Oh say can you Sea with the same stencil. I also scattered around a few small flowers that I had cut out with my Silhouette Cameo. I colored them with a Coloringz in Mandarin Mai Tai and a Creameez in Berry Hot. I colored the rest with some gold paint from my stash.
I added block enamel dots to the flowers I scattered around and added a couple of simple embellishments. I created a long tittle mixing a few different fonts in coordinating colors, this is something I love to do.
This was a lot of fun to create. I'm really glad I decided to add the teal.
There is a process video on my YouTube channel if you'd like to watch.
Products used:
Coloringz: Mandarin Mai Tai, Oh Say can you Sea
Paste-eez: Raspberry Sherbert, Hold the Mustard
Creameez: Berry Hot
Thanks so much for stopping by! Remember, if you make any purchases from Shimmerz be sure to mention my name and receive a FREE product.
It's Beck BT here today to share with you a sweet Valentines day Card perfect for those of you running a little late in getting one made for your sweet heart. This card is super fun and thanks to Dazzlers has a lot of punch for not much product!
For my card today I used:
Shimmerz Paintz Dazzlerz in Sea U in the Mornin’ The Process:
Take a piece of white cardstock and make the base of the card to your ideal size
Adhere an additional piece of cardstock in a matching colour cut slightly smaller than the card base centered
Cut a piece of white cardstock again slightly smaller than the colored cardstock. Layer your desired stencil over the top (I used TCW542 - Rug) and stencil some of the divine Dazzlers paste over the top. You could choose any of these divine colours or even make a series of them in different colours. Allow to dry
Adhere centered to the card with some dimension added in between. I like to use discarded corrugated cardboard cut slightly smaller than the piece I want to adhere for this as it gives a nice flat finish.
Finish off the card with your chosen sentiments (I chose some Kaisercraft die cut elements) and some matching enamel dots.
Here is another pic so you can get up a little closer and see the beautiful shimmer as it catches the light.
Thanks so much for heading over to the blog today to check out my project! I hope I've inspired you and shown you how lovely a little Shimmerz Paints can go a long way to creating an amazing card!