Showing posts with label layering. Show all posts

Saturday, April 8, 2023

Happy Days | April 2023 Color Kitz | Sarah Millerhouse

Hello! I am so excited to share this new layout featuring the April 2023 Color Kitz and the April Paper Collection! I love how beautifully the colors and patterned papers and embellishments coordinate! I have a link to the full process video below! 


I started this layout by making the giant egg! I cut an oval on scratch paper, and then I cut 1.5 inch strips from the patterned papers in the Paper Collection. I used my herb shears (in place of fringe scissors...my herb shears work so much better!) to create the fringe along the edge. Once I layered up the paper, I added some pink ribbon from my stash to match the butterflies from the embellishment sheet. 


Once the egg was complete, I traced around it and moved it out of the way. I added the beautiful mediums from the April Color Kitz around the edge. I started with the Vibez - Deep Blue Sea and added it with a brush. I then layered on the Inklingz - Me & Blue. While all of that was still wet, I added on the Inklingz - Ice Sage. By adding the mediums while they were still wet, I got great movement and blending! I love how it looks!


On the bottom right side of the layout, I used the Inklingz - Loose Lips, Pink Ships from the March Color Kitz to tie in the pink on the layout. 


After adding my sweet Easter photos, I fussy cut out all of the beautiful embellishments from the Paper Collection. I absolutely adore the bunny and ducklings! The beautiful flowers were perfect for layering. 


I added detailing in the middles of the flowers using Pops of Color and lots of shiny bits. I love how layering the elements brought the theme of the layout to life! I added the title pieces from my stash and adore the final layout capturing a beautiful Easter memory!


The full process video can be found here: FULL PROCESS VIDEO
Be sure to add my name in the comment section of your next order to receive a free gift!
Have a beautiful Easter weekend!



Wednesday, May 29, 2019

Paper purging with Samantha

Happy Wednesday everyone! I hope you all had the best Memorial Day Weekend. I spent sometime purging my paper bucket. I never realized what a crafting hoarder I was! SO, the solution for that is play time! 
I've been hoarding my Paige Evans "Horizon" Collection for a while now. It's so pretty, I'm afraid to use it. Can anyone else relate to my anxiety? Ha ha! I finally decided I had the perfect colors to coordinate with the new collection. This is one of my all time favorite photos of me and my favorite person, my husband, Nick. The black and white photo helps add some contrast to tons of color. It's balances everything into perfect harmony.
I recently snagged this fun layered cut file from Paige Evan's Etsy Shop. Taking each piece, I just went to town using some of my favorites.
 * Iris My Case Shimmerz from the May Missy Whidden Color Kitz Set. This color is available in the set only, but it's to DIE for!
* And a tiny Dotz epoxy embellishment I've been saving since the March Missy Kit. (This Kit is no longer available but we've got TONS of amazing Dotz available in the Shimmerz Shop)
* The green leaves were painted with lime green acrylic paint

The awesome thing about Shimmerz products is how fast they dry. There's no long wait times. So you can keep trucking right along with your projects. Cause if you're anything like me, when you're motivated to  produce a project that's been stewing in your mind, you want to pump it out as soon as possible. Simple to admire the heck out of it!
After waiting around the 5-7 minute mark for my cute flower pieces to dry, I then hot glue my pieces together. Alternating colors so there's not a bunch that look like the others.

I layered a piece of plain white cardstock on top of this fun piece of paper from Paige Evan's Horizon Collection. Then center my picture and add the fun florals all around. I had some of these fun stickers hanging around too, so I figured "WHY NOT?!" and painted them with the pink and iris colors. These stickers are from American Crafts. I'm not 100% sure if they are still available on their website but I did in fact find them a while back at Wal Mart. The SECRET Sticker haven!

Thanks so much for stopping by. I hope this inspired you to clean out your paper collection and play! Now that I have, I'm so glad I did. Don't forget! The June Color Kitz will be available to play with starting Saturday, so swing by the Shimmerz Shop starting at 9 AM MST to snag them. You won't be disappointed! Thanks everyone!


Sunday, August 13, 2017

Queen of the beach | Anna Komenda

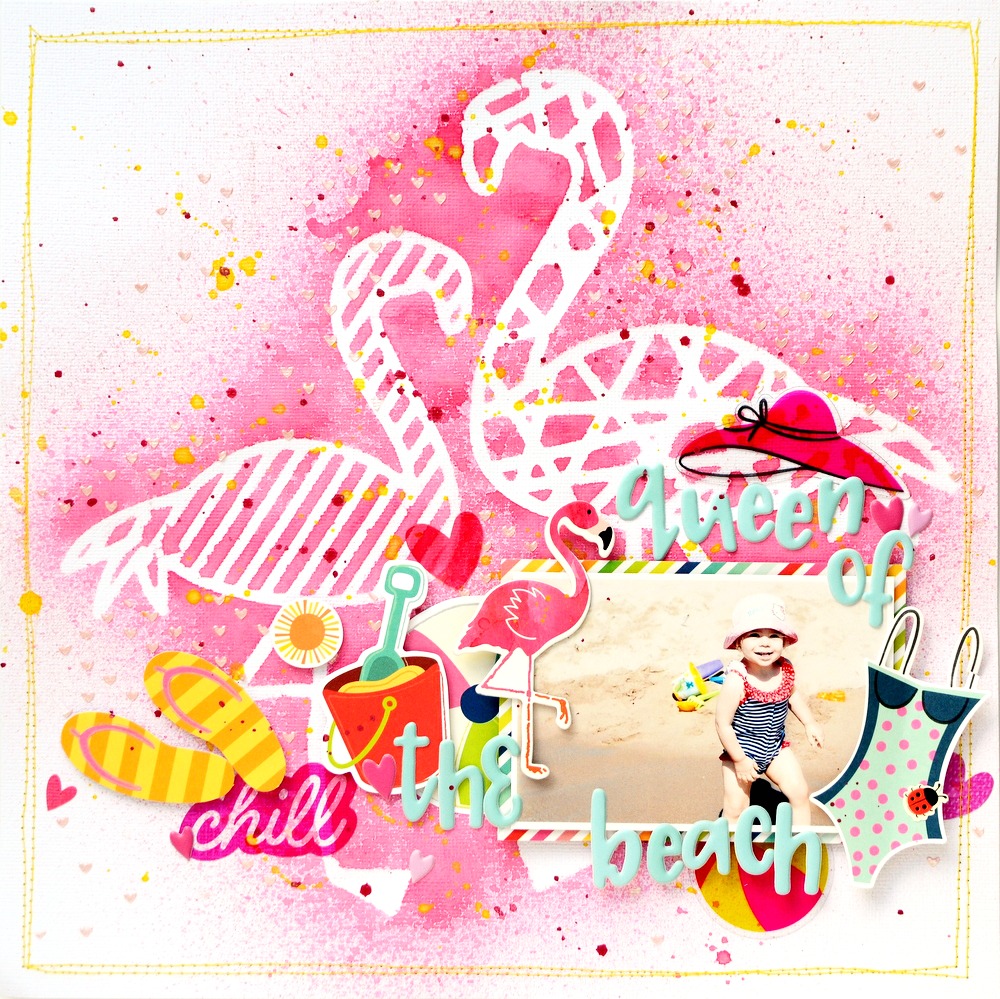
Hello everyone. It's Anna here with my August project and process video. Summer is my favourite season and I love creating summery, colorful pages. I am also a big fan of latest flamingo, pineapple and cacti trend. I do not travel to the very exotic places but still I like to use them on my pages.
Today I went crazy with pink and flamingos and I created a whole flamingo background.

I used Silhouette Cameo cut outs as my stencil. It's a really fun way to extend your possibilities. You can use a whole background stencil or just a small elements. This kind of stencil won't last long but let's be honest - how often do you use the same stencil? And I can still use the flamingos in second project :)


With those pretty birdies in the background I had to minimize the composition around my picture. I didin't want to cover too much. I use only small scrap of paper as a frame for my picture and some smaller die cuts to embellish page a little.


I also added some little hearts using a stencil and a Dazzlerz paste. It works perfect with details and I love how shiny it is. It looks like cotton candy. I also add yellow splatters using Shimmerz paint.


As always I have a video for you. The page is very easy and simple to make so the video isn't long. I hope it will inspire you to play with your mists and stencils.


That's all for today. Thank you for stopping by and see you in September with another project and video.

Shimmerz products:

XO Anna


Tuesday, July 11, 2017

Adventure Dog | Adrienne Alvis

Hello, everyone! We have the sweetest, craziest, most energetic, fur baby in our household and her name is Daisy! She is a yellow lab pup and she stole our hearts from the moment we brought her home! I've scrapped a few pages of her when she was a tiny puppy, but it's been a while so I have this fun layout to share with you today! 


I started by choosing a tiny pink and white, triangular printed piece of patterned paper from my stash and used some Acritonez in "3 Sheets To The Wind" to set the stage for the bolder colors I added. I simply took an old gift card from Starbuck's, dripped a little bit of the white Acritonez across my page, and swiped it horizontally using the gift card.


Next, I took another gorgeous Acritonez color in "Pinkadelic" and using the same "old gift card" method, swiped it over the dried white Acritonez...


I also used some plastic packaging and spritzed it with some Coloringz spray ink in "No Yoking" and gently pressed it around my background patterned paper so it would add a bright pop of color to my layout!


After the Acritonez and Coloringz dried, I sprinkled a few drops of Coloringz in "Well Blue Me Down" and "Don't Citron Me" around my page for a little extra color contrast. I layered a large cut file from Hip Kit Club on top of my background page and placed the photos of our lab, Daisy, on top of it. I layered a few chipboard stickers and enamel dots from my stash around my page and journaled  near the bottom to complete my layout!


I love how bright and happy the colors on this page turned out! I also love how well the black and white accents pop off the page and give it some added dimension! Thanks so much for joining me today and I hope you have a great week!


Sunday, February 12, 2017

Layout "Fantastic" | Anna Komenda

Hello Shimmerz fans. It's Anna here with my next project created with gorgeous Shimmerz products. 
Today I want to share with You a layout full of hand painted flowers. I've gone wild with drawing, painting and fussy cutting many florals. I had so much of them, that I didn't need to add a lot more embellishments to my page :)


There is also a process video for You.


I am not a watercolor artist, I didn't take any classes, I am no expert at all. I just love flowers and decided to give them a try. I watched few YT videos about painting flowers. I also checked some flower sketches to get some ideas about shapes and forms. I sketched my own flowers. They are not the copy of real flowers - just a variation.


I used a lot of Aqua Huez and Creameez to color my sketches but I also used mists as a liquid watercolors. I mixed colors to get new shades. I chose two small pictures of me and my little girls because, after all that work, I didn't want to cover the background.


I used a hot glue to attach the flowers. It helps to add dimension to the page without using 3D foam squares. Just be careful with You fingers. I lost my thumb prints long time ago :D


I like using multiply colors so I painted flowers using blue, pink, red and purple. Leaves and twigs combine all the flowers together creating this "wildflower bouquet" effect.
I really love how this page turned out. It's quite thick - perfect for framing and hanging on the wall.

I used a lot of products:
Creameez - Refresh mint
Spritz - Bamboo leaf 

Remember - if You want to get a free product while shopping at Simmerz store, don't forget to mention my name.


XO
Anna


Sunday, February 28, 2016

Layering Colors with Shimmerz Paints

Hi there Shimmerz Fanz! Melissa stopping in today with a shabby chic card made by layering colors to give extra dimension and interest. And it's super easy!


Here are the Shimmerz Products I used to make it.


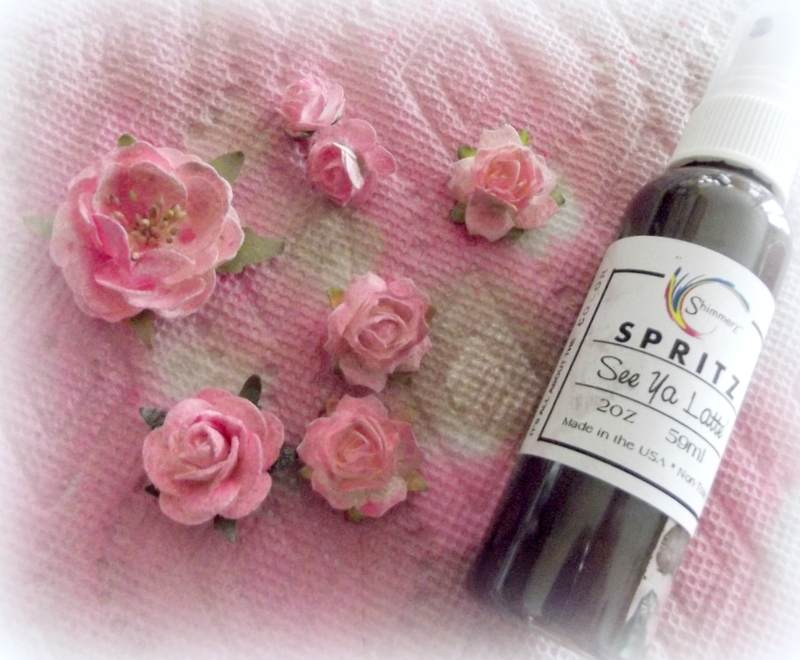
~  Cotton Candy and See Ya Latte' Spritz
~  Sweet Heart Vibez
~  Coffee Shimmerz
~  First Blush Inklingz

The first thing I did was "colored" my ribbon to give it time to dry. I first sprayed some seam binding ribbon with the See Ya Latte' Spritz. Leaving some of the white showing.


I then sprayed the ribbon with some of the Cotton Candy Spritz.


Both colors blend nicely together to give the ribbon a vintage look. Spray more color for a deeper look.


In your hand, scrunch up the ribbon into a ball and then set aside to dry. Takes 1-2 hours to dry completely. If you are in a hurry, you can dry it using a heat gun.


Next, using a dry brush or your finger add some of the Coffee Shimmerz to a white doily. Set aside to dry. It will only take a few minutes to dry.


Next, using some white flowers, spray a layer of the Cotton Candy Spritz. Next, a light layer of the Sweet Heart Vibez.


Then, again, a light layer of the See Ya Latte' Spritz. In this photo, you can see how the pink layers will dry lighter than when first sprayed. If you like them darker, keep adding layers until you reach your desired look. That's what is so great about these products, the more or less you add, the more different looks you can achieve.


After adhering the doily, ribbon and flowers to the card base, I went and added some First Blush Inklingz to the edges of the flowers for even more dimension and color. I used a simple water brush to add it.


I love these colors together. It gives the card a soft, romantic and vintage feel.


I hope you give these amazing products a try! There are so many colors and different textures of paints to blend together that the looks you can achieve are endless!


And don't forget, when placing your order, don't forget to add my name, Melissa B, to the "Notes to Merchant" section of your PayPal checkout! You will receive a Free Shimmerz Product with your order!!

Have an amazing day!!