Showing posts with label Cut files. Show all posts

Wednesday, May 11, 2022

May 2022 Color Kitz | Brianna Lepper

 Hey friends! Brianna here today sharing a new layout using the super gorgeous May 2022 Color Kitz!  This months kit is so bright and happy, you'll want to use it to document all of your Summer memories.  Here's my layout, make sure to check out my process video at the end of this post: 


I thought it would be fun to change it up a bit and I only used the positive pieces from the title cut file.  I painted each one using the colors from the kit and outlined them in black faux stitching to make sure they stood out from everything else.  


I popped them all up on foam tape and set them aside.  It's such a fun phrase for a title!


One more photo of the letters: 


Next, I created my background by spraying the Vibez Palm Reader and painting on the Shimmerz Here I Yam around the page.  I spritzed water and let the colors run and blend.  I even added a bit of the Creameez For Shore for some extra shimmer.  


I took one of the lemon cluster cut files and offset the inner lemon pieces so that they were sized perfectly when I went to back it.  I painted them using the Coloringz No Yoking and Inklingz Meet Me @ Sunset.  I painted the leaves using Palm Reader.  


After everything was adhered down, I matted my photo and put it down next to my cut file title.  I added some ephemera and included one of the Dotz.  


Here's another cluster: 


One more final shot of this fun layout: 


Thank you so much for stopping by today, I hope that I've inspired you in some way!  Make sure to add my name to the notes/comments section of all of your Shimmerz orders and you'll receive a free gift!  See you next month friends!
Brianna


Wednesday, November 10, 2021

November 2021 Color Kitz | Brianna Lepper

Hey friends!  Brianna Lepper here today sharing a new layout using the beautiful November 2021 Color Kitz!  The colors this month are amazing and I had so much fun created this Fall themed layout.  There's a process video at the end of this post, so if you'd like to see how this layout came together, I'd love for you to check it out! 


To start, I cut both exclusive cut files out on white textured cardstock and painted the colors from the kit onto everything.  It's hard to see the gold/yellow tones in the photos but you can see them pretty well in the process video.  I created my background by spraying and painting on the Rock-a-fella Blue, Tarnished Treasure and Greener Pastures.  I added some splatters and got the colors to move by spraying on some clean water.  


Here's a closer look at the background: 


After everything was dry, I adhered both the title and leave cut files and took the Dotz from the kit and created my embellishment clusters around them.  I love the dimension from the leaves, they turned out so pretty.  I also added in the woodland critters ephemera/stickers into my clusters.  


I finished off my layout by adding in some additional embellishments using one of my Felicity Jane kits that matched the Color Kit perfectly.  


One more up close shot: 


Thank you so much for stopping by and I hope that I've inspired you in some way today!  Remember to put my name in the notes/comments of all of your Shimmerz orders and they'll send you a free gift.  Make sure to check out my process video below and I"ll see you next month where I share a layout using the December Color Kitz.  Bye for now!


Friday, May 21, 2021

Fun Right Here | May 2021 Color Kitz | Niki Rowland with Process Video


Hi everyone, this is Niki (@nikiclairecreates) here with you today with a new layout and video (see below) using the May 2021 Color Kitz. This kit is awesome! I adore the colours. The Kitz contains five colours of Shimmerz Paint: Rule of Plum Vibez, Sugar Plum Shimmerz, Lettuce Get Together Creameez, Daffodil Creameez and Meet Me @Sunset Inklingz. The Kitz also includes an exclusive cut file, a set of three Dotz and a pack of cute little paper flowers.


I started off with the cut file. I cut it three times in white card in three different sizes. I then cut backing pieces for each one from Marshmallow cardstock. I then painted these backing pieces with three colours: Rule of Plum Vibez, Sugar Plum Shimmerz, Lettuce Get Together Creameez. Once dry I attached the cut file on top of each backing piece using wet glue and I also stitched around them with my sewing machine.


I then created a yellow background on a piece of Marshmallow card. I began with the beautiful Daffodil Creameez paint. I activated it with water and let it sit for a while so I had lots of lovely right paint and then I used a wide paintbrush to paint a very large area of colour on the right side of my layout. When that had dried a bit, I applied Meet Me @ Sunset to the background too, mostly around the edges of the yellow area I had created already and then I also added splatters of this colour all over the yellow area. Because the Daffodil paint was already dry, the Meet Me @Sunset paint sat on top and looks beautifully shimmery.


I then set about putting together the rest of my layout. I added torn strips of paper at the top of the layout. I mounted my photo onto yellow and green paper and I added twine to my lightbulbs to make them look as though they were hanging down – they look so pretty!

I added fussy cut flowers to the lightbulbs, as well as gold acetate butterflies, chipboard flowers, gold padded hearts and other embellishments. To each cluster I also added the cute little paper flowers from the Kitz.

I added in all three Dots from this month’s kit, they are such perfect clours and coordinate beautifully with the paint colours. I added in a few acrylic Perspextives: ‘&’ frame to the left of the photo, two pretty swans and little yellow starbursts on the yellow painted area.

I finished off with some sequins from Spiegelmom Scraps (Jewel of the Nile) and some more splatters of Daffodil paint. Here's another look at the finished layout:


I think this layout turned out really pretty! I hope you have enjoyed it. Don’t forget if you place an order via the Shimmerz Store, put my name in the comments to receive a freebie. Enjoy the process video below:

Thank you so much for joining me today and happy scrapping

Niki xx

@nikiclairecreates


Tuesday, March 9, 2021

March 2021 Color Kitz | Brianna Lepper

Hey friends!  Brianna Lepper here sharing a new layout using the absolutely stunning March 2021 Color Kitz!  I couldn't wait to create with this kit because the colors in it are so beautiful!  


Here's my layout: 


To start, I cut the cut file out on white textured cardstock.  While I was still in my Silhouette Design Software, I duplicated the cut file and offset the inside pieces of the word 'sunshine'.  I planned on painting the backing pieces using the Gosh Garnet and French Twist Inklingz and the brand new Vibez Pink Lemonade from the kit.  By doing this, it made it so much easier when I went to adhere the backing pieces on.  I love letting my Silhouette do the work for me!  


While my backing pieces were drying, I got to work on my background.  I loosely painted on the Blue My Mind Inklingz and also sprayed on a bit of the Shimmeringz in Goldie Lox.  The gold in all of these colors really brought everything together.  So pretty!  I also painted a bit of the Goldie Lox onto the 'Hello' word in my cut file.  


Before I started backing the rest of the cut file, I applied thin foam strips to the entire thing.  After I backed it, I started applying a heavy amount of liquid glue to each of the letters and carefully sprinkled on the Gold Foil pieces from the kit.  This made the entire page so much more sparkly!


I then adhered the entire cut file to my background and got to work on embellishing.  I created little clusters around my photo using the Dotz from the kit and made sure to add some gold tangled thread underneath them.  


I added a few chipboard stickers and a really fun rainbow embellishment.  The colors matched the Magical Forest collection by Crate Paper so perfectly!  


Here's one more up close photo.  I just love the shimmer and all of the texture and dimension.  


For a more step by step process of how this layout came together, make sure to watch my video below!


Thank you so much for stopping by today!  I hope that I've inspired you in some way! Have you had a chance to pick up the Color Kitz yet?  Make sure to do so before they sell out, you're going to love this kit!  See you next time friends!  

-Brianna


Tuesday, December 15, 2020

December Color Kitz | Brianna Lepper

 Hey friends!  Brianna Lepper here today sharing a new layout using the absolutely gorgeous December Color Kitz!  For $27.99 + shipping, this is what you'll receive in the kit: 


Seas The Day Vibez
Bubblegum Blast Shimmerz
Granny Gray Spritz
Buddy's Favorite Color Shimmerz
Olive Branch Spritz
1 exclusive layered process "By The Chimney With Care" cut file created by Shimmerz Paints 
1 set of "Oh What Fun" Dotz
1 package of Silver Dusting Embellishmentz

Here's my layout: 


To start, I cut the cut files out on white textured cardstock.  In my Silhouette Software, I offset the backing pieces to the ornaments with the intention of painting them.  While they were cutting, I started on my background.  I prepped a piece of thick white cardstock with gesso and painted on the colors from the kit.  I blended and splattered each color and created a fun, watercolor background.  


I then sprayed the garland pieces using the Olive Branch Spritz color.  If you want more of a deep and rich color, you can always add a few more coats!  I wanted a more lighter green so I only applied one coat.  


The ornaments on the larger cut file are so cute and I immediately wanted to make little shakers with them using the Silver Dusting Embellishmentz.  They're so fun and shiny!! 


Here's an up close shot of a different ornament shaker: 


Next, I scattered the exclusive Dotz around my page and added some tangled thread under each one.  


Then I embellished using some items from my stash and added my title to the page.  I'm really enjoying using up a lot of my stash!  


I really love how this layout came together! It was so fun layering the cut files and creating little shakers inside the ornaments.  


Thank you so much for being here and I hope that I've inspired you in some way today!  Make sure to add my name to the notes/comments section of your next order and you'll receive a free gift!  Check out my process video below for a more step by step process.  See you in my next post!


Thursday, October 1, 2020

The October Color Kitz Collection | Samantha Robles

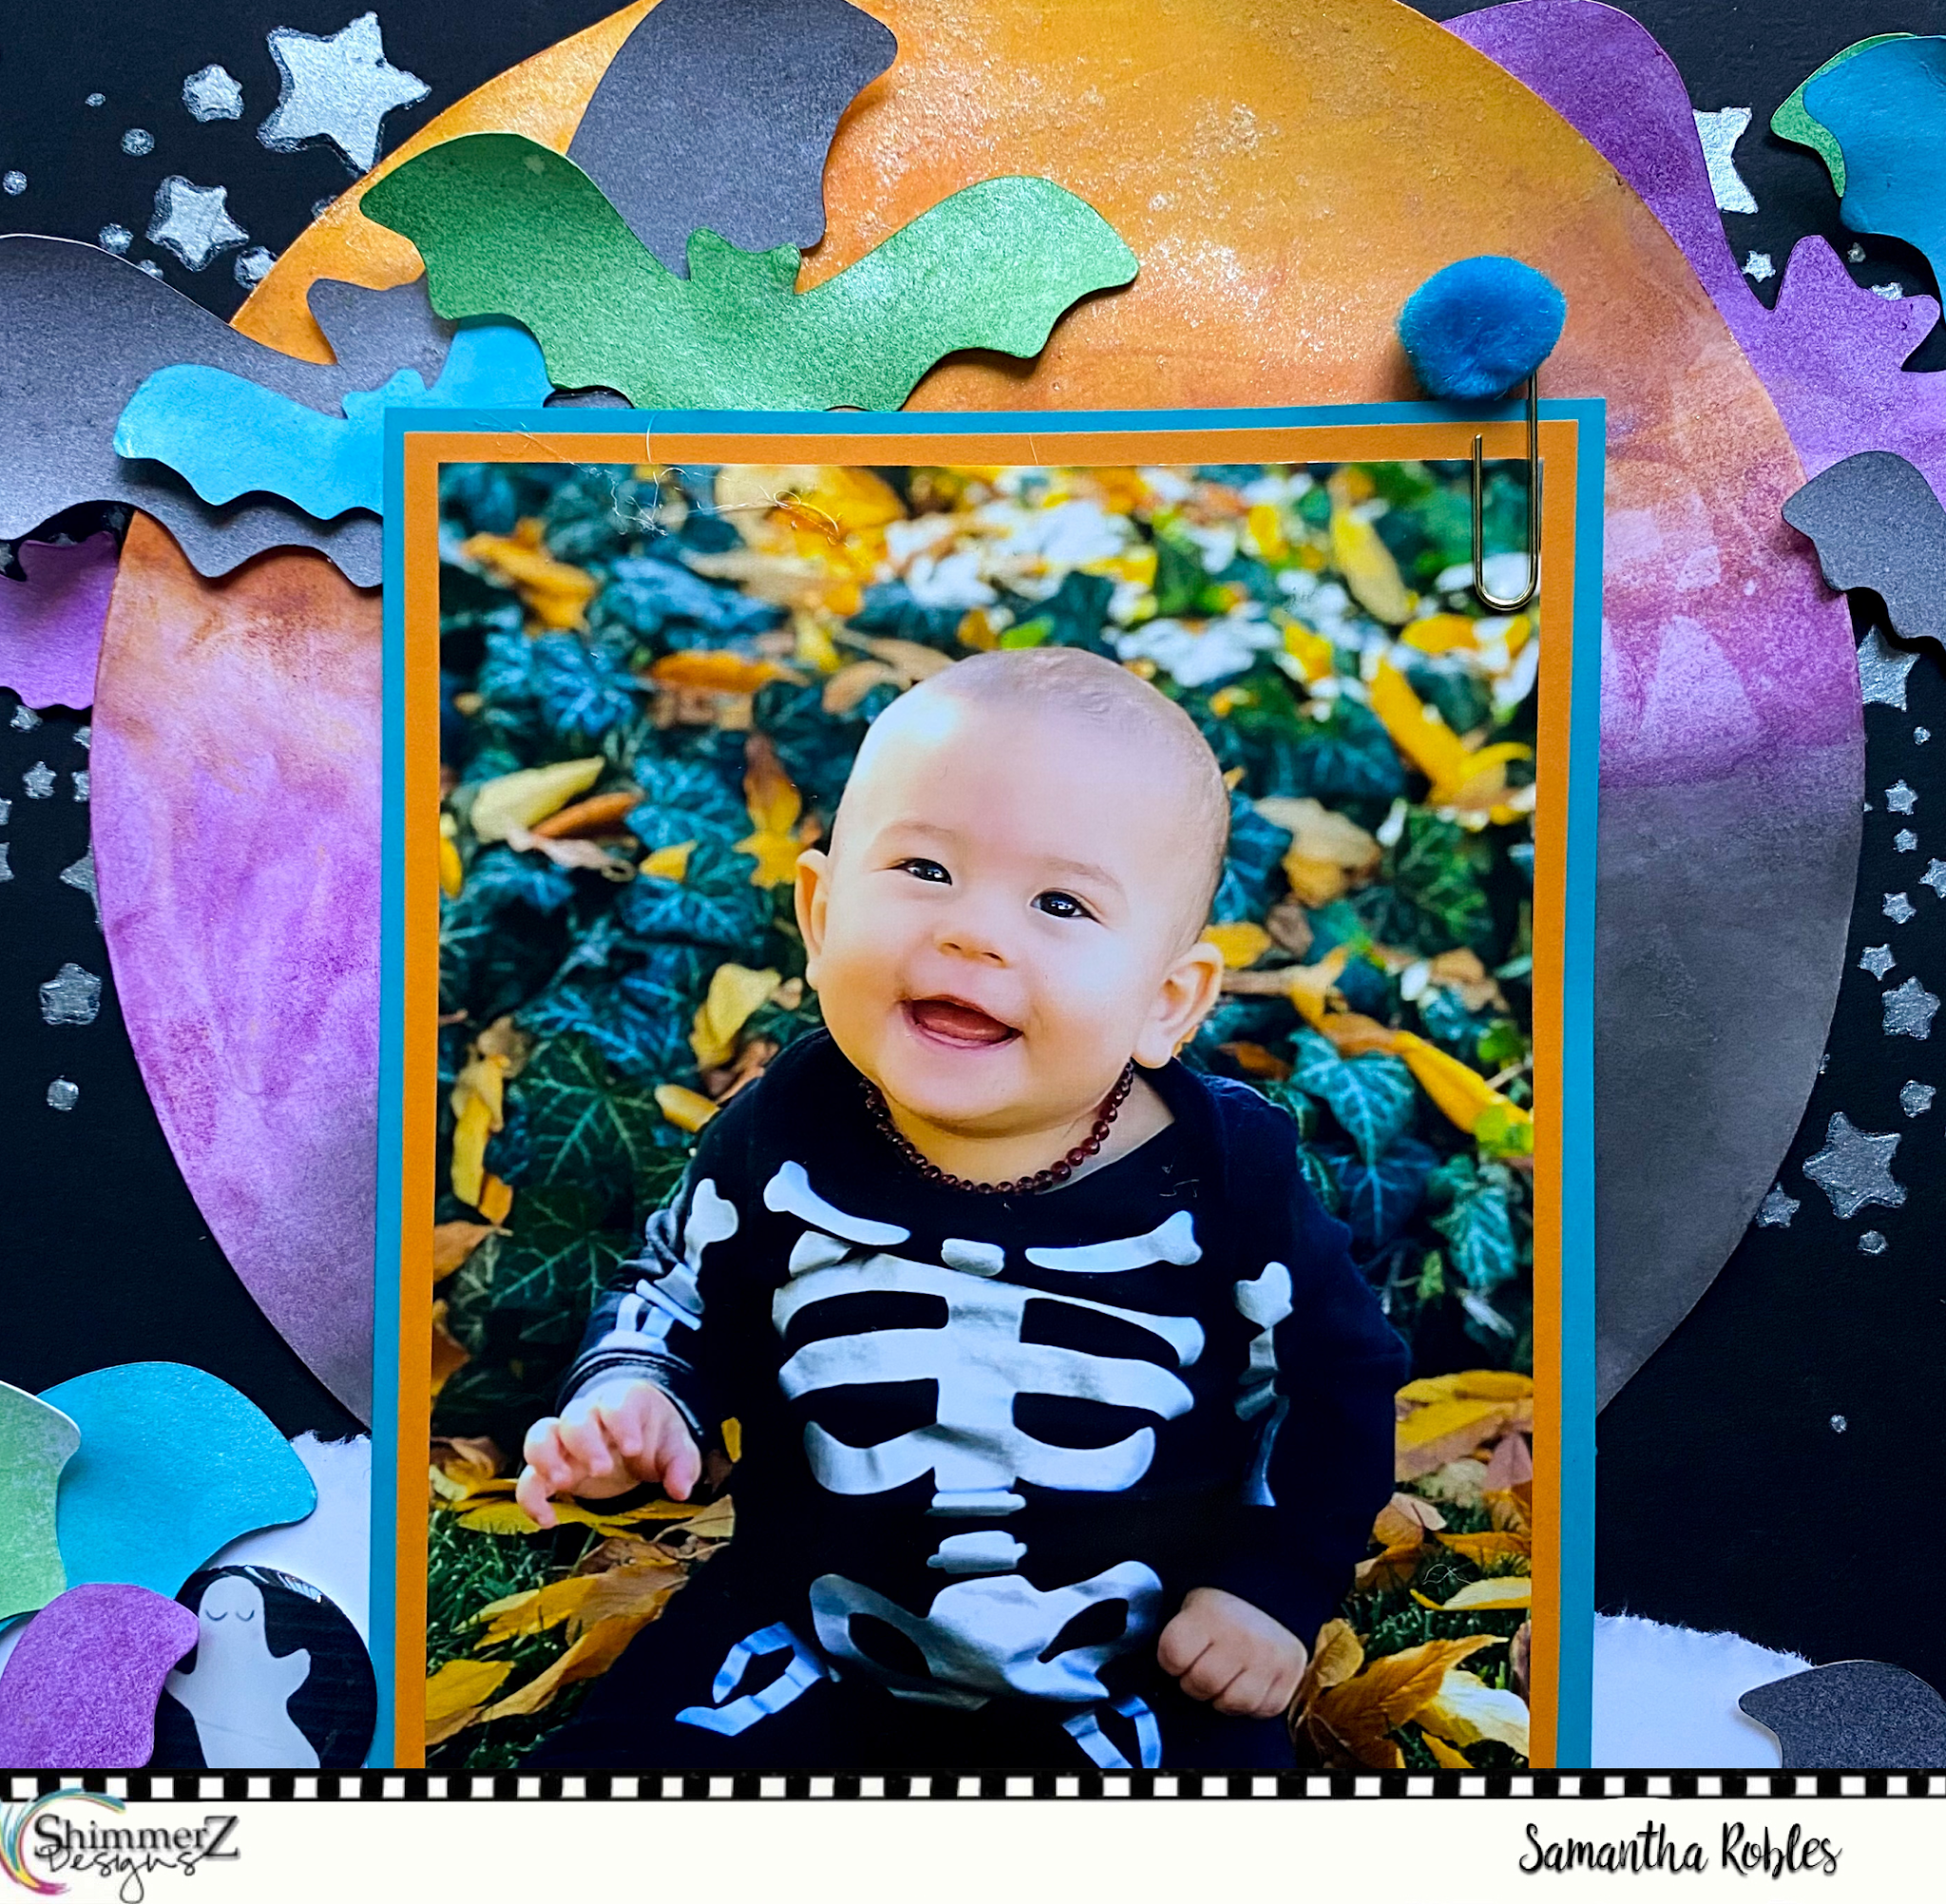
 Hi everyone! It's finally October, which I think is the best month of the year. The changing colors, cooler weather, Halloween! I'm all about the skulls and spooky things. Which is why The Shimmerz Paints October Color Kitz Collection is by far my FAVE of this year. I've had this photo of my son saved for years now. He's dressed up on his first Halloween as a tiny skeleton. The cutest one I've ever seen. The perfect brew for this month's kit!

I started my process by cutting the exclusive cut file available in the kit. I'd like to think it's Justin Timberlake approved (wink wink). I then back my cut file with a sheet of "Night Sky" by Carta Bella. After that, I then stencil on some Shimmerz Paints Foilz in "Silver Dollar" with my Paige Evans Stars Stencil. I wanted a spooky night's sky to go with my moon.

I started my moon soon after by cutting a circle out and using clear gesso all over. Once my gesso is dried, I take some cheap makeup sponges (such as THESE) and smudge in my:
  • Taupe of the Mornin' Spritz
  • Marigold Shimmerz + a small touch of Bumbly Bee Shimmerz
  • Plum Pudding Spritz


Let that sit for about 20 minutes or so. While my moon is rising (Haha, get it ;) ) I then cut out four of the new Layered Bats Cut File and begin to spray them with all the sprays in the kit. Including the new exclusive Vibez shade: Love Potion #9.
Once all my pieces are dry, it's time to glue and add the adorable exclusive Dotz to add the finishing touch. So boo-tiful and spook-tacular for the season!

Thanks so much for stopping by. Don't forget, we only have limited supplies of each Kit. Make sure you grab them while you can. While you're at it, treat yourself to some other Halloween faves in the Shimmerz Shop. We have tons of new cut files, embellishments and our new product, Foilz.

Have a wonderful weekend!


Saturday, November 2, 2019

The November Winter Wonderland Set with Samantha Robles

Happy November everyone! I cannot express to you how much I adore this time of year. Everything feels magical. Whether it's snowing, Christmas magic or just the endless amounts of cuddling. I love it. The November Winter Wonderland Set from the Shimmerz Paints Color Kitz is just that. It's a perfect transitional kit. You get the warm rustic colors mixed with the chilly Winter hues. It's the perfect set for November.
So, I bought these adorable chip board snow globe pieces last year. It was just a fun little random find. I started this project by painting the chip board "When Skies R Grey" Shimmerz. It took 2 coats to fully cover the chipboard and it's dark edges. While that's drying, I started on getting my Snow Wreath cut file ready to cut. This cut file was created by Paige Taylor Evans with this kit in mind. It's totally exclusive to Shimmerz Paints. Pretty cool, right?!
I try with my layouts to multi task multiple pieces at a time. That way it can all come together at one time. I found this "Snow Cute" chipboard piece in my stash from "Scrapaholics" and decided to mix things up. I mixed white acrylic paint with "Moody Mauve" Coloringz and just started painting a layer on. The acrylic will give it a good base to hold on to. After that piece has dried, I began spraying it with some more Moody Mauve. This piece I did let sit and dry overnight because I did make the mistake in over saturating it.
I LOVE how it turned out. It's got a snowy rustic look to it.
I had some leftover little flowers leftover from a previous project. I used the Mochachino and Penny 4 Your Thoughts Inklingz on the flowers to add that cute little touch. I also picked up these fun foam snowflakes from Hobby Lobby to give this page more of a 3D effect. This kit also includes some adorable Dotz, made exclusively for this kit. I put those in the snow globe, added some sequins from Spiegelmom Scraps and it all tied together. Guys, I cannot express how this layout got me so excited for the season!

Now, run to the Shimmerz Shop before these Kitz FLY off the shelves. They do tend to go pretty quick because you're getting such a great value. Thanks a ton for stopping by!

Happy November!

-Samantha 

Saturday, September 21, 2019

"First Day, oh yay!" by Samantha Robles

GOOOOOOD Saturday morning everyone! I'm so excited to share this fun layout process of my sweet boy's first day of Preschool. We're homeschooling Oakley so we didn't have the typical first day photo. Which means, I didn't make a typical school layout. No pencils, no textbooks. Nothing like that here. I wanted a layout the shares Oakley's "bubbly" personality in the photo.
The only B2S item on this layout is the fun "Preschool" sticker I found at Joann's. How I started this layout is with some of the colors found on the 3D sticker. Lots of vibrant colors. What I love about this sticker is it's not TONS of primary colors. Primary color school things are not my jam. The colors that matched perfectly to the sticker are:
4 Leaf Clover Spritz
Sweet Heart Vibez
Snow Way Man Vibez
Chick-a-Dee Spritz

After getting my colors ready, I cut circles out using my Cricut. These circles are found in any cutting machine program. I cut anywhere from 4.5 inches to 2.75 inches. Lots of random sizing. After my circles are all cut and ready, I prime them using Vicki Boutin's gesso. THE BEST GESSO EVER! It's like crafting butter. It's awesome stuff.
Next, I spray each circle. I cannot stress this enough: Do not worry about making it perfect. Some spots will absorb better than others as you can see. You want that though. 
You can add as many layers as you want. The more layers of color you add, the more vibrant the get. Let those circles sit and dry for about 20 minutes. If you add more, let it sit about 10 minutes longer per layer. 
Once your circles are dry, they're ready to add on! I did put my 3D sticker on first so my circles would surround it and the photo. Making them the center focal point. After adding my circles on, I journal at the bottom of the page. I did make a mistake in that. I chose a Sharpie pen that matches the 4 Leaf Clover but it showed up super light. Lesson learned. It does NOT look like it does on the lid, he he!
The final touch is adding some fun thread to add on the fun messy look. And there you have it!
Thanks for popping by. Don't forget, tomorrow the Shimmerz Paints Website is getting a facelift, so just hang tight if you're shopping tomorrow. It'll be so worth it, I promise!

Sunday, August 11, 2019

Missy Whidden Color Kitz: The August Edition with Paige Taylor Evans

I created a new layout to share with you today using the Missy Whidden Color Kitz: The August Edition and an exclusive hibiscus cut file I designed to go along with it!
Riverfront Spokane by Paige Evans
- 2oz bottle of Plum Pudding Spritz
- jar of Pining For You Creameez
- jar of Beets Me Inklingz
- jar of an exclusive new color: Rita on the Rock Shimmerz
- package of three exclusive Dotz: "Paradise Party"
- exclusive hibiscus cut file created by me!
I started by cutting the cut file from textured white cardstock using a Silhouette Cameo 3 and then placed it onto another textured white cardstock background. Then I applied white gesso across the entire thing and let it dry.
 Once dry, I added all the Shimmerz from the August kit, plus one more color - Pink Stilettos Coloringz. I sprayed the background with water to let the colors blend and move and do their thing then set it aside to dry.
 I tried peeling the hibiscus off the mat but it was totally ripping and peeling off the colors. Oopsies! Time to think of a plan B! I die cut the hibiscus again and simply glued it on top, slightly off-set. I like the contrast this provides and you can see the textures peeking from behind.
 I added a photo of Jane tucked into the top and placed two of the three August kit Dotz by the photo. To finish I used the mini foam Thickers from my Whimsical collection to create the title and wrote journaling with a purple pen below.
 This layout only took about an hour to make! That's so fast for me and I LOVE it when that happens.
I hope you are inspired to check out the Missy Whidden Color Kitz: The August Edition along with the hibiscus cut file I designed exclusively for this kit! Thanks for stopping by!