Showing posts with label Olive Branch Spritz. Show all posts

Tuesday, December 15, 2020

December Color Kitz | Brianna Lepper

 Hey friends!  Brianna Lepper here today sharing a new layout using the absolutely gorgeous December Color Kitz!  For $27.99 + shipping, this is what you'll receive in the kit: 


Seas The Day Vibez
Bubblegum Blast Shimmerz
Granny Gray Spritz
Buddy's Favorite Color Shimmerz
Olive Branch Spritz
1 exclusive layered process "By The Chimney With Care" cut file created by Shimmerz Paints 
1 set of "Oh What Fun" Dotz
1 package of Silver Dusting Embellishmentz

Here's my layout: 


To start, I cut the cut files out on white textured cardstock.  In my Silhouette Software, I offset the backing pieces to the ornaments with the intention of painting them.  While they were cutting, I started on my background.  I prepped a piece of thick white cardstock with gesso and painted on the colors from the kit.  I blended and splattered each color and created a fun, watercolor background.  


I then sprayed the garland pieces using the Olive Branch Spritz color.  If you want more of a deep and rich color, you can always add a few more coats!  I wanted a more lighter green so I only applied one coat.  


The ornaments on the larger cut file are so cute and I immediately wanted to make little shakers with them using the Silver Dusting Embellishmentz.  They're so fun and shiny!! 


Here's an up close shot of a different ornament shaker: 


Next, I scattered the exclusive Dotz around my page and added some tangled thread under each one.  


Then I embellished using some items from my stash and added my title to the page.  I'm really enjoying using up a lot of my stash!  


I really love how this layout came together! It was so fun layering the cut files and creating little shakers inside the ornaments.  


Thank you so much for being here and I hope that I've inspired you in some way today!  Make sure to add my name to the notes/comments section of your next order and you'll receive a free gift!  Check out my process video below for a more step by step process.  See you in my next post!


Sunday, November 26, 2017

Autumn Enchantment Junk Journal by Joyce


Hello my fellow Shimmerz Sirens!


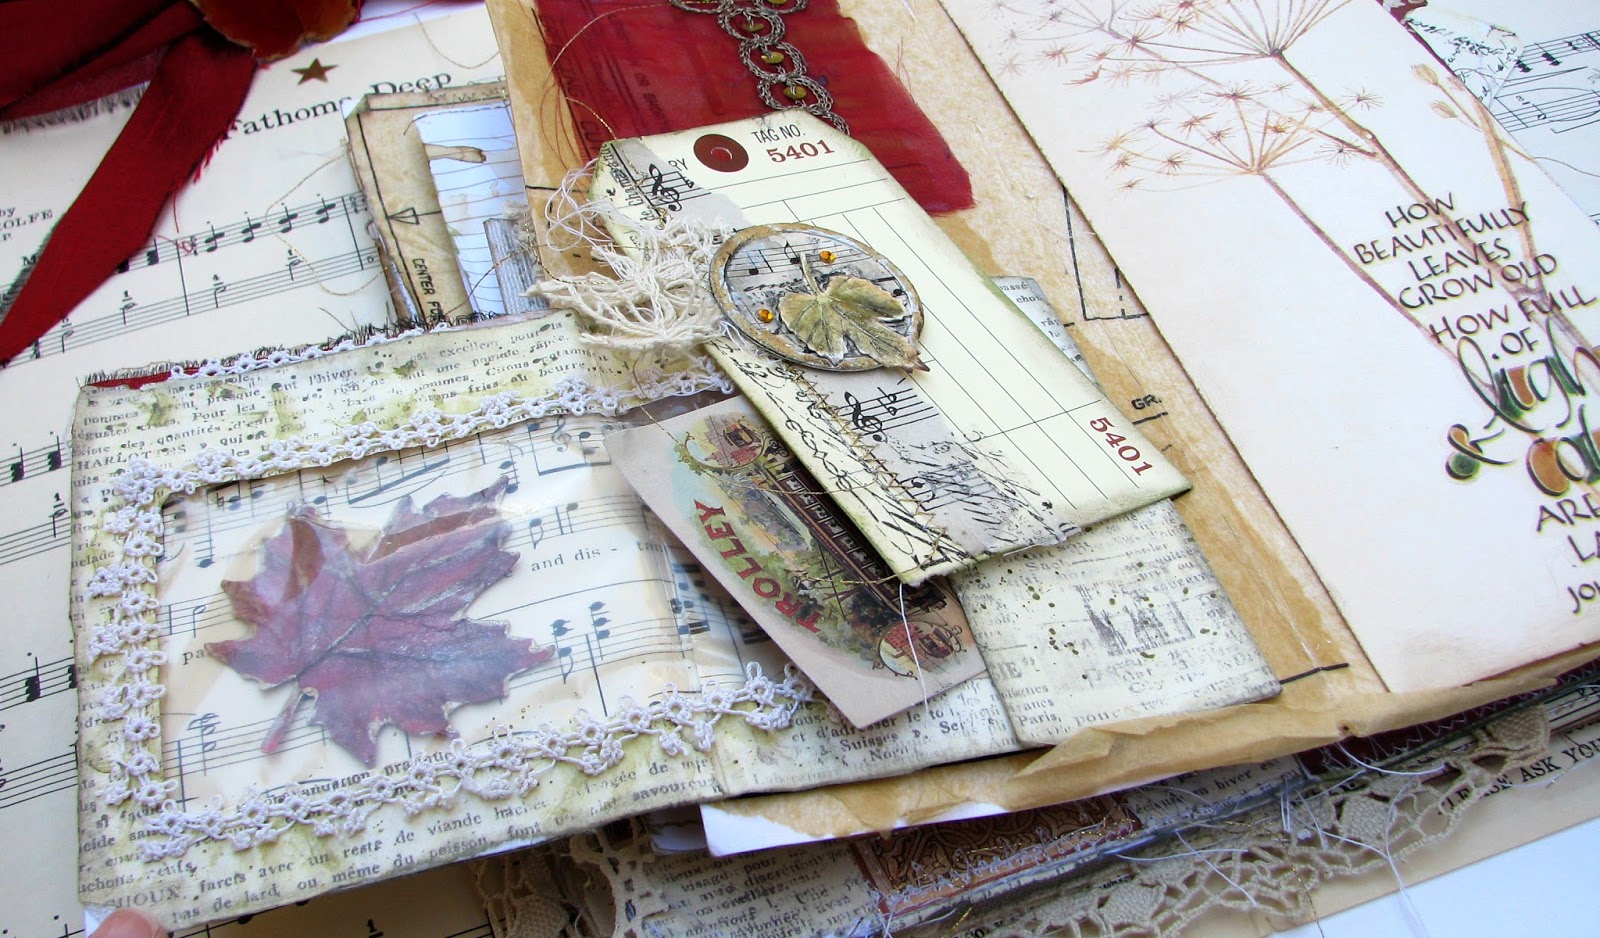
I’ve got a new junk journal to share with you today featuring lacy bits, embellishments made with Shimmerz Paints products, some pattern dress paper, pages from the Edith Holden’s nature books, ephemera, and lots of other artsy stuff we like.

I put together a little slide show on my new You Tube channel and you can find it here.


Or, if you like, you can browse through some of the photos I have included in this blog post, and I’ll share the products I used too.

I didn’t realize that by combining Shimmerz Candlelight and a Spritz that I could achieve a little element that looks like metal, or resin.  I think adding a little foam pop up underneath the leaf helped give the leaf some dimension. I just loved how these die-cut leafs turned out, and they fit perfectly on a medium sized metal rim tag.  So here’s how you can achieve that look too: 


With a toothpick, apply Shimmerz Candlelight over the die-cut and try not to cover the outer borders too much. Then while the product is still wet, dip your paint brush in the Spritz and apply to one side of the die-cut and let the products merge. Gently push some of the Spritz to the other side of the die-cut, but sparingly.   I like to apply most of the Spritz to one side of the leaf. When dry, apply a watercolor pencil to areas you want to enhance and let it dry. With a small ink pad, gently pat around the outer of the edges to darken them a little. And, finally I added some Blingz Gold to the outer edges on the metal rim to age the tag up even more You’re done! Easy, right?  Pssst...doesn't that crusty, bitty gold Blingz around the metal rim look good? I love it!
 

What I like about the post cards below are that the Paste-Eez applied over a stencil makes the pattern stencil look like an authentic dried leaf.


The Maple Leaf embellishment (see below) details were posted in an early blog post here on the blog if you want to try them out too.


Thanks for letting me share my new journal with you, and I sincerely hope you try out these products to create your own embellishments.


Wednesday, November 15, 2017

Maples Leaves by Joyce

I found another use for those Tim Holtz tickets....a place in my autumn junk journal.
Well, you know me by now.... I just couldn't leave those tickets, as cute as they are, without embellishing them a little.  And, so I did with Shimmerz Paints.

I 
I punched some maple leafs out of a Canson watercolor paper pack and applied Bleeding Heart, Heavy Metal (I like how some of the shimmery grey matter from the paint spreads out on the paper and puddles on the leaves) and a little bit of Olive Branch too, but just a little bit to each of the leaves. When they dried, I crumpled up each leaf to break down the paper fibers and add some wrinkles to them.  Then I folded the paper leaf down the middle, and with the two thumb nails, I pinched the leaves down the middle to form leaf veins.  Then I applied the same method over the rest of the leaf. Applied some dark ink pad around the outer edges of the leaves.  And finally, I dabbled on some Shimmerz Candlelight to highlight the peaks of the folds.  They look and feel like weathered leaves. And, they were so quick and easy to make too.


I can't wait to show you where these fall embellished tickets ended up.  Come back and visit me here on November 26th, and I'll share their new home with you.  And, you will see some more pretty little lovely leaves to share using different Shimmerz Paints products too.


Sunday, October 15, 2017

Autumn Tags by Joyce

Like so many of you, Autumn is my favorite time of year.  Now, and when I was a kid, if I find a pile of faded dead leaves ahead of me on my walking path, I stomp on them just to hear the crunchy noise they make under my shoes.


These tags weren't anything like I thought they would turn out to be. You know how you have a certain idea in your head while creating, and a little happy accident materializes? Well, these are my little happy accidents. I first spritz over bright colors of yellow, orange, green and red and they were just too bright for my taste that day. I added some gesso over my work to tone down the colors, and by doing so, the colors blended and toned down to warm dusty autumn colors.  I added some elements I received in some happy mail from my art buddy and soon the tags were creating themselves. I love it when that happens!

Shimmerz Products use on this project were as follows:

Spritz - Tuscan Sun, and Olive Branch
Vibez-Snow Storm

Coloringz-Bleeding Heart, and Mandarin Mai Tai

I hope you experience a little happy accident too.

Thank you for letting me share with you.


Monday, July 17, 2017

Friendship card with Astrid

Hello lovely Shimmerz friends, - today I have a card to share celebrating friendship.

The card is made with two different panels and here is the list of products I used:
Paints:
Inklingz: Meet me @ Sunset, Miner Miner 49er Penny 4 Your Thought and Tarnished Treasure.
Creameez: Sage It Isn't So
Sprays:
Vibez: Egg Noggin
Coloringz: Chocolate Brownee
Spritz: Olive Branch, Treasured Hymn
For the dark background panel I used Kraft card and painted it first with Penny 4 Your Thoughts. Then I used Tarnished Treasure through a stencil to add a bit of variation.

The central panel was dry embossed with an embossing folder and then colour was added with the help of the paints and sprays.
The large leave cut and embossed with the Tim Holtz layered leaf die and embossing folder was first painted with Sage Is N't So and then I added some Olive Branch Spritz for a bit more variation.
The little wooden butterflies were first stamped with a script stamp in Archival ink and then coloured with Miner Miner 49ner and then darkened with Penny 4 Your Thoughts and Tarnished Treasure.
The friends label was just a little embellishment from my stash...
Well, that's it pretty much, - hope you like my card and of course, - thanks for your visit like always!
And if you decide to order some of the lovely Shimmerz products from the store


Thursday, June 15, 2017

Wild Caught


I was attracted to the dark murky dusty colors with subtle hints of cream, and peachy/coral colors illuminated by the light.  Desperately wanting to create with this photo, I quickly took inventory of my Shimmerz Paints inventory, and “voila.”  I had all the colors I needed to create an art journal entry entitled, “Wild Caught.” 

Here’s how I created a paper swimming hole for my dear mermaid who appears to be young, and fortunately for me inexperienced about such matters as getting caught by a hungry creative soul like myself. 

Book Pages:

White gesso over portions of book pages.
Clear gesso over the white gesso so that the mist colors won’t be resisted by the white gesso.
Stamp, using water resist ink, and emboss over various areas of the paper.
Spray a light mist of water over the book pages to help absorb the following Shimmer Paints:
Shimmeringz – Heavy Metal
Vibez – Deep Blue Sea
Sptiz –Olive Branch

Paper Clay Starfish:  I hand cut this starfish out of paper clay to use as an embellishment and applied some Shimmerz Peachy Keen, Taupe of the Morning, and Deep Blue Sea. 

Chipboard embellishments were posted in an earlier post of mine with all the details. You may find details here.


She’s such a pretty mermaid….I may have to set her free.

I hope I have inspired you to create something whimsical in your art using Shimmerz Paint Products.


Monday, May 29, 2017

Embellishments by Joyce


This post is primarily about creating embellishments for our projects using Shimmerz Paint products.  I thought I would share with you some of my embellishments that will be used on my upcoming Shimmerz blog posts and maybe inspire you to create some of your own.

Faux Encaustic – metal rim office tag:

My newfound go to Shimmerz product is….”Paste-eez!”  The product is dimensional and can create a lovely milky ethereal faux encaustic look without the hassle of melting bees wax.  This embellishment started with one of those white metal rim tags you find at the office supply store.  Apply some Shimmerz paint to the white part of the tag, let dry.  Apply some paint brush splatters of Shimmerz Vibez Snow Storm on top of the paint, let dry.  Affix a fussy cutting of a butterfly, let dry.  Finally, apply a coat of Paste-eez, Salt of the Earth (not too thick of a coat) with a small spatula.  The important thing to remember is to let the Paste-eez dry naturally if you want a faux encaustic appearance.  Simple and easy. Right?  Now, I want to run to the office supply store and find the smaller metal rim tags….more Paste-eez please!  Warning:  It’s addictive, and you will want to apply this product on everything.

Here’s what the embellishments look like on a finished page of my little whispers book.


Tag: Gesso; apply a little torn bit of a doily piece to one side of the tag; apply bits of fiber paper with a matte medium; using a paint brush I applied Spritz-Bamboo Leaf and Spritz-Olive Branch.


Blue Fern Studios shell chipboard

Gesso the chipboard; apply fiber paper on chipboard using a matte gel medium and dry thoroughly.

Apply a diluted application of Coloringz – Peachy Keen over chipboard, being careful to  leave small spaces of white gesso intact; then apply full strength Coloringz-Peachy Keen in valleys of the fiber paper using a small paint brush, dry each application thoroughly; apply Spritz-Taupe of the World with a very small fine paint brush in to the little valleys of the fiber paper and dry thoroughly; use a very sharp charcoal watercolor pencil in the little valleys to create depth and contrast; if the lines look too hard and harsh, apply a fine mist of water and let the products loosen  and flow, dry thoroughly; lightly go over raised areas of the chipboard with moistened Creameez-Marshallow that has been allowed to thicken so that you may use your finger to swipe some and add over the top of the raised fiber paper areas; finally apply some metallic white paste on the top raised paper areas.

Note:  Before proceeding with each application above, allow each application to dry thoroughly, otherwise you will have a muddy mess on your chipboard and the fiber paper will deteriorate.


Doesn't the Texturez -Tidy Widy make the coral in the photo below look realistic?  Love that stuff!


Watch for my June 15th design team blog post here on Shimmerz and you’ll see where these shimmery good and sumptuous chippy pieces ended up.


Wednesday, March 15, 2017

22% Irish!


It’s all about the color Green today!

Hello Friends!  It’s me Joyce! 

While investigating my roots and heritage, a DNA test revealed that I was 22%
Irish.
I had no idea!
Now I understand why Celtic music has always enchanted me…
it was my heritage tugging at my heart.


So, of course, I was going to create with this knowledge.  Some of my favorite elements on this art journal entry are the chipboard pieces, and the background on the typed written pages of the book.


Shimmerz Products Used: 

Spritz: Olive Branch; and 4 Leaf Clover
Vibes: Rolling In The Hay
Inklingz: Brass Knuckles; and I Love you Onyxly (the cross chipboard includes this product)Shimmeringz: Heavy Metal 

I hope I have inspired you to tell your story with some Shimmerz Paints products. 
Listen for my Shimmez Siren call beckoning you to come back and visit me here on
March 29th.