Showing posts with label 12x12. Show all posts

Thursday, August 24, 2023

Happy Story | Sarah Millerhouse | August 2023 Color Kitz


I am excited to share this layout featuring the August Color Kitz, combined with the new Color Splash Glossy Acrylic Sprays. 


On the background, I used two colors from the August Color Kitz - Vibez - Before Dawn and Shimmerz - Silver Tongue Devil. I love how the colors look with the vellum camera page from the new Main Character Energy collection by Shimelle. 


Once those colors dried, I added on splatters of the new Color Splash Sprays in six colors - Pinking of You, Sunset Strip, Squeeze the Day, Once Upon a Lime, Sea Breeze, Rockin' Robin. 

I also created an accent layer using the same colors. I blended and layered the colors to create the large square in the middle of the layout. I love how these sprays dry with a beautifiul, bright, glossy finish! 


I finished the rest of the layout using ephemera and embellishments from the Main Character Energy collection. I loved using the bright happy colors to capture the memory of my sweet girl celebrating her 4th birthday with two girls she loves!


I hope you have a beautiful day and get to make something creative today! 
If you decide to place a Shimmerz Paints order, which you definitely should, put my name in the comments section of the order to get a free gift! 


Monday, June 12, 2023

Adventures | Sarah Millerhouse | June Color Kitz


Hello! I am excited to share this layout featuring the BEAUTIFUL June Color Kitz! The color combinations in this month's kit are absolute perfection! 


I started this layout by adding color to the background. I used Foundations mixed media cardstock as the base of my layout. I added the Vibez - Rip Van Periwinkle at the top of the layout. I sprayed it first, and then I spread it around with a paint brush. Around the top and side edges, I added the Shimmerz - Pool Me Close. Towards the bottom of the layout I added on the Shimmerz - Iris My Case. Both of the Shimmerz are so gorgeous and full of sparkle. As these colors were drying, I splattered in the new Spritz - Pipe Cream for some added dimension and variation in color. 


On top of the background color, I got busy adding all of the beautiful things from the June Paper Color Kit! I started with the turquoise paper at the top. I cut six inch strips in various widths. I snipped the top corners of each strip to look like a slat of wood and distressed the edges. I glued these down at various heights to look like a wood wall. I then fussy cut many of the embellishments from the ephemera sheets. I added the wood fence, and I used tons of the fussy cut flowers and vegetation to cascade down the fence and around the photos. 


In the centers of each flower and around the clusters I added small crystals and half pearls from my stash to adorn the flowers and add sparkle! 


I also added Pops of Color in coordinating colors to add dimension and visual interest. I added two perspextives from Bramble for the title and globe to carry the theme of my photos through! As a finishing touch, I splattered on the new Color Splash - Gold Digger to add one last bit of shimmer, shine, and dimension! 


I have a full process video up on the Shimmerz Paints YouTube channel! I hope you will check it out and have some time to create with these beautiful products! If you're placing a Shimmerz order, be sure to add my name, Sarah Millerhouse, in the comments section of the order to receive a free gift! 


Monday, May 8, 2023

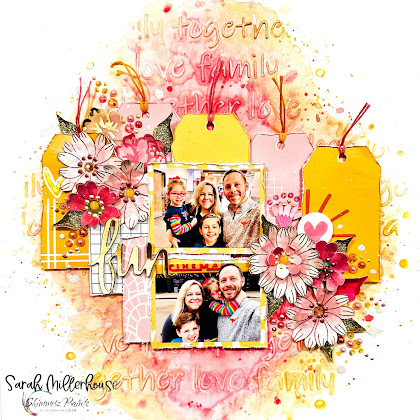
Fun | Sarah Millerhouse | Shimmerz Paints May 2023 Color Kitz

I absolutely love the May Color Kitz and the beautiful combination of colors! I also had fun combining the colors with the May Paper Color Kitz. The patterned papers and embellishments are super bohemian and whimsical, and I loved using them to create this layout. 

I started with texture paste and a stencil from Peartree Cutfiles. It is a large format stencil in 12x12, so I was able to add the texture paste to the entire page at the same time. I sat it off to dry overnight before adding wet mediums to the background. 

Once it was good and dry, I added the beautiful colors from the Color Kitz. I started with the Vibez - Chip Mauve The Ol’ Block. I kept the color in the center of the layout in an oblong shape. While that was still wet, I added on the Vibez - Pink Lemonade around the rim of the previous color. I then added the Shimmerz - Golden Wheat the the outermost edge of color. 

Once that was dry, I added the patterned paper and fussy cut elements across the center of the page. I love the patterned paper full of tags, and I used five of those. I added holes and thread to each one. I used craft foam to pop them up on varied layers. I layered on a few more pieces of patterned paper and my sweet photos. 

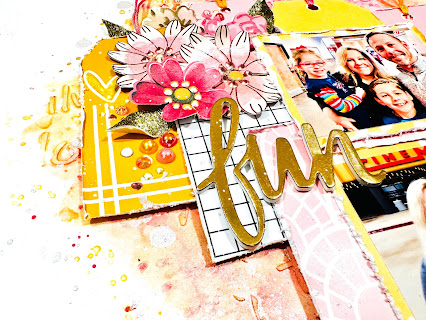
For the embellishments, I started with the white flowers I fussy cut out, and I added color to them using the mediums in the Color Kitz. Once those were dry, I added them to the layout as the foundation for the clusters, starting at the top left of the photos and working my way down to the bottom right of the photos. I threw in more elements from the Color Kitz and a few flowers from my stash. 

I adorned the flowers with the enamel dots from the Felicity Jane set found in the Paper Kitz collection. I then added shiny bits and objects from my stash to the clusters. I also added splatters of the Blingz - Pixie Dust from the Color Kitz that I absolutely ADORE!! This medium is jam packed with sparkle and shine, and it sits so beautifully on top of the paper I added it to. This is one of my favorite details on the layout! 


I have a full process video here: Full Process Video

Have a beautiful week ahead!! - Sarah Millerhouse

Saturday, April 8, 2023

Happy Days | April 2023 Color Kitz | Sarah Millerhouse

Hello! I am so excited to share this new layout featuring the April 2023 Color Kitz and the April Paper Collection! I love how beautifully the colors and patterned papers and embellishments coordinate! I have a link to the full process video below! 


I started this layout by making the giant egg! I cut an oval on scratch paper, and then I cut 1.5 inch strips from the patterned papers in the Paper Collection. I used my herb shears (in place of fringe scissors...my herb shears work so much better!) to create the fringe along the edge. Once I layered up the paper, I added some pink ribbon from my stash to match the butterflies from the embellishment sheet. 


Once the egg was complete, I traced around it and moved it out of the way. I added the beautiful mediums from the April Color Kitz around the edge. I started with the Vibez - Deep Blue Sea and added it with a brush. I then layered on the Inklingz - Me & Blue. While all of that was still wet, I added on the Inklingz - Ice Sage. By adding the mediums while they were still wet, I got great movement and blending! I love how it looks!


On the bottom right side of the layout, I used the Inklingz - Loose Lips, Pink Ships from the March Color Kitz to tie in the pink on the layout. 


After adding my sweet Easter photos, I fussy cut out all of the beautiful embellishments from the Paper Collection. I absolutely adore the bunny and ducklings! The beautiful flowers were perfect for layering. 


I added detailing in the middles of the flowers using Pops of Color and lots of shiny bits. I love how layering the elements brought the theme of the layout to life! I added the title pieces from my stash and adore the final layout capturing a beautiful Easter memory!


The full process video can be found here: FULL PROCESS VIDEO
Be sure to add my name in the comment section of your next order to receive a free gift!
Have a beautiful Easter weekend!


Saturday, November 30, 2019

Carefree Guy | Kelly Janes

Hey Shimmerz fans! Kelly back today with a new 12x12 scrapbook layout!


I have Fall on the brain! It's my favorite season to scrapbook and the season always seems to go by so quickly! I wanted to document this sweet pic of my dog in the leaves that I snapped last week. I originally printed the photo in color, but there was just so much brown in the photo (the leaves were a yucky brown color & he is also brindle) that it just overpowered the layout. So, I decided to print the photo in black and white.


I cut a circle (using my Cricut) in the center of a patterned paper from the Pinkfresh Studio Just a Little Lovely Collection. I knew I wanted to decorate the edge of the circles with leaves and thought it would be fun to color my own using Shimmerz Paints.


I grabbed a few sheets of cheap watercolor paper and sprayed/painted the paper with multiple Shimmerz Colors. I colored a blue sheet of paper (using Frost Bite Vibez, Cold as Ice Vibez & Lapis Dance Creameez), a pinkish orange paper (using Sweet Heart Vibez, Cotton Candy Spritz, Lil' Yellow Skool Bus Coloringz, Sunset Strip Vibez & Mandarin Mai Tai Coloringz) and finally topped off with a purple paper (using Rip Van Periwinkle Vibez, Princess Vibez & Plum Pudding Spritz). Now you definitely wouldn't need this many colors. I just wanted to have a variety of shading on each piece of the watercolor paper.


Once the watercolor paper was dry, I ran each piece through my die cutting machine using leaf dies. I then arranged the leaves around the circle on my background patterned paper. I used my sewing machine and metallic gold thread to hold the leaves in place. I also embellished the layout using puffy stickers, epoxy stickers, enamel dots, and die cuts. I used a puffy phrase sticker for my title and finished things off with gold splatters from Miner Miner 49er Inklingz.


Now you can take a look at how my layout came together!


I love using combinations of paints to create different depths and a dimension to the colors! If you haven't given it a try I highly recommend it! Thanks so much for spending part of your day with me!


Saturday, October 26, 2019

Color Challenge - Don't Citron Me | Kelly Janes

Hey there, friends! Have you taken part in the Autumn Shimmerz Color Challenge? The color I chose, for this challenge, is Don't Citron Me Coloringz. I find green to be a challenging color and it's definitely not something I naturally gravitate towards, so I knew it would be a great color to choose for the challenge!


I started my 12x12 scrapbook layout by adding a layer of clear gesso to the background. I then used heavy black gesso with a spiderweb stencil to add a bit of detailing to the background. I then took the Don't Citron Me Coloringz and sprayed it directly onto the background. 


Once the green was dry, I sprayed Ruby Spritz and Lil' Yellow Skool Bus Coloringz onto a scrap piece of packaging. I mixed those colors together with a paintbrush to create a deep orange color and then used the packaging technique to add that color to the background in a few different areas. I think it's so fun to add the color to the background using different techniques (packaging technique, using a paintbrush, spraying directly on the background, etc.)! You get a different look with each technique!


I then moved onto embellishing. I grabbed multiple Halloween themed embellishments and 4 photos of my kiddo when he was trick or treating. I had so much fun layering the embellishments on the background! I love how the mixed media background peeks out from behind the photos and embellishments!


Now you can take a look at my process video!


I hope you'll play along with the challenge this month! Remember to use the hashtag #shimmerzcolorchallenge when posting online!


Monday, June 18, 2018

"You are the cutest" Scrapbooking Layout | Simone Schermann


Hello Shimmerz Fans. Have you ever been in a creative rut? Or just knew you wanted to create but didn't exactly know what? That was me today. I didn't know what to create and didn't know where to start and when I stumbled across this sketch created by Laura Whitaker, I knew I would use it as a starting point for my layout.


I dove into my stash looking for a photo that had the right size and then papers that lend themselves easily for fussy cutting. That's when I found several of the Shimelle "Glitter Girl" papers and especially a hexagon paper in my favorite colors. It is so much easier to create within your favorite colors so that's what I chose. I also had the idea to use colored cardstock as my background paper and then creating a backdrop for my mixed media by using white gesso.


And then I just went for it. No more thinking about it, no more excuses: I completely forgot the world around me and did one step after the other. After preparing my background with gesso and waiting for that to dry, I laid out the photo and started working on getting an idea of the design on top. I loosely used the sketch for my design elements: there was a tag behind the photo sticking out on top. There were flowers on the bottom left and top right. I worked on my title and put it onto wax paper for later. When the gesso was dry, I chose my sprays and paints and used the packaging technique and paint splatters to add color. The last step was putting it all together and adding details.


What a great experience again. I just love being in this creative headspace where it feels as if I was in a parallel universe for the time being. Here is a link to my process video on youtube. If you place an order in the Shimmerz Store, don't forget to mention my name Simone in the comments at checkout to receive a free mini surprise product! Thanks for stopping by today!

SUPPLIES:
Creameez - Boogie Boardin' Blue, Ride the Tide, Lettuce Get Together, Witches Blue
Shimmerz - Key Lime
Vibez - Jeni B Blue, Grape Escape, Blue Jeans
Coloringz - Oh Say Can You Sea, Night Moves

Monday, May 21, 2018

"Dream Big" Scrapbooking Layout | Simone Schermann


Hello Shimmerz Fans. Guess what?! I finally had the courage to create a 12x12 paper full of texture and color that I then used to create a scrapbooking layout. I prepared my white cardstock with gesso first and then pulled out some stencils and Pasteez, Dazzlerz, different sprays as well as Creameez and Shimmerz, in short I grabbed my whole arsenal of ShimmerzPaints products. Then I chose a color palette as you can see from the photo it was very green heavy palette and just started. In the video that is linked below you can see the whole process, but it can be summarized as: I added color and water here and there until I felt I had a nice balance and then let it dry.


I came back the next day with some scrapbooking supplies, a photo and a punch. I punched out lots of squares from my paper and then started to arrange them in a pattern on a white background paper. I quickly realized that there are endless possibilities so I decided to go with the first one that I liked. I can see a series of layouts in my future that explores all the different options. Or at least some of them.


As you can see from the two closeup shots above, no two squares look the same, they all look like they belong together but each one is unique. I love the sparkly texture from the Dazzlers and I was absolutely amazed at the intensity of the Shimmerz, I definitely need to stock up on more colors. Did you see that there was a new release of six Spring colors? You can find them here.


After I had designed my background with the squares and stitched them onto the paper, I then went on to create a layout. I had so much fun mixing and matching papers and embellishments from so many different manufacturers.


Here is a link to my process video on youtube. If you place an order in the Shimmerz Store, don't forget to mention my name Simone in the comments at checkout to receive a free mini surprise product! Thanks for stopping by today!

SUPPLIES:
Creameez - Ride the Tide, Boogie Boardin' Blue, Daffodil, Green Goddess, Pining for You, Witches Blue
Shimmerz - Key Lime
Dazzlerz - Foiled Again
Vibez - Jeni B Blue, Snow Way Man
Coloringz - Don't Citron Me, Heidi Ho Blue, Oh Say Can You Sea, Well Blue Me Down

Sunday, February 18, 2018

Brrr | Anna Komenda

Hello mixed media fans. It's Anna here with my shiny and frosty project. I used Shimmerz mists and paints to create a winter page full of sparkly snowflakes. I chose a picture of my daughter playing with snow and throwing it into the air. It was cold but sunny day and snow sparkled beautifully. 


Using sparkly mists helped me to highlight the winter glow and frost. I used four different shaded of blue to make my snowflakes. I love how all the Vibez combine together.


It's hard to show how sparkly my background is. Shimmerz paints are filled with a lot of shimmering powder and it's so easy to add shine to you projects using them. They also dry with a glossy type of finish.


With background as pretty as that and with so much effort put into making it, you don't want to cover it with embellishments :) That's why I added only few of them here and there.


I am happy how it turned out. As always I have a process video for you.


Products used:

That's all for today. Thank you for stopping by and see you next month with another mixed media project.

XO Anna