Showing posts with label 12x12 layout. Show all posts

Friday, April 3, 2026

Hello Sunshine 12x12 Scrapbooking Layout

Hey all!  Nicole here with my layout using the April Color Kitz!  I'm making this page to document my sweet little kitty laying on my lap...I just love that!  

The first thing that I did for this layout was pick the paper I wanted to use.  I went with this green paper with white flowers on it and the reverse side had this beautiful orange.  I placed that papers where I wanted on some 12x12 watercolor paper to see where to add my mixed media.  I used the Marigold and Lawn and Order Shimmerz pots to make the painted background.

When my paint was dry, I added my papers down as well as my picture.  I then started embellishing.  I remembered that there was a paper with black and white flowers so I decided to fussy cut some of the flowers for my embellishment clusters.

I then added one of the dotz and some of the die cut pieces to my layout, including my title, Hello Sunshine!  I finished off the layout by adding some sequins from my stash.

Thanks so much for popping on to read about my layout.  I hope it gives you an idea of how to use your kit and paints.  I also have a process video for this that you can watch here: Hello Sunshine Process Video

Until next time, Nicole Santos 

Wednesday, March 4, 2026

Let's Go 12x12 Scrapbooking Layout


 Hey all, Nicole here with my first project using the March Color Kitz!  You can see that this month's kits are just full of beautiful, bright colors!  I'm documenting me and the fam flying to Texas last December!


 The first thing that I did was use some clear gesso on the right side of that beautiful heart paper.  I then added 4 of the paints from the kit over on that side as well and let that dry.


 I then fussy cut some flowers from two of the patterned papers.  I added this with some of the die cuts from the kit to my embellishment clusters.  I also added my title with the letters that come with the kit!

Lastly I added some splatters of Black Hole to my clusters and called my layout done.

Thanks for popping on to read all about my layout.  You can also watch my process video for this here: Let's Go Process Video

Don't forget that if you grab the kit or anything else over at Shimmerz to use my name Nicole in the shopping cart notes to get a free gift with your order!

Until next time, Nicole Santos
 

Wednesday, November 19, 2025

Thankful Scrapbooking Layout using the November Color Kitz


 Hey all, Nicole here using the gorgeous November Color Kitz to make this fun layout documenting a beautiful fall sunset!

I started by making these cool die cut fringe pumpkins using paper from the kit and fussy cutting the THANKFUL banner.  I then used the rest of the patterned paper from the THANKFUL banner page, as well as the golden star paper to make my background.


I added my fringe pumpkins, picture and the THANKFUL banner to my background and then started to embellish.  I used the little medallion stickers from the kit and then die cuts to make three clusters on my page.


I finished my page with some journaling and splatters from the two vibes that come with the kit.

Thanks so much for popping on to read about my layout.  You can still grab the November Color Kitz and use my name Nicole in the shopping cart notes to get a free gift with your order.  You can also watch my process for this video here: Thankful Scrapbooking Layout Process

Until next time, Nicole 

Monday, March 10, 2025

Lucky Me | Melissa Minor | March 2025 Color Kitz

 Hi crafty friends! Melissa Minor @cardsbymelissaminor here and I'm super excited to share a new layout with you. The March 2025 Color Kitz is one of my favorites! It's absolutely beautiful! I love all the bright colors. For my layout today I started by cutting apart one of the patterned papers into color strips. Then I distressed all the edges and cut down to 1x6 inch strips.


I adhered the cut strips onto the center of a 12x12 piece of white mixed media cardstock. Then I pulled out all the paints that came in the kit. I painted Freshly Minted Inklingz onto the top and bottom of the green strip. I painted Peaches & Cream Shimmerz onto the ends of the peach strip. The Don't Citron Me Coloringz I painted along the bright green strip. My favorite paint in the kit this month is the Pink Stilettos Coloringz. I painted it onto the top and bottom of the pink strip. I painted Stay Posy-tive Shimmerz onto the ends of the purple paper strips. I also brought in the Daffodil Creameez from the March bonus bundle and painted along the yellow strips.


I added 1/2 inch strips of the colorful patterned paper to the tops and bottom of the layout. Next to that I layered a 1/4 inch strip of specialty holographic paper. I love how it adds that extra shine to my page. I used an alphabet die from my stash to cut my title Lucky Me. I painted the letters with Don't Citron Me Coloringz. After all I am documenting photos of me and my boyfriend Dale from last St Patrick's Day. 

I added some of the shamrock and horseshoe ephemera from the kit. I used the shamrock Dotz with some tangled thread behind it. I really like the way this page turned out. 
Don't forget! You can add my name Melissa Minor to the comments section of your Shimmerz Paints order to receive a FREE paint! 

Happy crafting,
Melissa Minor

Watch the process video here: 


Watch my unboxing video here:


Monday, March 3, 2025

Spring | Melissa Minor | March Color Kitz

 Hi crafty friends! I'm super excited to be sharing a new layout with you using the March 2025 Color Kitz. This kit is absolutely gorgeous! I started my layout by fussy cutting some of the floral images from the black & white patterned paper. I then painted up the images.

I used the Don't Citron Me -Coloringz to apply paint to the leaves. I then used Pink Stilettos - Coloringz, Freshly Minted - Inklingz, Stay Posy-tive -Shimmerz, and Daffodil - Creameez (Available in the bonus bundle) to paint the florals. I love the way these large florals turned out! If you haven't painted on the Shimmerz Paints papers you need to give it a try.


Next I started on the base of my page. I pulled out a piece of white 12x12 mixed media card stock. I applied modeling paste through a stencil and set aside to dry. My stenciling is very subtle but I think it adds a nice little detail. Then I applied some Dusty Concord purple Distress Oxide ink to the center of my page. I applied the beautiful Stay Posy-tive Shimmerz and Pink Stilettos Coloringz to the inked portion and kind of mixed the two colors spreading out from the center.

The photos I'm documenting today are of myself trying on Lululemon leggings. My boyfriend Dale bought me my very first pair. So fun!!!! I print all my pictures at home using the Epson Picture Mate 400. My photos are printed to 2.5x4.5. I enjoy printing at home and being able to choose the size photos I print. I used one of the pretty purple patterned papers included in the kit along the center of my page. I matted that paper in black and distressed all the edges.

I added some of the heart ephemera, the film strip, and my title Spring. I love the Dotz that come in the Color Kitz. The selfie dotz was perfect for my page since after all this is a selfie photo. I placed some tangled thread behind my dotz for some extra interest. I also added a few of the sequins that came in this month's bonus bundle. They are so pretty! I really like all the colors in them. I have a full tutorial over on YouTube. 

Don't forget to add my name to your Shimmerz Paints order to receive a free paint!

Happy Crafting,

Melissa Minor @cards.by.melissaminor


Wednesday, November 27, 2024

Snug As A Bug | November 2024 Color Kitz | Brandy Vaughn


Hello, friends! I'm back today to show you my final layout using the November Color Kitz.


I began by fussing cutting fussy cutting leaves and fruit from one of the papers. I then took the remainder of the paper and tore a piece to use the back side as a foundation for my cluster.


I also included some ephemera pieces from the kit as well as a couple of pieces that I previously painted and fussy cut to add more texture and visual appeal to my cluster.


I glued all the pieces to the plaid paper, not the background paper. This way I can move the cluster around as one piece to ensure I place it exactly where I want it.


Finally, I added my title using the gold alphas from the kit then topped off the layout with some splatters of  Creameez in Whitches Blue. 


I hope I've inspired you to give the November Color Kit a try. Head on over to the Shimmerz Shop to check out all of the details on the kit. 
Don't forget to add my name to your order for a FREE PRODUCT!

xoxo
Brandy


Monday, October 14, 2024

I Can Be Scary Too! | Shimmerz Paintz October Color Kitz | Brandy Vaughn

 Hello, friends! I'm back today with another layout using the Shimmerz Paints October Color Kitz.


I am all out of Halloween photos to scrap so I used a photo of my cat and altered it in Adobe Express to make it look like a Halloween photo. Then I chose this cut file from Confessions of a Paper Addict because of the cat.


I cut the cut file out of black cardstock and misted on some Spritz-A Chance of Rain that I pulled from my stash. Then I misted Vibez-Jack O'Lantern onto some white cardstock and splattered some Inklingz-Sun Kissed on top of that.


I used foam dots to pop up the off-cuts of the fog. Then I grabbed some of the ephemera pieces from the kit and embellished around the cut file and the photo.


Finally, I grabbed some alphas from my stash for the title and finished off the layout with some black glitter drops.


If you would like, you can check out my process in the video below. Remember to add my name to your Shimmerz order for a product!

xoxo
Brandy


Monday, April 15, 2024

Celebrate | April Color Kitz | Brandy Vaughn

 Hello, crafty friends! Today I'm creating my own floral embellishments using the April cut file.


I just love how these flowers turned out! I cut them out on smooth cardstock and added my color using a paintbrush to get the perfect blended colors that I was looking for. 


I found a generic file on Cricut Design Space and painted it also. Then I picked out my word phrases and other elements to add to my page. 


Finally, I added a border from a piece of patterned paper in the kit, my title piece from my stash, and then a few dots of Color Splash in Black Hole to act like enamel dots. 


All in all, this was a simple layout that yielded gorgeous results! I hope you are inspired to create your own embellishments using this month's cut file and Color Kitz! 


Be sure to check the Shimmerz Paints store online for a closer look at all the goodies in the April Kitz.

Don't forget to add my name, Brandy Vaughn, to the comment section of your order for a FREE paint!

I would also love it if you would check out my process video below. 

xoxo
Brandy


Monday, June 12, 2023

Adventures | Sarah Millerhouse | June Color Kitz


Hello! I am excited to share this layout featuring the BEAUTIFUL June Color Kitz! The color combinations in this month's kit are absolute perfection! 


I started this layout by adding color to the background. I used Foundations mixed media cardstock as the base of my layout. I added the Vibez - Rip Van Periwinkle at the top of the layout. I sprayed it first, and then I spread it around with a paint brush. Around the top and side edges, I added the Shimmerz - Pool Me Close. Towards the bottom of the layout I added on the Shimmerz - Iris My Case. Both of the Shimmerz are so gorgeous and full of sparkle. As these colors were drying, I splattered in the new Spritz - Pipe Cream for some added dimension and variation in color. 


On top of the background color, I got busy adding all of the beautiful things from the June Paper Color Kit! I started with the turquoise paper at the top. I cut six inch strips in various widths. I snipped the top corners of each strip to look like a slat of wood and distressed the edges. I glued these down at various heights to look like a wood wall. I then fussy cut many of the embellishments from the ephemera sheets. I added the wood fence, and I used tons of the fussy cut flowers and vegetation to cascade down the fence and around the photos. 


In the centers of each flower and around the clusters I added small crystals and half pearls from my stash to adorn the flowers and add sparkle! 


I also added Pops of Color in coordinating colors to add dimension and visual interest. I added two perspextives from Bramble for the title and globe to carry the theme of my photos through! As a finishing touch, I splattered on the new Color Splash - Gold Digger to add one last bit of shimmer, shine, and dimension! 


I have a full process video up on the Shimmerz Paints YouTube channel! I hope you will check it out and have some time to create with these beautiful products! If you're placing a Shimmerz order, be sure to add my name, Sarah Millerhouse, in the comments section of the order to receive a free gift! 


Saturday, May 20, 2023

Happy Days | Sarah Millerhouse | Shimmerz Paints - Color Splash


Hello, Shimmerz Paints Friends! I am SO excited to be sharing my first layout using the brand new Color Splash Glossy Acrylic Sprays! They are simply amazing, and they might very well be my new favorite mixed media product on the planet! 


These sprays are fabulous in so many ways! I first noticed how beautifully they coat the surface you spray. They have a beautiful opaque quality, and a little goes a long way! 


The next thing I noticed is that when sprayed together and swirled around with a brush, the colors stay true to themselves, and I didn't get any muddy colors. The photo above depicts how amazing they are when swirled around and mixed together. 


If you know me or my style, you know that I love a good splatter on a page! For me, this is where the true magic happened with this medium. I had a whole bunch of color on my page, and it was still wet and swirling around. As I splattered on other colors, they sat where they landed, held their shape and tone, and added texture to each spot. Coming from a person who loves to play with every medium available to figure out what works, I am telling you that this is a rare quality! 


The Color Splash sprays also have a magical finish! The glossy effect is stellar! With some mediums, as they dry, you get a fading of vibrancy and the colors tend to continue to mix until set. That didn't happened here! The medium sits on top of the paper and coats it with color! I LOVE these sprays!!! 


To see this page come to life, check out the full process video linked here: Full Process Video
As always, if you place an order, be sure to add my name, Sarah Millerhouse, to the comment section of the order to receive a free gift! Happy creating! 


Monday, May 8, 2023

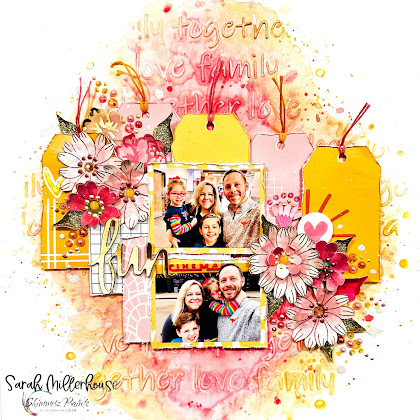
Fun | Sarah Millerhouse | Shimmerz Paints May 2023 Color Kitz

I absolutely love the May Color Kitz and the beautiful combination of colors! I also had fun combining the colors with the May Paper Color Kitz. The patterned papers and embellishments are super bohemian and whimsical, and I loved using them to create this layout. 

I started with texture paste and a stencil from Peartree Cutfiles. It is a large format stencil in 12x12, so I was able to add the texture paste to the entire page at the same time. I sat it off to dry overnight before adding wet mediums to the background. 

Once it was good and dry, I added the beautiful colors from the Color Kitz. I started with the Vibez - Chip Mauve The Ol’ Block. I kept the color in the center of the layout in an oblong shape. While that was still wet, I added on the Vibez - Pink Lemonade around the rim of the previous color. I then added the Shimmerz - Golden Wheat the the outermost edge of color. 

Once that was dry, I added the patterned paper and fussy cut elements across the center of the page. I love the patterned paper full of tags, and I used five of those. I added holes and thread to each one. I used craft foam to pop them up on varied layers. I layered on a few more pieces of patterned paper and my sweet photos. 

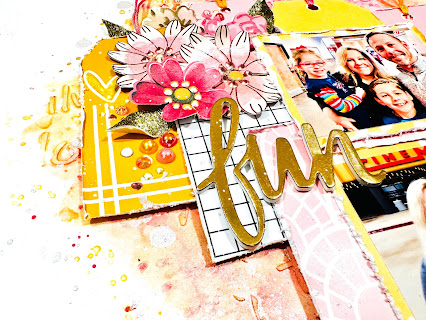
For the embellishments, I started with the white flowers I fussy cut out, and I added color to them using the mediums in the Color Kitz. Once those were dry, I added them to the layout as the foundation for the clusters, starting at the top left of the photos and working my way down to the bottom right of the photos. I threw in more elements from the Color Kitz and a few flowers from my stash. 

I adorned the flowers with the enamel dots from the Felicity Jane set found in the Paper Kitz collection. I then added shiny bits and objects from my stash to the clusters. I also added splatters of the Blingz - Pixie Dust from the Color Kitz that I absolutely ADORE!! This medium is jam packed with sparkle and shine, and it sits so beautifully on top of the paper I added it to. This is one of my favorite details on the layout! 


I have a full process video here: Full Process Video

Have a beautiful week ahead!! - Sarah Millerhouse