Showing posts with label Pink. Show all posts

Monday, February 1, 2021

February Color Kitz with Samantha Robles

 Happy Monday everyone! I'm so excited to be back creating after being on maternity leave. We'll be using the new February Color Kitz Collection, featuring two new colors.

First, I start with the exclusive cut file found in the kit. These adorable roses! Each rose gets a shade of: "Pink A Boo" Inklingz
"Age Before Ruby" Coloringz
and  Gold-N-Roses Blingz
The cute little leaf petals are then painted with Pining For You Creameez.
Next, I cut out the new "Sweet Heart" cut file. I only wanted to highlight the "sweet" portion so the cut file didn't swallow up my cute girl's photo.
After glueing the pieces together, It's time to back my photo with some paper from Cocoa Vanilla's "Happiness" collection. This pink matches perfectly! I finally add some embellishments from an old stash I had from American Crafts and some sequins from Spiegelmom Scraps.

I cannot rave about the new colors enough! They're simply stunning and a must for any crafter. Supplies will be limited. If you'd like a freebie product from Shimmerz, make sure to drop my name in the comments of your order(s).

Have a happy Monday!
-Samantha Robles


Tuesday, February 4, 2020

Sweet | Color Kit Cut File Layout with Process Video

Hello Everyone!

Thank you so much for joining me today and viewing how to make this "envelop explosion" layout. Ever since I first saw this gorgeous cutfile (designed by Samantha Robles for the February Color Kitz), I fell in love with it! I instantly knew that I wanted to create a layout which would convey the idea of a dropped envelope full of mementos with its contents spilling out, and after finding out memory I wanted to document, I got to work. So, let's get to it! (Process video is linked at the end of this post).

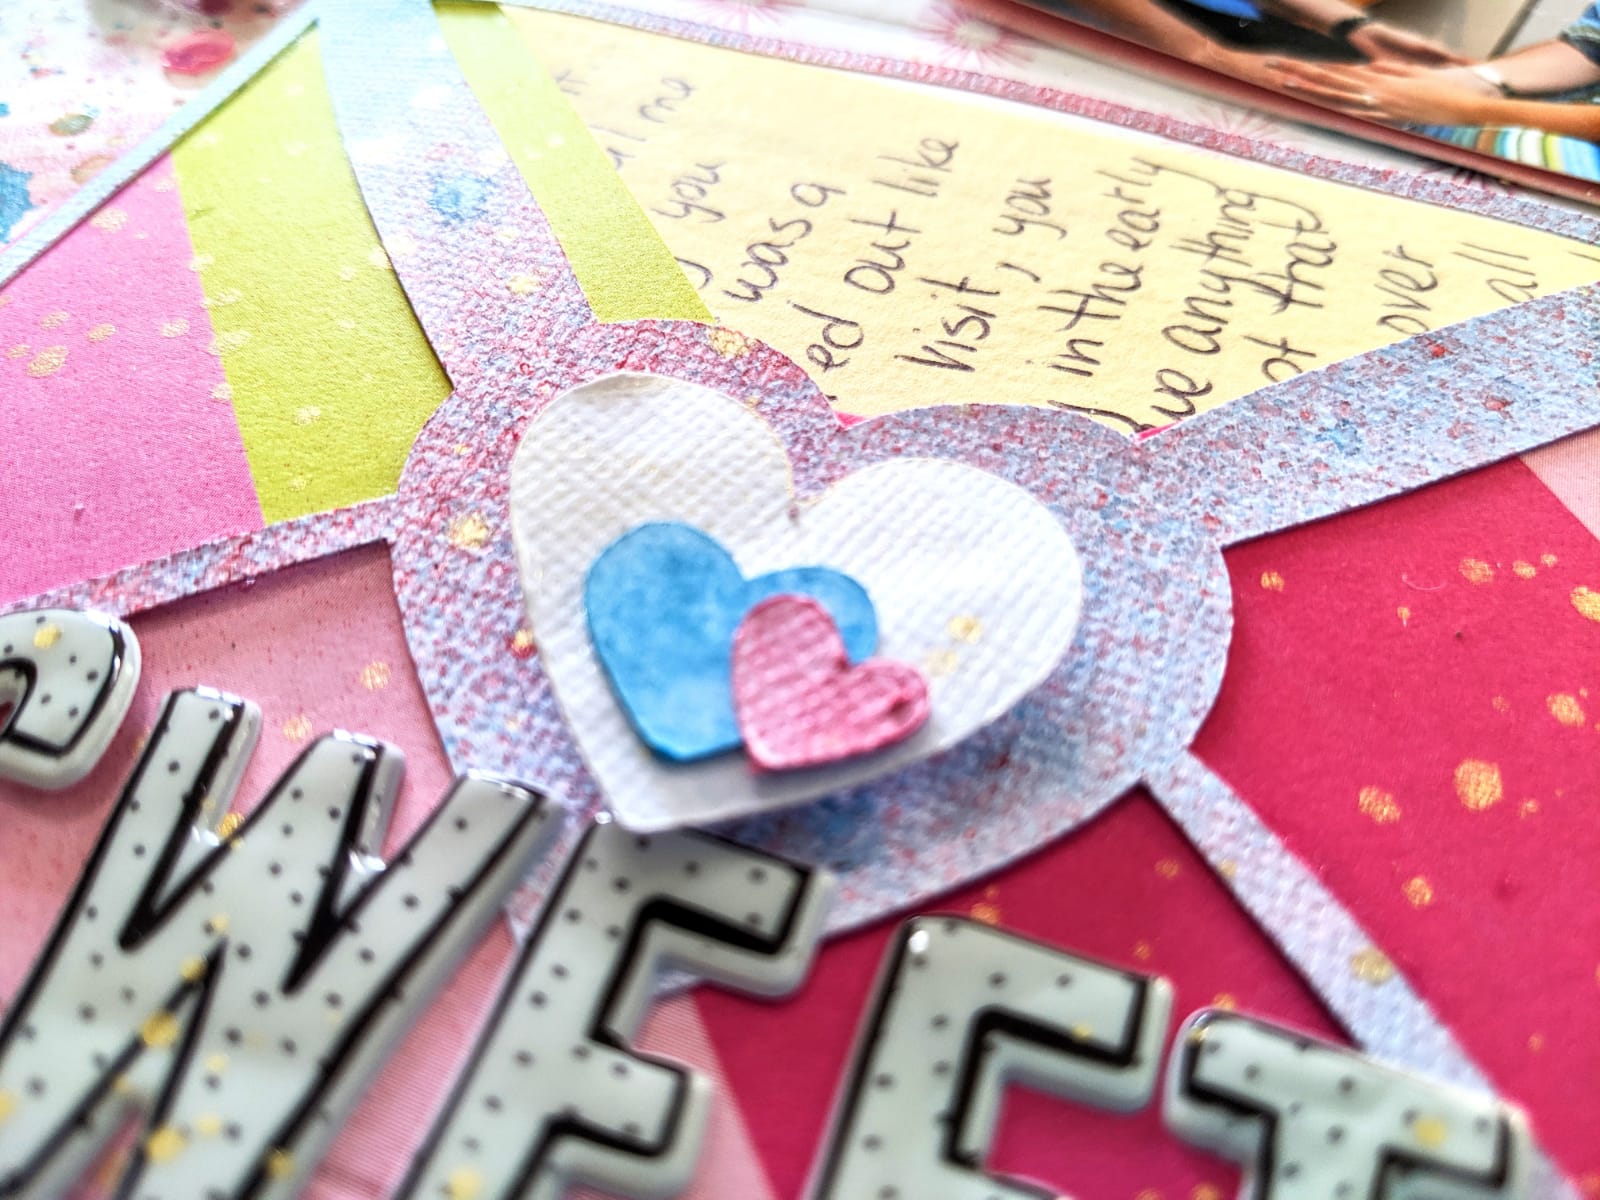
Since Valentine's Day is right around the corner, I wanted to use more pinks and reds in this layout, and in order to tie in the photos with my color scheme, I added a bit of blue into the mix. I began by cutting out the cutfile; Altered it a bit to have some extra hearts in various sizes and made sure that that envelope within the cutfile measured at least 4x5. This is so my pictures could really seem like that really did spill out of the envelope.


Then came the process of coloring all of the elements in my layout. Listed below are the colors and where I used them:
Background
- Peacock's Plume (Shimmerz)
- Coral Reef  (Inklingz)
- Cheeky Pink (Creameez)
- Pink Caviar (Shimmerz)
- Pink (Shimmerz)
- 1 Hot Mama (Creameez)
- Pip Pip Cherry-O (Shimmerz)
- Dear John Letter (Inklingz)
- Bubble Gum Blast (Shimmerz)
Hearts and Envelops Over Lay
- Razzle Dazzle Berry (Vibez)
- Cotton Candy (Spritz)
- Bed of Roses (Spritz)
- Jeni B Bleu (Vibez)
- Goldie Lox - (Shimmeringz)


Once all my items were dry and my pictures were matted on craft foam, I placed the envelope with the envelope cut file laid over it at the bottom left-hand corner followed by the pictures placed at an angle as if spilling from the envelope. Then I spent some time rearranging the hearts all around the pictures; some of the hearts are placed on craft foam, others laid on top of each others, and still others are glued directly unto the background.

After this, I added some pink, yellow and white sequins from Spiegel Mom Scraps that I had in my stash (Freezin' for a Reason). I then splattered some Miner, Miner 49er all around the layout to tie things together and add a pop of gold. Wrote my journaling on some scrap pieces of yellow cardstock and added a border around my layout using Jenni B Bleu and a brush.


I loved how this turned out! It had many processes, but I loved playing around with the colors and cutfile. Hope I've inspired you to get your story documented. Remember, you can get some free paint by writing my name in the comments section of your next Shimmerz order. 

Process video: https://youtu.be/0wryaEJ3RMg 

See you soon!


Thursday, January 16, 2020

Sparkle Every Day with Samantha Robles

Happy Thursday everyone! I'm so excited to pop in here and share a fun layout process. Sure to get you in the mood to "Think Spring". I don't know about you guys but as soon as the Holiday's have moved on, we're in this awkward phase. I'm ready to jump in to all things Spring. 
Today's layout process is just that.
I started this layout by cutting TONS of Paige Evan's rolled flower cut files. After cutting those out, I then sprayed them with 3 colors:

I sprayed so many flower that I actually let them sit overnight on plastic wrap sheets. I completely saturated the flowers, front and back. That's why I just decided it's best to be patient and let them sit through the night. The next morning, it was time to roll and glue them together.
On  some white cardstock, I cut a giant circle and pieced it on top of Paper 9 from the Pink Paislee Horizon Collection. Once my sheets were pieced together, it was time to start adding my florals in. To add some color contrast, I added some floral ephemra pieces from the Horizon collection. Anyone close to me knows that I bought like 8 of these in the span of 9 months or so. That's how obsessed I am with them.

Soon after spacing all my pieces together, I then backed this adorable photo of my puppy, Remi, onto Paper 23 from the Horizon collection. I then add some foam tape to the back to make it pop. While I'm piecing my final touched on the flowers around the frame, I cut Doily 1 cut file from Paige Evan's Etsy shop onto some pink sparkly paper. Then cut it right in half and tuck it behind my backed photo. I pieced an old quote piece on top of the Doily.  The final touch is adding Dotz from the Sweetheartz Set.

Thanks so much for popping on by today. I had fun sharing this process with you. Don't forget to sparkle every day! 

-Samantha Robles

Monday, March 19, 2018

Spring flowers | Anna Komenda

Hello everyone. It's Anna here with new art journal page. I can't wait for the sprint to come and color this grey world around me. I hate winter and it's always hard for me to stay cheerful during long winter evenings. I am trying to stay positive by making a lot of rainbow projects including my latest art journal page. I was inspired by the flowers I was and I wanted to try making them in my journal.


I started this spread with mists applied with brush like watercolor. 


After sketching few flowers I applied white acrylic paint first. Then I mixed leftover mists with some more white paint and I received new, fun acrylics


Between each layer I used my heat gun to dry the page. It prevented flowers from smudging. I finished flowers using colorful Shimmerz paints.


As always I recorded a video for you, so you can follow my process.


Don't forget to mention my name "Anna" while placing an order in Shimmerz Shop. You will get free mini product. How cool is that?

Here is the list of Shimmerz products I used in my project:
Spritz - Chick-a-dee

Thank you for stopping by and see you next month with some more mixed media fun.

Anna

Saturday, January 20, 2018

Hello sunshine | Anna Komenda

Hello Shimmerz fans. It's Anna here with my first Shimmerz based project in 2018. I am tired of making winter / Christmas projects and I was so happy to be able to come back to my favourite pink and other girly colors.


I was inspired by the cut file. I even had a perfect picture to go with it. Background is created entirely with gorgeous Shimmerz products. I mixed mist with white acrylic paint to get some new, fun shade.


I also added colorfyl flowers under the cut file using sparkly Shimmerz.


Bruskstrokes created with Dazzlerz are also a great idea to add texture and shimmer to your pages.


As always, you can watch whole process in the video below:


Shimmerz products:
Spritz: Chick-a-dee

An the last thing: if you are placing an order in the Shimmerz store, don't forget to mention "ANNA" to get a free mini product. Yay! Who wouldn't want that.


See you in February. XO Anna


Wednesday, October 28, 2015

Circles of glitter

Hi Everyone, I've been at it creating another mixed media card for you to enjoy but this time with a cleaner and more simple design look.

Creating my own 'pattern paper' as such is something I just love to do, and when die cut it can add a beautiful accent to any paper craft project.


For my card today I used the follwoing Shimmerz products:

Shimmeringz - Tickle me Turquoise 
Blingz- Gold Glimmer & Pixie Dust

I first created a background using the three colours applied to different areas.  Then once dry I die cut the circles using Spellbinders Classic Circles die set and adhered them to the card base as pictured.


 I just love the shimmer that the Shimmerz and Blingz gave the circles for a beautiful accent on this card.

Finishing off with a stamped sentiment and enamel dots made it complete.

 Thanks so much for heading over to the blog today to check out my project!  I hope I've inspired you and shown you how lovely a little Shimmerz mixed media can be on your sweet cards even while keeping the design fairly 'clean and simple'.

Till next time
xxxBeck BT


Like what I have used and would like to get your hands on some?  See below:  


Wednesday, October 7, 2015

Mixed Media Butterfly Card with Beck BT

Hi Everyone, I've been at it creating another mixed media card for you to enjoy and hopefully be inspired.  This one was so much fun to create using divine Shimmerz paints to accent some beautiful stamping.


For my card today I used the follwoing Shimmerz products:

Shimmerz Inklingz - Blue Lagoon
Shimmerz Creameez - Trippin in the Tropics & Get Glowing
Shimmeringz - Tickle me Turquoise & Pink
Blingz- Gold Glimmer
Vibez - Egg Noggin
Texturez - Tidy Widy

The background was created with mixing layers of colour with the Shimmerz 'Trippin in the Tropics' & 'Get Glowing' Creameez followed by splattering some 'Get Glowing' Creameez as well.


For the sentiment I added Shimmeringz to some 2Crafty Chipboard words and dried with a heat gun for a little texture

Shimmerz Texturez in Tidy White was used for some textured stencilling in the background.  Be sure to do your background stamping first as it is always harder to do that over the top of texture.


Shimmerz 'Tickle me Turquoise' and Inklingz 'Blue Lagoon' look beautiful added to the stamped Indigoblu image along with Creamez 'Trippin in the Tropics' and Shimmeringz 'Pink'.


Accenting was created by adding some Creamez 'Get Glowing' to the butterfly as well.


 Thanks so much for heading over to the blog today to check out my project!  I hope I've inspired you and shown you how lovely a little Shimmerz mixed media can be on your sweet cards.

Till next time
xxxBeck BT


Like what I have used and would like to get your hands on some?  See below:  


Monday, March 28, 2011

SHIMMERZ Hits the Wall!

Gracie wanted a pink room. . . like every little girl. I wanted to do something "just for her" that was unique and one of a kind. So I took metallic wall paint in same pink color and painted stripes. Then. . . I painted ribbons on one side of each stripe and topped them with Periwinkle Shimmerz. Then I painted teeny-tiny rosebuds and leaves around the ribbons. I used Pink and Green Olive Shimmerz on them. Click for a closer view.


Here's a close up on all those little rosebuds.


Then Gracie and I created 10 of these little beauties!


Of course we spritzed them with Concrete Shimmeringz. . .and WOW!!. . they really shimmer!


Her room now couldn't be more girlie! She loves it and I loved doing it! So go ahead. . . get crazy with your Shimmerz!

Wednesday, June 2, 2010

Rock-N-Roll Background with Shimmerz Paints

I was out taking pictures of my kids in the yard, when my youngest struck this silly post and said, "Mom! Look at me! I'm a Rock Star!" *giggle* That girl cracks me up every single day . . . I'm so glad I had my camera around my neck ready to capture that little tidbit of her personality.

When I went to scrapbook the photo, I really wanted to play up the rock-n-roll theme. I chose a color scheme of black, white, and hot pink and added lots of silver studs. But it felt a little too elegant . . . I needed to "grunge" it up a bit.


I added a rock star feel by spritzing the background cardstock with Baby's Breath and Cotton Candy Spritz. Next I dripped Hottie Pink Blingz and Pink Shimmerz paint here-and-there.


I allowed the paint to dry for a minute and then wiped most of it away, leaving the dried edges of the paint drops. It was an experiment, but it turned out exactly the way I wanted it to. :) LOVE when that happens!


Rock on, Shimmer On! :)
Jana Eubank

Monday, March 1, 2010

Spritz & Vibez, Shimmerz Paint & Glitter

Today I thought I'd show you how I used Shimmerz Paint, Spritz and Vibez to add a bit of depth to this Easter Page.


Page created with the Noel Mignon Seaside Cottage kit.

As I was building my page, I decided that my background needed some sprucing up. Here is what it looked like BEFORE *Please excuse the nighttime photos.*


And here is what is looked like AFTER. It's amazing how much depth you can add to a background just by pulling out your paints and mists!


I used Weatherd Wood Tim Holtz Crackle Paint to add a "frame" around the patterned paper layer and then spritzed the background with Snow Storm Vibez for a whitewashed, shimmery feel. But that's not all! I also added drips of Cotton Candy Spritz. I love the distressed and soft feeling it adds!


I also used Pink Shimmerz Paint to add some color to my chipboard pieces on this page.

The Prima letters are cream and were feeling washed out on my page and decided to add a little color to them. First, I sanded them lightly to rough up the coating on the letters and then I painted them with Pink Shimmerz. While the paint was wet I sprinkled clear craft glitter over them. Finally, I sealed them with a Matte Finish Spray. I LOVE how they turned out. A little shabby, a little distressed, but full of beautiful sparkle!


I wanted the Maya Road "love" chipboard piece to match the Prima chipboard letters, so here is what I did.

First, I gave the chipboard piece a base coat of white acrylic paint.


Next, I used a script stamp (this one is by 7 Gypsies) and black ink to add a little pattern. I then misted it with Treasured Hymn Spritz to make it off-white like the Prima letters. I could stop here if I wanted it to look like the original chipboard letters.


But I continued on with the Pink Shimmerz Paint and glitter to make it match the letters on my page.


And here is how the final piece looks! :)


Are you playing with Shimmerz this week?!! :D :D :D