Wednesday, December 30, 2009

Shimmerz Meets Cards Magazine


If you look at the January 2010 edition of Cards Magazine, on pages 16 and 17, you'll find that the "Things" they love are SHIMMERZ, BLINGZ and SPRITZ!

All of us at Shimmerz are thrilled and honored to not just be mentioned, but to be featured in such a wonderful magazine.

We want to hear from you. Have you seen it yet? We are pretty excited!!!

Love wall hanging using Shimmerz and Blingz

I created this HOME wall hanging using January kit from My Scrapbook Nook and Shimmerz paints and Blingz. All the little elements are hand cut by me. The chipboard cloud base is an album I had laying around.

After I adhered the paper to my chipboard base I sanded the edges and then painted all around with Bubble Gum Shimmerz and Hi Ho Silver Shimmerz Blingz.

I have a bag of make-up sponge wedges to use for dabbing and painting. They are inexpensive and I can wash them out and reuse. The clouds are hand drawn and cut from patterned paper. I painted each one with Hi Ho Silver Blingz. I added Hi Ho Silver Blingz to the roof, as well.

Blingz is just like Shimmerz, except they have more sparkle and are thicker than Shimmerz. That is why you can see nice, big sparkles on my project.


I can't wait to display this in my home. Have a great day.

Tuesday, December 29, 2009

Home Sweet Home -- made sweeter with Shimmerz!!

I've always had a fascination with dollhouses and miniatures. I bought a plain wooden house a while back and I've been saving it for the right project. Last week I was finally ready to dive in. I gathered up some goodies and went to work. Here is my Home Sweet Home:


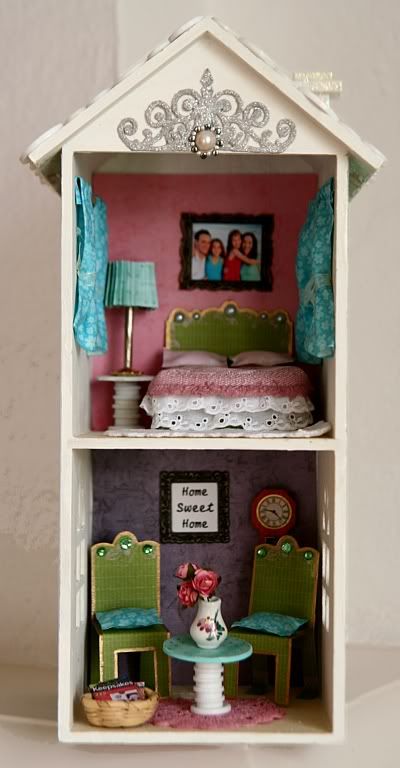
I used Shimmerz on several places throughout my little house:
*I painted the chimney with Pixie Dust Blingz and added some fine glitter on top of it.
*I painted a piece of decorative Prima felt with Hi Ho Silver Blingz to create the shimmery, silvery decoration at the top of the house.
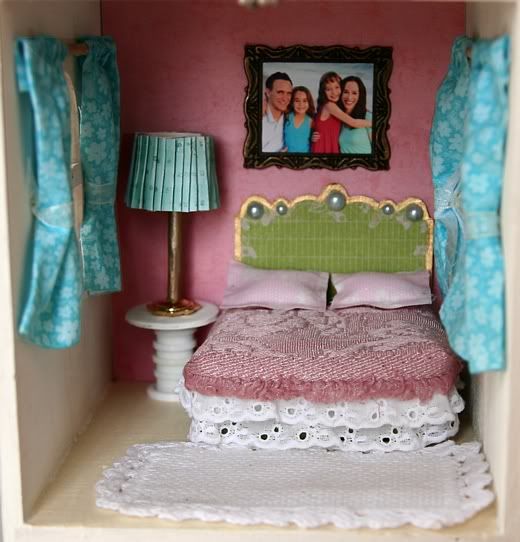
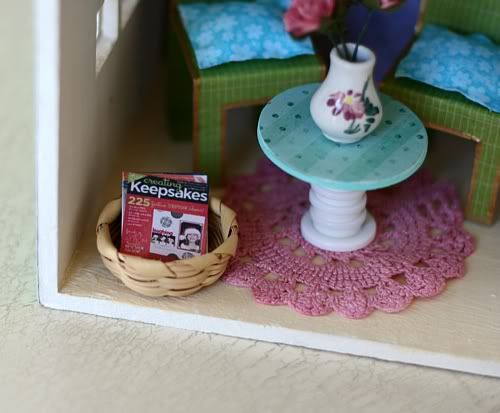
*I sprayed the bedspread fabric (originally a light tan color) and the downstairs rug (originally white) with Bed of Roses Shimmerz Spritz for a little extra color and shimmer.

Here are some of the other things I did to make my little Home Sweet Home:
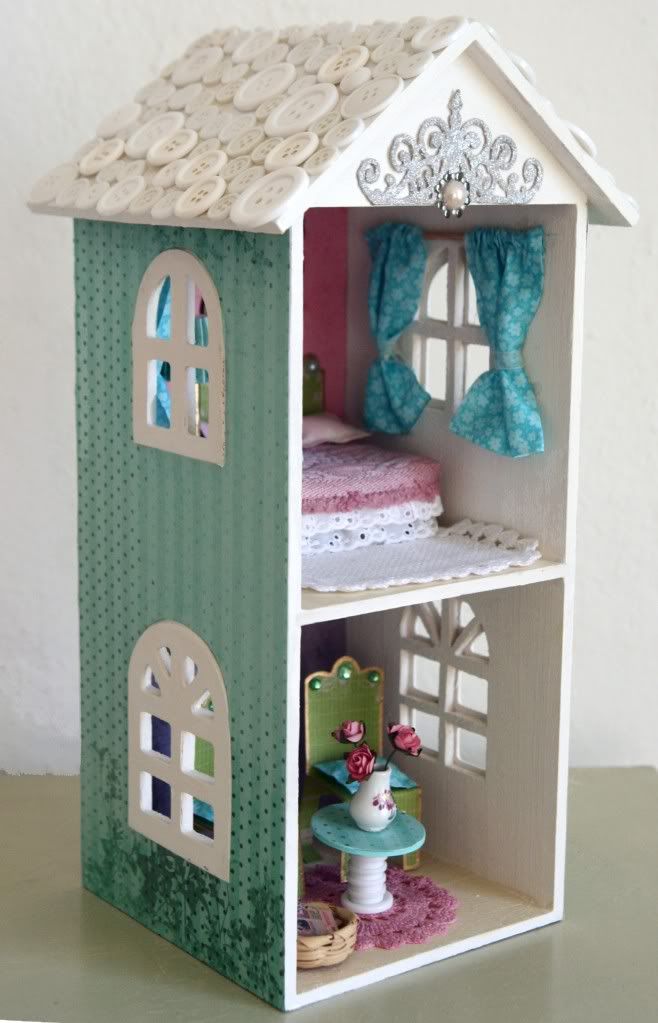
*I covered the outside and some of the inside walls with Prima paper.
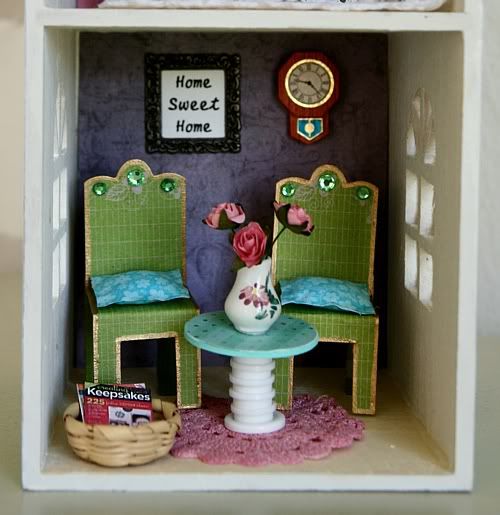
*I made the bed and the chairs out of the packaging from Prima flowers. I added little pearls and rhinestones.
*I glued buttons onto the roof
*I made the curtains out of fabric and made the rods out of pieces of wooden dowels.
*I made the bedspread and the pillows out of fabric. Thank goodness for Fabritac!!
*I made the bed skirt out of lace.
*To make the lamp shade, I took a strip of Prima paper and created tiny pleats, then I glued the ends together. I added a little rod and stuck it into a gold button base.
*I glued a stack of white buttons together to make the bases for the table. For the table tops, I covered chipboard circles with patterned paper.
*I printed out a tiny copy of our family photo and put it in a mini metal K&Co frame to hang on the wall. Yep, that's us!!
*I computer printed the "Home Sweet Home" sign and put it in a frame to hang on the downstairs wall.
*I scanned the cover of Creating Keepsakes magazine and printed out a tiny version of it to put in the basket.
*I put a few mini Prima flowers in a vase that I "borrowed" (shhhhhh . . . don't tell) from my daughters' dollhouse.

I can't tell you how much fun I had creating this little house!! I'm ready to move right in!

-Stacy Cohen

Monday, December 28, 2009

Shimmerz Kid!


I love the handmade traditional part of Christmas at our house! This is my son, Curtis using Shimmerz Paints in "Tickle Me Turquoise" to create a paper bracelet for each of his sisters. Yes, kids can use Shimmerz too because they are a safe, non-toxic product, and kids LOVE the sparkle, even boys! "Mama, I love Shimmerz...They are so beautiful. My sisters will love these!" He also used "Bed of Roses" Shimmerz Spritz on the pink flower, "Bamboo Leaf" Shimmerz Spritz on the green one, and "Baby's Breath" Shimmerz Spritz on all of the bracelet cuffs. The gift bags he made were using 3 snowflake die cuts placed on the bags as masks, "Rockafella Blue" Shimmerz Spritz, "Bed of Roses" Shimmerz Spritz, and "Bamboo Leaf" Shimmerz Spritz, separately. He cut of the tops of the bags using a pair of decorative edge scissors. Needless to say, I think he is hooked!

Valentine's Day is right around the corner! Stock up on those Shimmerz Paints early..."Royal Red", "Hottie Pink", "Cotton Candy" Spritz...get a headstart with your kiddos and create the prettiest Valentines in the classroom!

Have a great New Year's!
Lori S.

Saturday, December 26, 2009

A Thing for Roses | Shimmerz Paints


I have a "thing" for roses, so it's no wonder I try to turn everything into one. I played with Melissa Frances Crepe Paper and Mica today that I picked up at my favorite store, scrappin' Girlfriends but it just needed some extra PUNCH....so I reached for my Shimmerz Goodies! I used "sunny" Shimmerz first and just lightly brushed it on,,,then grabbed my "bed of roses" Spritz and gave it just a few spritz, and WOW did it start to pop into a sparkely fun little project. The Shimmerz just brought it to life! I can't wait to make more! Hope you're having a lovely weekend! ((hugs)) ~j

Thursday, December 24, 2009

Shimmerzy Frame...

Have you ever thought of using Shimmerz paints to
frame your photo's or journaling?

I did using my December The Girls Loft kit
and lots of Shimmerz!! 
I love  how it turned out on this
layout I did of my hubby and me...
I wanted to frame this random photo my son took of the two of us.
He was snapping pictures left and right and after looking through
them, I saw this and was thrilled to find it in the bunch of us..


I used Shimmerz Tickle Me Turquoise paint with a
medium sized paintbrush. I didn't care if the lines were perfect
or not, I freehanded my frame around the edges, letting it touch
my photo. I also framed my layout on the edges with the same
freehand technique. 

I also used the same Tickle Me Turquoise  with dotted lace paper and painted the "dots"
at the top and bottom.  My letters were originally silver and since I was
going with a "turquoise" theme...I decided to paint over the silver glitter
to make turquoise glitter. LOVE how they turned out!

Trimming small circles, I placed one at the top right of the kraft cardstock
and spritzed with Shimmerz Licorice spritz. Love how that made a slight shadow.

I used the mini sack for an envelope in which a tag with
journaling is.  I spritzed the tag with Licorice Spritz then journaled on it
here:


Thank you so much for letting me share.
May you ALL have a very blessed and Merry Christmas!
~Leslie~

Tuesday, December 22, 2009

Hurry, hurry!!! We Want To Hear From YOU

!!! Shimmerz Paints is having a Design Team Call! Shimmerz is a cutting edge manufacturer, and looking for individuals who are not afraid to think outside of the box. Get Messy! Shimmerz is looking for artists and designers who can create a variety of projects such as layouts, cards, altered art, and whatever else you can do!
What To Send:
Submit 2-3 projects (Does not have to feature Shimmerz, but we want to see the sparkle and shine); Good Photography is a MUST!
Name and Contact Information.
Blog Address.
Previous Design Team Experience and/or Publications.
A few sentences on why you want to be a part of Shimmerz.
If interested in being a part of Shimmerz, please apply by emailing photos of your projects, and other information to mcelyea@q.com by December 28, 2009. The new Design Team will be announced on January 1, 2010.
Blog: shimmerzpaints.blogspot.com
Website: shimmerzpaints.com
Email: mcelyea@q.com

Soldered Photo Pendant


Hello, this is Lori S., Guest Designer for Shimmerz! Last week I made my first ever piece of soldered jewelry! The person I made it for received it so now I can post it! It certainly isn't perfect, but for my first piece I am thrilled. I printed the photo onto a plain piece of white cardstock using photo quality. I cut out words from pages of an old book and began creating a collage on both sides, as they would both show through the glass. I then lightly sprayed Treasured Hymn Shimmerz Spritz directly onto the piece, photo and all. I absolutely love the shimmery effect. It is subtle yet beautiful. If you have not used these products before, they are a MUST for the new year!! I then sandwiched the collage between 2 pieces of glass. I used the copper tape and began the soldering process. I googled how to do this and read different websites before attempting it, and I also practiced on a piece of glass first. I want to do a couple more pieces, and it didn't take too long to complete, really. Hopefully after the first of the year I can experiment a little more with this new found craft! Again, not too shabby for my first piece! Merry Christmas everyone!

Last minute Christmas tags

Do you need a quick, last minute gift tag? I have a solution. I didn't have any white tags so I made these by cutting some white cardstock, punching a hole and adding a white reinforcement label. You can find it at an office supply store.

I punched several 3/4" circles and arranged them randomly on the tags. I sprayed the tags with Olive Branch Shimmerz Spritz. Once the circles were removed I had this beautiful background. Next, I used Licorice Shimmerz Spritz to lightly spray over the tags.

I embossed the bottom edge of the tags with embossing folder from Cuttlebug.

I die cut stars from red felt, or you can trace a star on any shape that you like. I painted the white flowers with Mossy Stone Shimmerz paint. I added hemp cord, a little glittery pom pom and names of the recipients stamped on the paper strips that I sprayed with Olive Branch Shimmerz Spritz.


I hope you give these tags a try.

Monday, December 21, 2009

A Magical Shimmery Christmas


It's beginning to look a lot like Christmas....not only one of my favorite Christmas songs....but oh so true when you Shimmer things up!

When I saw Dena's idea for using Shimmerz Spritz on her photo paper before printing I was hooked and had to try it for myself....thanks for the awesome inspiration, Dena!!!


Some gorgeous papers from Webster's Pages - Winter's Wings made a perfect backdrop for my photo....which was a little blurry, so I love the 'little lights' effect that the Shimmerz created. I used Epson Matte Presentation paper and spritzed with Baby's Breath Shimmerz Spritz and let it dry completely and then printed my photo normally with my ink jet printer for this fabulous effect.


Hope you have a Shimmery Christmas!


Lucy

Sunday, December 20, 2009

Vinyl Letter Board


Hey readers, Lori S. here, guest designing for Shimmerz this month! I am very happy with how this board turned out! My friend, Janny did them for a church thing and had an extra vinyl quote so she gave it to me. I cut a piece of wood to fit and routered the edges to make them pretty. Then I spray painted the wood, sanded the edges of it to make it look rustic, and applied the vinyl quote. I used Mod Podge in a matte finish over the top to seal it. I painted the pre-cut wooden stars in metallic gold paint, then applied "Gold Glimmer" Shimmerz Blingz over the top of the stars...Oh yes...You can use Shimmerz on wood!! I hot glued the stars in place. If you do not have access to a vinyl cutter, I know you can order them online, find kiosks in the mall, and Craft Warehouse or some other craft stores may have them. That goes with the board as well, and usually they are already painted and sanded for you.

Happy Creating!
Lori S.

Love tags and Shimmerz Spritz

I know that Christmas is this week, but I wanted to make some love tags. Red is a good color and it can be used any time of the year.
For these tags I used Bed of Roses Shimmerz Spritz and Licorice Spritz. I had recently cleaned my space and found a ton of fun things to play with.
I stamped the tag with VersaMark ink and then embossed the image with clear embossing powder.
I stamped the background with a polka dot stamp.
This is where the magic begins. First I sprayed a light color coat with Bed of Roses Shimmerz Spritz. I used a towel to gently wipe the embossed areas, and the tag. I sprayed with Bed of Roses, again, and then added a light coat of Licorice Shimmerz Spritz. I wiped the embossed areas and this time I got that Licorice color in the grooves of the embossed image.
I added some stamped hearts, Love sentiment and a fabric bow with a button. Perfect gift tags for that someone special.

Saturday, December 19, 2009

Children's Fingerprint Tree with Shimmerz


I'm in charge of the 2-3 year old Sunday School class at church and since Christmas is right around the corner, I wanted to do an easy and inexpensive ornament craft with them.

I came up with this Christmas tree.


Each "dot" is actually a finger print. I used Shimmerz paints because they are totally and completely safe. If my daughter licked her finger, I wouldn't worry a bit. When crafting with many little ones, it is important to know that they will survive the experience, right? (giggle)

Lyssie (just turned 3 y/o) is very proud of her handiwork (or should I say fingerwork?)


If you are interested in making this craft with your sweeties here is what you'll need.
Materials
1. One 8 1/2 x 11 inch piece of white cardstock
2. Royal Red and Celery Shimmerz
3. Brown paint (I used acrylic because that is what I had on hand.)
4. A star of some sort. (I used a brad, but a punched star would work too. Or you could even do a yellow fingerprint for a star.)
5. Ribbon for hanging
6. Pencil, eraser, hole punch and triangle template
Directions
Prep-Work
1. Cut 1 ovals out of your cardstock. I used my Creative Memories oval cutters. This made it really easy.
2. Trace a triangle very lightly in pencil (this marks the boundaries of your fingerprint tree.)
3. Paint your brown trunk.
4. Punch a hole and thread your ribbon through the top.
With the Children
1. Paint one finger with Celery Shimmerz and stamp it inside the triangle. Repeat until you have the look you want. You can manually stamp the child's finger, or give them more freedom to do it themselves.
2. Paint one finger with Royal Red Shimmerz and add ornament accents.
3. Add a star (if desired)
4. Write the child's name and date on the back. Erase your pencil triangle.
5. You're done! Wasn't that easy?
Happy Shimmery Crafting!
xoxo
Bethany Kartchner

Friday, December 18, 2009

On the Tree!

Every year it seems that putting up our Christmas Tree results in some kind of crazy fiasco. This year went off with a hitch, thank goodness! I think this is a record for our family. I love taking pictures of all of my fave ornaments on my tree. This picture turned out fabulous and I wanted to highlight it in a layout. And what better product to bring out the fabulous shimmer and shine of Christmas than our Shimmerz Spritz and Blingz?
I made the cute chipboard tags by using our Shimmerz Spritz in Eucalyptus and a paint brush! Then I layered some of our GORGEOUS Gold Glimmer over the top for an even more eye catching shimmer. And because at Christmas time you can go over the top a little, I sprinkled the edges in large chunky glitter to achieve this look:

So this year why not pay homage to your ornaments and tree and don't forget to make it shimmery and shiny while you are at it!

Happy Holidays!

Fairy Garden Shimmerz

What fairy garden layout would be complete without some shimmery, sparkly Shimmerz?? 


I created this layout using almost all Prima products, and of course I had to add some Pixie Dust Blingz to the white Prima flower! Very appropriate for a fairy page, don't ya think? I used Celery and Green Olive  Shimmerz on the leaves.


I used lots of tulle behind the photos to give the page an ethereal feel:


Have a magical day!!!

-Stacy Cohen

Big Announcement Coming up at Shimmerz Paints!!!


Hi Shimmerz Fans!! I'm so excited to announce that I can't announce what we've been up to!! ;) But I can tell you When........
just in time for CHA WINTER 2010 we have a Big Announcement that we are SO excited about. It's been in the works for some time now and we think that you are simply going to Flip!

I can also tell you that it will include a Big Name and a Big New Release!!!

So be sure to keep checking right here on the blog for more updates as they become available. :)

Thursday, December 17, 2009

Guess where Shimmerz is today?!?!

Some big news for all you Shimmerz fans. We're featured on the Scrapbook Trends blog as of today. Make sure to check it out and tell us what you think!
http://scrapbooktrendsmag.com/blogs/scrapbooktrends/

-S-

Shimmery Christmas Trees


I used Purple Cows 2-in-1 Trimmer along with designer blades 2801, 2803, 2810, and 2811 and Making Memories Mistletoe line to create this Christmas card. It was very simple to make! I just cut strips of patterned paper using the different blades and layered them along the bottom of the card.

I spritzed the top portion with Olive Branch Shimmerz Spritz, cut the trees from patterned paper, painted them with Pixie Dust Blingz and adhered with foam adhesive. I added a few little embellishments and now I have a great accompaniment to any gift or cute a gift card holder!

Here's a close-up of the different borders and the bling.

supplies: patterned paper- Making Memories, cardstock- Bazzill; ribbon- Junkitz; Iridescent paint and Shimmering Spritz- Shimmerz Paints; gems- Zva; label- Dymo; trimmer- Purple Cows; adhesive- glue arts, glue dots int'l; ink- -clearsnaps

Add a little sparkle to you holiday gifts!

Tanisha

Shimmerz on Black


One of my favorite ways to use Shimmerz Spritz is on dark backgrounds - it looks like it is lit from within! Here is some Baby's Breath Shimmerz Spritz over the foil ephemera sheet from Making Memories on top of Jenni Bowlin Coordinations.....lovely!


The finished layout - don't you love the metallic SHINE?!?


Just bringing a little sparkle to your day! :)

Lucy