Showing posts with label Autumn. Show all posts

Saturday, October 24, 2020

Colorful Autumn | Audrey Yeager

 Hello and happy fall!!  One of my most favorite things about living the the Northeastern US is the changing of the seasons.  Our autumns are full of vibrance and color, and I wanted to capture that on my page using my Shimmerz products!


I began by covering my background patterned paper with gesso.  Then I added tried out some yellows mists as a base including Spritz in Chickadee and Tuscan Sun.  Then to deepen the shade, I added a Vibez in Rolling in the Hay. 


Using a burst pattern stencil, I then went over the yellow base with some oranges, greens, and red shades including Coloringz Mandarin Mai Tai, Vibez in Palm Reader, and a Spritz in Caribbean Sunset. 


To add some texture, I started with some Dazzlerz in Coral Me Crazy, and mixed in some Mandarin Mai Tai and Caribbean Sunset to make a brighter orange color.  I used a palette knife to spread it through the stencil. Finally, I added a few splatters of Coloringz in Moody Mauve.


For embellishments, I punched some leaves from colored papers, and backed a cut file for the title.  A few little clusters of some chipboard trees, some wood veneers, and journaling to top it all off!


You can watch the whole process below:


Thank you and happy fall!!

-Audrey


Thursday, August 20, 2020

Fall Leaves Mixed Media Layout - Daisie Scraps

 Hi everyone!  Daisie here sharing my first Shimmerz DT layout!  I'm so excited to be here!  I decided that with fall just around the corner it's time to start getting into the fall scrapping mood.  I pulled out 2 cute 4x6 photos of my youngest and a friend playing in the leaves and used that as my starting inspiration.  


Here is a list of the Shimmerz products I used for this layout:

I started with a piece of white cardstock.  I thought I was going to paint my leaves directly onto the background of my paper so I mapped out my original design idea and started creating my leaves.  To do this I used an embossing stylet to "draw" my leaves out.  The stylet creates a raised edge on the opposite side of the paper which is perfect for filling in with paints without worrying too much about going outside the lines.  I "drew"  all of the leaves I thought I was going to use and then started painting.  

I used quite a few different Shimmerz products to get the colors and effects that I was aiming for (see product list for all of the colors used!).  I wanted to have some of the leaves look like they were turning so I mixed some of the light green shades with browns and deeper teals.  I realized that I didn't have any orange colors and decided to use the purples and deeper pink colors.  It worked out perfectly!  

I quickly abandoned my original layout plan and decided to cut out the leaves I had created.  I then stitched down the center of each using gold thread.  I pulled out some kraft cardstock for my background because it went great with the color of my leaves.  Then I started playing!  I sprinkled Gold-N-Roses and Pink Moscato all over the background in a diagonal.  I pulled out some scrap pieces of paper and fussy cut out some butterflies and some phrases.  The butterflies I jazzed up using the Foilz in Mother of Pearl.  It adds all of the shimmer with no color.  It's perfect to add that special sparkle to any plain embellishment.  After that I just kept embellishing around my leaves.  They really put you in the fall state of mind! 


Don't forget to add my name (Daisie) to the comments on your next purchase for a fun mini freebie.  Please check out my video to see the complete process!


I had a lot of fun creating this layout!  I hope you enjoy it!  I can't wait to see everyone's favorite colors to use for fall!  Thanks for stopping by!

Daisie
@daisiescraps


Wednesday, September 18, 2019

Autumn Colors | Julee Tilman

Hi Shimmerz friends! It's Julee Tilman popping in to share a little Autumn loveliness with you today. I recently got a few new colors of Shimmerz and Inklingz and decided to have a play with a few of them, plus some Coloringz sprays.


I started out by smooshing Freshly Squeezed, Scarlett's Fever, and Lil' Yellow Skool Bus on watercolor paper and then embossing some autumn leaves in copper onto it.  I then splattered with a bit of Penny 4 Your Thoughts and fussy cut.  The colors dried a little less vibrant than I wanted, so I spritzed each one with a different color of coloringz spray to up the intensity.

Next I painted some Royal Red, Dandy-Lion, and Marigold onto an acrylic block and smooshed down onto watercolor paper.  I then spritzed with water to make the colors run a bit and then added a few squirts of coloringz and some more water to extend the color to where I wanted it for my elements.


Next I cut a few sprig die cuts and painted them with Penny 4 Your Thoughts.  The sentiment is embossed in copper onto a die cut circle and popped up on dimensional foam.  I then started tucking the leaves and die cuts around the sentiment leaving room for this beautiful Dotz embellishment from the Color Splash Set that matched the colors beautifully.  I finished off with lots of splatters, some tattered edges and a few enamel dot accents.

Thanks so much for stopping by today! If you're inspired to hit the Shimmerz shop, mention my name in the comments when you place your order for a free surprise.


Wednesday, August 28, 2019

Sun's Up Mug's Up | Julee Tilman

Hi friends! It's Julee Tilman here to share another shimmery card creation with you. I love autumn colors and while the leaves aren't turning just yet, this flaming autumn blaze is what the sun feels like around here lately! 😂


I started this card with Spun Sugar Dazzlerz and used it to stencil leaves all over a piece of watercolor paper. Dazzlerz are like a super shiny shimmer paste, perfect for adding dimension and shine. When the Dazzlerz had dried, I sprayed the piece with Coloringz in Scarlet's Fever, Freshly Squeezed and Lil Yellow Skool Bus. Coloringz are flat color sprays in super vibrant colors. I love how shimmery the Dazzlerz are under the Coloringz. I splattered a bit of Chocolate & Diamonds Inklingz all around and then set aside to dry.


I had a bit of excess ink on my craft mat, so smooshed a piece of cardstock into the ink for a coordinating background and stamped my sentiment on it. The stamps are from Reverse Confetti, and I stamped the mug with water safe ink and then watercolored with the same colors I used above. This is cut with a coordinating die. For the sun background, I sprayed Lil Yellow Skool Bus and Freshly Squeezed on two circle die cuts, then stamped the rays on the yellow and layered together.  A few leaves were stamped and die cut from another sheet of paper I smooshed ink onto.  A rounded rectangle and a cream card base finish things off.


Thanks so much for stopping by today! I hope this little project has inspired you. As always, if you're feeling up for a little shopping in the Shimmerz Shop, meniton my name in the comments when you place your order for a free surprise.


Saturday, October 20, 2018

Autumn Vibes Color Challenge | Amanda Baldwin

Hi Shimmerz Friends!

Amanda here, & I am so excited to be sharing my take on the 
Autumn Vibes October Color Challenge!
My focus color for this month is Vibez Quit Yer Wine-n and oh my heart, this color is divine!!! Absolutely perfect for all your Fall creations!
Rather than rave about how beautiful this color is though,
here's a look at what I created with it.....

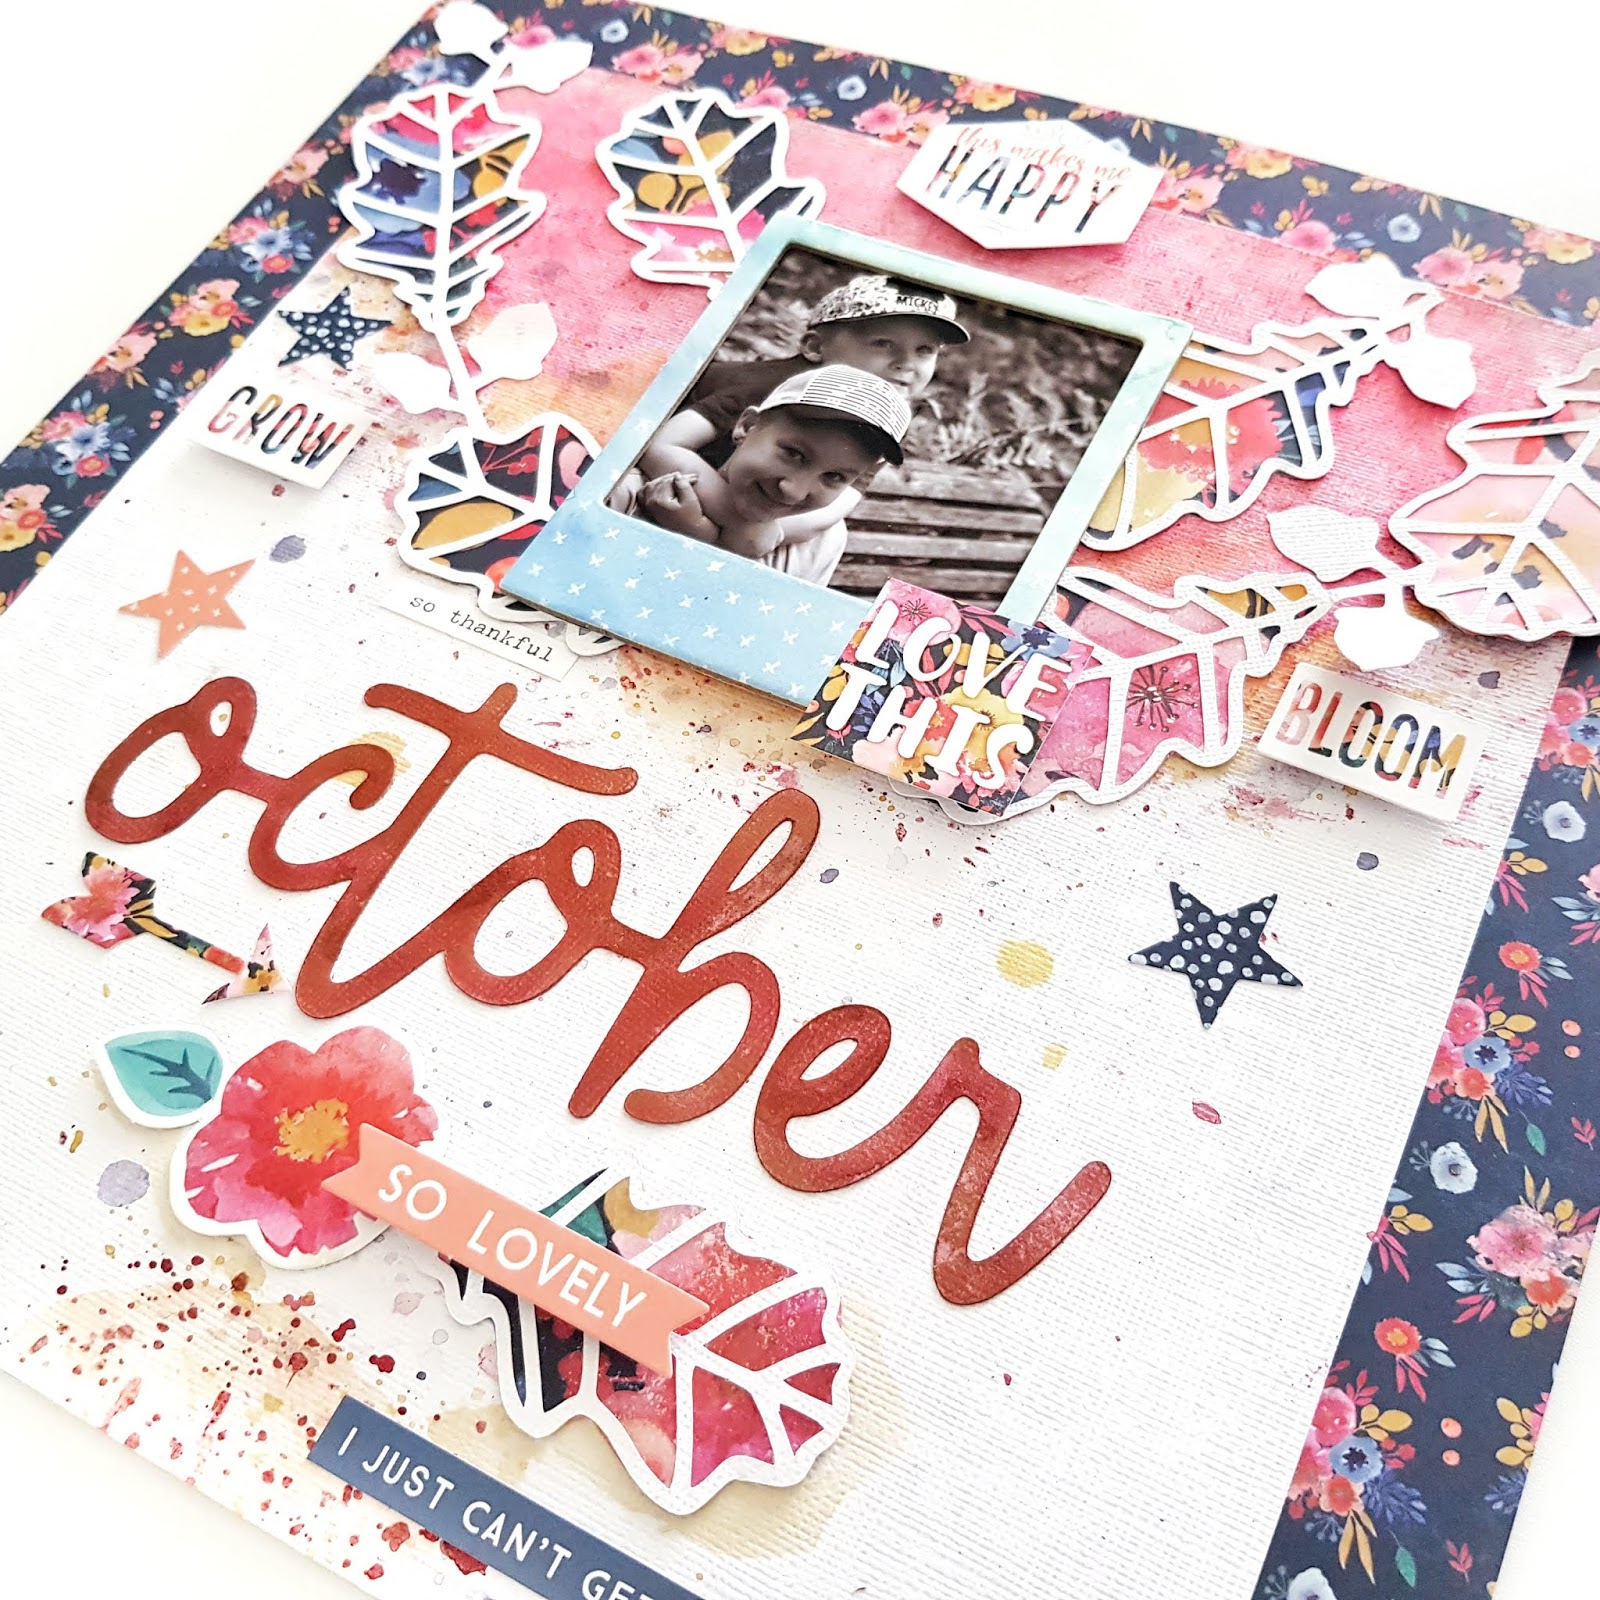
"October"


So Beautiful! 
I just adore that photograph of my two darlings, and the Vibez Quit Yer Wine-n color was the perfect choice for both celebrating Fall and childhood playfulness! 
I apply Quit Yer Wine-n to the top semi circle of the layout with the packaging technique. This creates a more textural look, and really highlights the berry tones within the Quit Yer Wine-n color. I also splatter this pretty color along the semi circle rim, and then decide to create a much smaller semi circle of splatters at the base of my layout too! 
To compliment Quit Yer Wine-n, I add Vibez Glorious Day and Coloringz Ahoy Matey to the mix. 
Here's a closer look for you.....


Gosh, it's pretty!!!


The golden hues in Glorious Day really add that 'extra' to the wine base. So beautiful! 

While that mulberry wine base is gorgeous, I really must stress how different the Quit Yer Wine-n color appears when applied this way. Using the packaging technique really impedes the shimmering sediment in the paint. You'll still see 'shimmer' but  not at the intensity that we're used to. 
You'll spot the difference immediately when you see my title sprayed with Quit Yer Wine-n below....


Oh.WOW!!! 
How incredible is that golden shimmer through that burgundy wine color?!! 
Absolutely sensational!!!


Quit Yer Wine-n is such a beautiful, rich color and certainly looks its absolute best when sprayed onto projects. 


For a few painty tips, and lots more details - including how this beautiful layout came together, 
please check out my process video on the Shimmerz Channel HERE 
I hope you enjoy watching, and feel inspired to try our beautiful Vibez: Quit Yer Wine-n for all your Fall creations! Get yours from the store HERE 

Thanks so much for visiting, 


**Type AMANDA in the comments section of your order to receive a FREE gift!**


Tuesday, October 16, 2018

Hello My Pretty | Julee Tilman

Hi Shimmerz friends! My boys are super excited for Halloween this year, bringing home all sorts of Halloween drawings and projects from school each day. Their excitement inspired me to pull out some traditional Halloween colors and create this fun card using Shimmerz paints and stamps.


The background of my card is randomly stamped with the outline flower image from the Fresh Start stampz set and then loosely watercolored with Pumpkin Shimmerz. I love how simply beautiful this flower can be for making your own backgrounds.

Next I used an ink blending tool to sponge Pumpkin Shimmerz onto cardstock using the Tim Holtz Shifter Diamonds layering stencil. After this layer dried, I took another pass with Coal Shimmerz to complete the alternating pattern. I decided to use the same stencil for the black panel, repeating in Pumpkin Shimmerz twice, since it had the perfect amount of shimmer to stand out on the black cardstock.


My center piece is cut from some Pebbles Midnight Haunting paper and I painted a bit of Pumpkin Shimmerz on cardstock to mat the circle, then created a rosette with patterned paper. The rosette is a 1.25" x 12" strip of paper, scored at 1/4" intervals, then folded accordion style and glued together  I accented with a stick pin, a bit of ribbon and a flower button that I painted with Pumpkin Shimmerz to match.


Thanks so much for stopping by today. I hope you're inspired to add a little Shimmerz to your creations this week! And if you're in the mood to pick up some new colors, include my name, Julee Tilman, in the order comments at checkout for a free gift.


Shimmerz Products Used
Shimmerz: Pumpkin, Coal
Stampz: Fresh Start

Wednesday, October 3, 2018

Love You | Niki Rowland


Hey there Shimmerz fans! Niki here with you today and I'm sharing an Autumnal layout with you today. I have used just one colour on my layout: Blingz Gold n Roses.


I started off by painting lots of leaves cut from white card with a cut file. I gave them just one coat but applied the paint fairly thick. The Gold n Roses Blingz is absolutely gorgeous...it's a lovely deep pink/purple colour with a golden shimmer running through it.


While I waited for the leaves to dry I applied some of the same colour to a piece of packaging. I added some water to make the paint a bit more watery and then applied it directly to a piece of white cardstock. I applied it all the way across the page so that it would show from underneath my paper layers at the top of my layout.


Once everything was dry I added gold stitching to the leaves and then arranged everything onto my layout.


Once the paper layers, photo and leaves were all arranged onto my layout I then added a few extra embellishments including a wooden mushroom, a couple of wooden buttons and a wooden leaf. I then added the gorgeous Blingz Gold n Roses to those too.


Finally I finished off by adding a few paint flicks in...you guessed it...Gold n Roses Blingz! How versatile are these Shimmerz products! I've used this paint in four different ways: painting die cut cardstock shapes, packaging technique, painting wooden embellishments and adding paint flicks.

I absolutely loved just using the one colour to create this layout, it was a great experiment and I'm super pleased with how my layout turned out!

Don't forget if you place an order for Shimmerz Paints, put my name in the comments and you'll get a free gift - happy days! 

Happy scrapping xx 

Products used: Blingz Gold n Roses


Tuesday, October 2, 2018

Autumn Color Challenge Card | Julee Tilman

Hi Shimmerz friendz! This month, Samantha challenged the team to select one color and create an autumn themed project with that color as the focal point. I recently purchased a pretty wreath for my front door, and thought that I could sort of recreate it on a card with Don't Rain on My Parade Vibez. This color is a beautiful, shimmery, dusty blue that takes my breath away.


To create my wreath, I pulled out the Petite Poppies Stampz set and selected one of the leaf images to create a wreath from. I then stamped in a circular repeated pattern to form a wreath base. I also stamped another slightly larger wreath to tuck behind. Then I stamped the leaf image multiple times and embossed everything with gold embossing powder. I then watercolored with Don't Rain on My Parade and fussy cut the pieces while my boys watched football.

To compose the wreath, I layered all of the pieces around a sentiment circle from my stash. It's a digital design I created, printed on a laser printer and foiled with a minc machine. When I had the wreath shape arranged how I liked, I started with the accent pieces. I embossed one of the petite poppy images in gold and then painted with Don't Rain on My Parade Vibez and Miner, Miner 49er Inklingz. While I was at it, I gave some wood embellishments a coat of Salt of the Earth Paste-eez to prime them, and then painted with Don't Rain on My Parade and Miner, Miner 49er. I used the same colors for a small  paper flower, then tucked everything together and arranged with some berries and gold ball floral picks.


While all the glue was drying on that, I set out to make a cozy background. I used a plaid stencil to sponge the Don't Rain on My Parade Vibez onto cream colored cardstock for the background. Doesn't it look like a cozy blanket? When I'm ink blending with sprays, I like to use mini ink blending foam. The trick is to dab your foam off on your palette until it's not too watery and then take it to your stencil. If it's too wet, it will seep under the stencil, so start with a little, and you can always layer more color on as needed.

I loved how the background turned out, but decided I wanted a pop of color between the blues for contrast. I wanted a rusty color, but didn't have one in my stash. So I decided to create one with a bit of Scarlett's Fever and Freshly Squeezed Coloringz mixed with  So Sappy Shimmerz. It turned out a beautiful shimmery copper color and was perfect for some die cut leaves. Don't they just shine? I tucked the leaves in behind the wreath to finish off the card.


Thanks so much for stopping by today! I hope you've enjoyed this bit of fall shimmer! And if you need to stock your stash with some more shimmery (or stampy) goodness, be sure to take advantage of the promo going on at the Shimmerz Paints shop through October. 5 with code HELLOOCTOBER. If you place an order, put my name, Julee Tilman, in the comments, so they know who sent ya!


Shimmerz Products Used:
Vibez - 
Don't Rain on My Parade
Coloringz - Freshly Squeezed, Scarlett's Fever
Inklingz - Miner, Miner 49er
Shimmerz - So Sappy
Paste-eez - Salt of the Earth
Stampz - Petite Poppies

Saturday, September 22, 2018

Fresh Start with Julee Tilman

Hi friends! Today I'm sharing my first card for Shimmerz. I fell in love with their beautiful products earlier this year when I asked for a sweet little collection of colors for Valentine's Day and now I am so excited to have been selected to join their card creations team! I'm a stamper at heart, and the beautiful new line of stamps, combined with all the gorgeous colors in the Shimmerz line have me giddy to create!


I started my card with a simple smooshed background. I cut a 4 x 5.25" panel of tan designer paper, then sprayed a bit of Chocolate Brownie Coloringz (Coloringz are vibrant, highly pigmented sprays with no shimmer) on a piece of acetate packaging and then smooshed onto the designer paper. I love the subtle painterly effect it gives! Would love my walls to have this exact treatment (but wouldn't love to do it myself - haha)! I splattered some of the leftover ink, then sponged around the edges lightly with a brown ink pad.


Next I pulled out the lovely Fresh Start Stampz set. This set has some beautiful multi-step floral imagery as well as sweetly lettered sentiments. I was particularly drawn to the every day is a fresh start sentiment, since I'm starting this new journey with Shimmerz.  So I stamped the sentiment on a die cut circle  and set it aside while I got to work on the flowers.

I started with the solid flower, inking first with clear Versamark ink, then adding Lil' Yellow Skool Bus Coloringz on my craft mat and then picking up with a waterbrush to give the stamp a good coat of yellow. Next I stamped the detailed flower in a salmon color and then the outline flower in brown.  I stamped three flowers all together, then fussy cut them, cutting just the center portion of one in order to add a little dimensional pop to the flower center. I used a makeup brush to pick up some of the leftover inks and sponge around the edges of my cut flower and the sentiment circle.


Since I had picked an autumn palette, I gathered a few fall embellishments... leaves from a floral pick from Hobby Lobby, a wooden leaf and some sequins from Target.  The sequins were a shiny gold, but I wanted a more subdued color, so altered them with a mixture of Tidy Widy Texturez (a fabulous white texture paste) with a few sprays of Chocolate Brownie Coloringz and some Coffee Shimmerz (Shimmerz is a beautiful super sparkly paint), then painted the sequins. I also gave the wooden leaf a coat of Coffee Shimmerz, then  pulled everything together with a raffia bow. I dipped the bow in chocolate brownie ink, then added a few rhinestones and glued everything down. For a little extra shimmer I added a bit of Limoncello Shimmerz to the orange leaf and some highlights on the lower layers of the flowers.

Thanks so much for stopping in today! If you need some Shimmerz in your life (and who doesn't?, remember to put my name, Julee Tilman, in the comment section when you place your order. ðŸ˜€ And today's the last day of our fall promotion. Be sure to use code FALL2018 for 20% off your order through tonight (Saturday, 9/22)! Happy shopping!


What's in it?
Stamps: Fresh Start (Shimmerz Paints)
Paper: Thankful Heart (Recollections), cream, early espresso
Ink: Chocolate Brownie and Lil' Yellow Skool Bus Coloringz, Coffee and Limoncello Shimmerz (Shimmerz Paints), Salmon, Palomino, Cattail Colorbox Dye-Stress inks (Clearsnap)
Accessories: Tidy Widy Texturez (Shimmerz Paints), autumn wood cuts and floral picks (Hobby Lobby), sequins (Target), rhinestones, raffia