Showing posts with label Honeymoon Inklingz. Show all posts

Friday, April 17, 2020

Good Stuff | Niki Rowland with Process Video


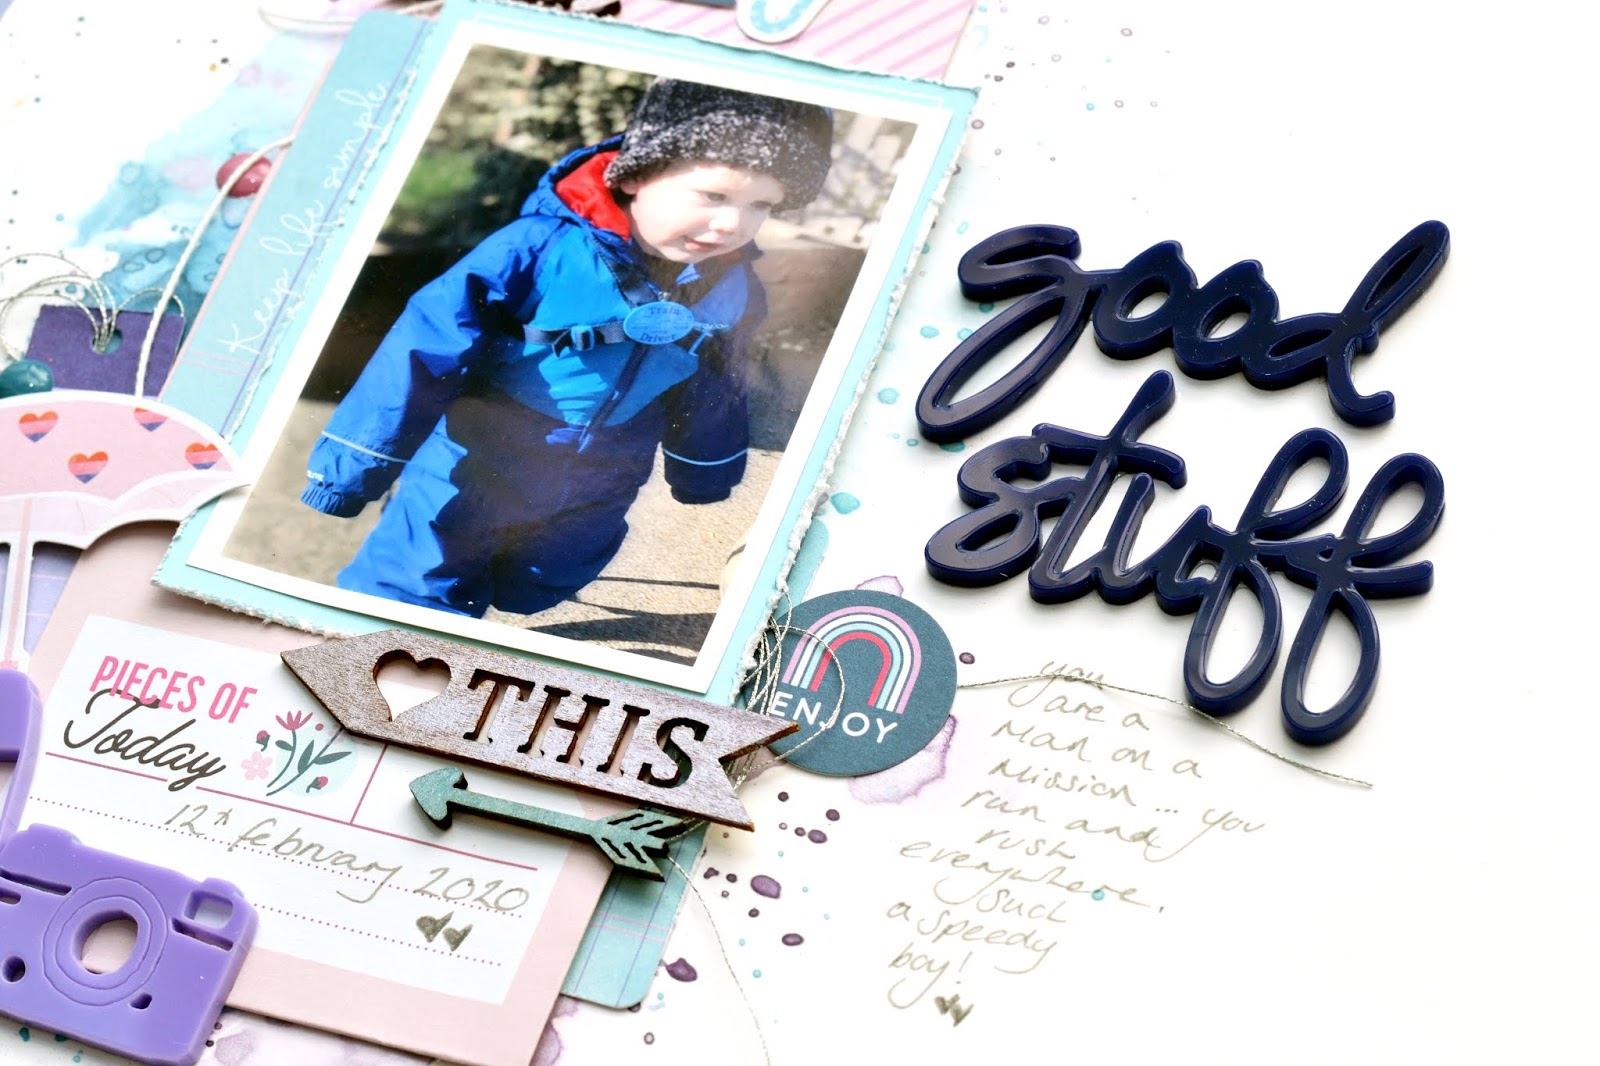
Hey everyone, this is Niki (@nikiclairecreates) with you today with a new layout and process video. I have been using a selection of blues and purples to create my background.

I have used the packaging technique to make the background with the following colours: 
I used packaging to get the water colour effect but also added areas of the dark colours with my paintbrush. This was so I could apply a small amount of the dark colour and had more control. I didn't want to lose my light colours under too much dark, so using a paintbrush made that possible. 


I added lots of splatters in the same colours and then used my mixed media area as a basis for my layout. I layered up a large tag over the paint, and then added my photo to that. I then built up the elements of my layouts from there.


 I added in some wood veneer arrows. I really love to use wood veneer on my layouts becuase they take paint really well. There can therefore be adapted to suit any mixed media layout! I painted the Love This arrow in Purple Peony and the other smaller arrow in Ride the Tide.


Here's another look at the finished layout. There is also a process video for this layout which you can view below.


Thank you so much for joining me today, I hope you have enjoyed this layout and that you also enjoy the process video. Don't forget that if you place an order via the Shimmerz Store, put my name in the comments to get a freebie!

Happy scrapping
Niki xx


Thursday, October 31, 2019

Frightful | Niki Rowland


Hellllllllooooooooooo, and happy Halloween everyone! This is Niki here with you today with a very spooky layout featuring three colours of Creameez and Inklingz.


I really wanted to use that bat patterned paper for my background but then I wouldn't have had anywhere to put my mixed media, so I added a large strip of white across the middle of the background. I was then able to have some fun with spooky Shimmerz colours and create a background. I always think a white background isn't quite right on a Halloween layout so adding mixed media was the perfect way to recify this!


I used three colours:
Together they were a great Halloween combination. I used the packaging technique to apply the colours across the white cardstock strip. I added large areas of the colours and then added loads of splatters too. I almost wanted it to look like a spooky sky so I was sort of aiming for clouds (sort of!)


 I then added strips of torn patterned paper over my background.  I machine stitched through with black thread and hand-drew spider webs onto the background too. I fussy cut out some clouds from one of my papers and added them to the top of my layout.


I finished off with a haunted house, a witch, a gravestone, plus several lots of fussy cut candy. I really love creating Halloween layouts, they are soooooo different from my usual style that I have loads of fun making them.

Thanks so much for joining me today and have a FRIGHTFUL day!

Happy scrapping xxx 

PS don't forget if you place an order via the Shimmerz website, add my name to the comments and you will get a little freebie - happy days!


https://www.instagram.com/nikiclaire/


Tuesday, October 22, 2019

October Color Challenge | Jen McMurtrey


Hello Shimmerz friends!

It's Jennifer today with my October Color Challenge project. When contemplating what color to use for the challenge, I knew that it had to be purple because it is the color I struggle with the most. 


I totally went into this blind when I asked Stacy to surprise me with a purple color . . . and, believe me, she delivered! When I opened my Shimmerz package, there were five purple shades to choose from!! Five! 

Here's a look at the Shimmerz colors I used:

To get this project started, I pulled out all of my Pinkfresh Studio stash and selected purple papers and embellishments to match my paints. I ended up using a piece of black and white floral patterned paper, which I painted using each of the purple shades. After painting the flowers, I used Creameez Get Glowing to paint all of the leaves. This was a pretty time-consuming process, but it was well worth the effort!


Once all of the paint had dried on the patterned paper, I sent it through my Silhouette Cameo using the Flowers For You cut file from Paper Issues.

While that was cutting, I added more of the purple colors to a piece of white cardstock.


Next, I went to work layering everything on the page.


Again, I chose purple embellishments from a couple of Pinkfresh collections to accent all of the beautiful Shimmerz colors.


I love all of the texture and the gold with the purple is stunning.

Here's one more look at the completed project. Despite my lack of love for purple, I am really liking how this turned out. 


Loving the colors you see here? Be sure to visit the Shimmerz shop and pick yours up today. Remember to type JENNIFER in the comments at checkout to receive a freebie with your order.


Thanks for stopping by today! I hope you are inspired to create!

- Jen


Monday, February 4, 2019

Great Things Take Time

Here's my new design team page for Shimmerz Paints,which are amazing!I have used a photo from google free, by A.M. Lorek. 


To make this page, I applied clear gesso to Prima Spring Farmhouse paper.
I applied texture paste with Celtic stencil from TCW,then put the layers with the photo together. I tore off parts of the surface paper of corrugated cardboard, and painted it with gesso. I added the photo with a layer of cardstock taped on, then watercolor paper. I put layers of foam core board between everything to add dimension, and to allow room to tuck things into.


I picked out chipboard from Reneabouquets, and painted it with A Rose( by any other name) and First Blush Inklingz.I put on a thick layer of Clear Rock Candy Crackle with a paintbrush,just letting it drip from the brush, as I moved the brush across the chipboard. It comes off the brush in a line, not drops.


To add visual interest I applied micro beads, seed beads, glass glitter, mica flakes,pearls,a few tiny pieces of gold lace,sequins, rhinestones, Swarovski crystals,green plastic crystals, glass pebbles,beads,shells, pressed flowers,lichen,and leaves, pine cones,Prima flowers,a butterfly from Reneabouquets,Tim Holtz,Prima, and Vintaj metal,and chain and bling from my stash.


All the lavender is Honeymoon Inklingz.The butterfly on the lower left is Tim Holtz tissue. The brown is Penny 4 Your Thoughts Inklingz. The green is Green Olive Shimmerz. I added all the colors to the chipboard later on to balance out how intense the orange is in the photo,plus one more shade. A greyish purple color called Imperial Amethyst Inklingz.  I put it on the cardboard,background paper, and flowers too.


I dabbed a little gold mica powder around the page.The watercolor paper under the photo is painted with a mix of Honeymoon and Steely Blue Eyes Inklingz.


I added a little Prima stamping.


You can see a few wisps of gauze.


I extended the woman's hair out onto the page using copper mica powder and Penny 4 Your Thoughts.


Thank you so much for looking,and have a great week! 


Saturday, January 19, 2019

Bloom Where You Are Planted | Melinda Beltran

Happy Saturday crafty friends,
Today I am over on the ShimmerzPaints.com blog sharing my latest design team creation.
Here's a look at my completed card. It is an A2, top folding card base from some Parakeet Bazzill cardstock. I then used a piece of whit cardstock for my mat. I brushed on a combination of some Marigold and Bumbly Bee Shimmerz Paints to create the shimmery Golden background.

Here's a closer view of the background. The picture doesn't accurately capture the two shades but they are there!

Next, I went to work creating my flowers. I cut them out of plain white cardstock and then painted the die cuts with my Corney Flower Blue Shimmerz Paint and Honeymoon Inklingz. I then staggered and layered the two sizes of die cuts to give the flower some fullness. I slightly curled the petals to give them some added dimension. For the leaves, I started again with plain white cardstock and then painted them with a combination of Olive U Truly Inklingz and Green Olive Shimmerz Paint.

I then created the SVG file for the pretty decorative frame and then layered that along with the flowers to my mat. Here you can see I added some pearl embellishments for a little extra flair.


I then used the Bloom Where planted sentiment from the Hello Happiness Stampz set and stamped my sentiment onto a cross stitched square die. I then cut out another cross stitched die from some green cardstock for an additional layer. I mounted both of those onto my card.

Here is one last look at my completed card. I think it turned out so vibrant and pretty. I think the recipient is really going to enjoy it. 

Supplies Used

DON'T FORGET, ADD MY NAME IN THE COMMENTS SECTION OF YOUR ORDER AND GET A FREE MINI FREEBIE TO TRY!

As always, thank you so much for stopping by. Be sure to come back by and see what the rest of these incredibly talented designers are creating! Until the next time, you have a wonderfully crafty day!

Saturday, November 17, 2018

Poinsettia Christmas Card | Melinda

Hello crafty friends,
Melinda here with you today, sharing another card creation featuring the amazing Shimmerz Paints. 
Shimmerz Paints Die Cut Stamp Card
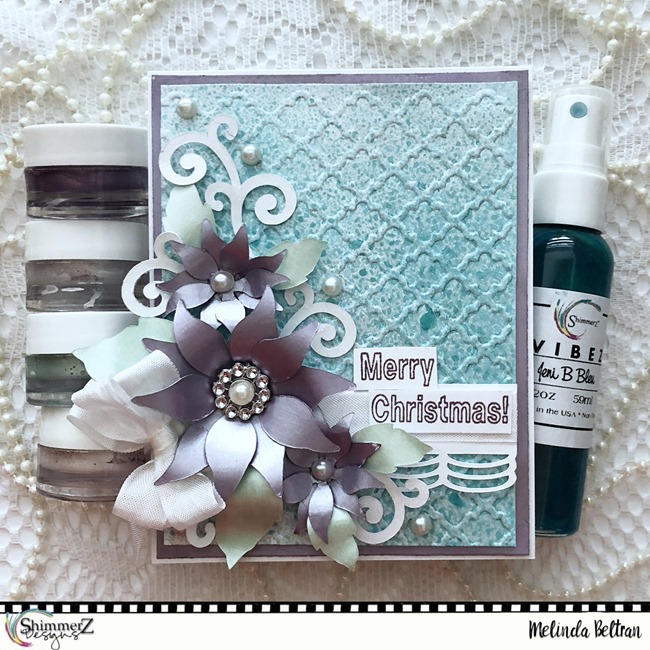
My finished cardis a standard A2 top folding size. The base is plain white cardstock. In fact, everything started out with plain white cardstock! I cannot resist starting with plain white cardstock and watching what this amazing product range will do!


poinsettia cu
I created and cut my Poinsettia and border pieces.  I used Honeymoon Inklingz for the flower pieces and Freshly Minted Inklingz for the leaves. I really like the Inklingz range of products. They are so creamy and glide on the paper so smoothly. I added some pearls and a larger embellishment to the centers of my flowers.


flourishes
For the little swirls, I  added some Puttin’ On The Glitz Pasteez. It gives them a soft sparkle without looking too overdone. You can also see the background here. I started with plain white cardstock, ran it through my embossing machine with an embossing folder and then painted it with some Angel’s Kiss and  Misty Morning Inklingz. I then spritzed it with my Jeni B Bleu Vibez. Love all the shimmer and interest it has.

sentiment
Here’s a closer look at my sentiment. It comes from the new Love Never Melts Clear Stamp Set. I layered it onto my border.

small flowe cu
Here’s just another look at the flowers. I cut them in two sizes so I would have one larger flower as my focal point and then have a couple of smaller ones nestled by it.

bow cu
For a final touch, I added a bow from some of my seam binding ribbon. Seems these days all my cards have some of this….rofl!

shimmerz poinsettia card-melinda2
Here is one last look at my completed card. I really like the way it turned out using some non-traditional Christmas colors!

CHECK OUT THIS GREAT INCENTIVE!!!
ShimmerzSurpriseFreebie SQ3-JPG
Supplies Used
love never melts lg
misty morning

jenni b bleu vibez

puttin on the glitz - pasteez
freshly minted

angels kiss

honeymoon

FREE SVG
I am sharing this free SVG file set exclusively here on the Shimmerz Blog
CLICK HERE TO DOWNLOAD
Free for a limited time, so be sure to scoop it up!

Now all that's left is for your to go pick up a little Shimmerz Paint and you can make your own!

Don't forget to mention my name in the comments when you place your order there! You will get a little freebie to try!


Thank you so much for allowing me to share with you. Please leave me a comment and let us know you were here. Don't forget to check back to see what the rest of these amazing designers are working on! Until the next time, you have a wonderfully crafty day!