Showing posts with label Celery. Show all posts

Wednesday, April 17, 2019

On My Mind | Julee Tilman

Hi Shimmerz friends! It's Julee and I'm popping in today to share a little cardmaking inspiration.


Have you grabbed the Missy Whidden April Color Kit yet? I was so excited to play with this color palette, but when I went to pull the colors from my shelf, I realized I didn't actually have 1 Hot Mama and Honey Do List like I thought I did. Doh! Guess that just means I need to do some shopping, right? 😃 Since I had two of the colors and the kit's exclusive Butterfly Beauties Dotz, I decided to just roll with it and substitute Pip Pip Cherry O and Celery Shimmerz for my card. I love the fun spring feel these colors have, and what's not to love about a little extra Shimmerz?


I started by painting Pip Pip Cherry O, Celery, Bumbly Bee Shimmerz, and the Jeni B Bleu Vibez individually onto a plastic baggie, adding water, and smooshing onto watercolor cardstock. If you try this at home, be sure to dry in between colors or you might end up with a muddy mess. While I had the colors out, I painted a strip of each color to use to punch out circles to frame the beautiful butterfly Dotz.


I stamped a couple tiny sentiments and embossed in white on black cardstock. I then cut a super thin strip of black cardstock to align the butterflies diagonally.  A thin black mat and a white card base and I was finished.


Thanks so much for stopping by today! As always, if you place an order in the Shimmerz shop, mention my name, Julee Tilman, in the comments for a free mini surprise.

Sunday, February 26, 2017

Gypsy Soul


Did you hear that gypsy Shimmerz Siren call out to you?
Yep, that was me, Joyce. 
I’m going to show you how to apply some gypsy/bohemian style
to your art today using Shimmerz Paints.


 I have been enchanted by Gypsy genre and bohemian art styles lately, 
 so I thought I’d take those  feelings and put them on paper.
I adored the movement in the girls dance!
And, I thought I could create such movement with some art products.

  • Applications of stencil and Shimmerz Texturez Tidy Widy were applied over various areas on the 9 x 12 watercolor paper.
  • Then a heat gun was applied over the textured product and allowed to rise, bubble and burst which rendered a lacy look. 
  • On top of the stenciled work, drops of Shimmerz Paint colors were applied, and I quickly added drops of water over the paint colored drops.  After this application, I allowed the color to dry completely before apply several other colors using the same technique.
  • Once all the colors of paint dried thoroughly, I applied a white art pen over the raised stencil work to make it look like a lacy appearance.

And what’s a gypsy girl without her baubles and chains? 
  • Some Inglingz Brass Knuckles was applied over the chipboard chains and then some white art pen markings were added to each bead in the chain.
  • I gently swiped some Shimmerz Celery over the chain. 
  • Some gesso and Shimmerz Key Lime were lightly applied over the metal flower charms.

 Shimmerz Products:
 Spritz – Chance of Rain, 4 Leaf Clover, Plum Pudding
Vibez – Plum Tuckered Out, Blushing Bride
Shimmerz – Celery, Berry-licious, Orchid-stra, Key lime
Inkglingz- Brass Knuckles
Texturez – Tidy Widy


Listen for my Irish Shimmerz Siren call to bring you back on March 15th,


Friday, December 14, 2012

On a canvas

Hello. It's Naomi here. I hope you are all having a lovely weekend.

Today I'd like to share a little bit of painting I've done, of course using Shimmerz.
This is the canvas that I had already painted and added some details.
And here comes the fun part!
Adding more tiny little details with lots of different colours.


It is a time consuming process which I LOOOVE.
I just love watching how the whole painting grows. yes very slowly..
Using shimmerz was an awesome way to give it a shiny touch, too.

Here is the finished painting. I could've gone on forever...but it will do now:))


Products used:
Shimmerz Magenta
Blingz Hottie Pink
Pearlz Peas B Mine
Pearlz Blue Into Town
Shimmerz Jilted Jade
Shimmerz Celery
Shimmerz Key Lime
SHimmerz Sky Blue
Pearlz Powder Puff
Pearlz Mint Julip

Thank you for popping by.
wish you all a wonderful week ahead.
And a very merry Christmas and a happy new year!

lots of love,
Naomi

xx Naomi

Sunday, March 4, 2012

Sharing an LO...

Hello. It’s Naomi and I am here to share an LO today.
Last time I posted a very purple crazy LO with lots of misting so I thought I would do something a little different, simpler and less misting.

Here are the Shimmerz products I used


VIBEZ Hot Fudge
COLORINGZ Tropical Tanline
VIBEZ Hermit the Frog
COLORINGZ Mandarin Mai Tai
SHIMMERZ Jilted Jade
SHIMMERS Celery


And this is what I made.


There isn’t an awful lot misting on this LO but I love how a little bit of paint splatters and masking can give it such nice look. And I like how they are so versatile.

Thank you for stopping by and hope you have had a lovely weekend!

Naomi xx

Monday, June 14, 2010

Shimmerz helps out with a little HUG...

Hi everyone! This is Lolly (Shimmerz guest designer for the next couple-o-months)! I am super excited to share my first Shimmerz project with you!!!!

I was torn between sharing something with flowers (which are one of my absolute favorite things)... or a little tree... I decided to go with the flowers for now and we'll do the tree next time (that little tree is gonna steal your shimmery lovin' little hearts... I swears)!
Craft Goodies Used for this Project:
The Paper Studio
-
Chip Decor Letters
Petaloo - Color Me Crazy Flowers (awesome mega pack with enough flowers for multiple projects)

Cuttlebug - Quilling Flower Folders (Daisy & Chrysanthemum)
Assorted Gems
Shimm
erz - Vibez - Sunset Strip & Jeni-B-Bleu
Shimmerz - Spritz - Bed of Roses
Shimmerz Paints - A
qua Marine & Celery
Shimmerz -
Pearlz - Carrot Top, Sunny Side Up & Green with EnvyShimmerz Blingz - Hottie Pink (this color totally rocks!!!!)
(shop for Shimmerz HERE)
...I also used an assortment of craft acrylic paints to paint the chipboard letters 3 different colors of green!

Now let's get started for real!

I tend to test and play around with things when starting a project... just to make sure that the
way I see it in my head has a fighting chance to become reality.


My initial plan was to cover all of the chipboard letters with quilled flowers, but they looked too packed together and plain... plus they needed way more POP!

So I busted out this awesome pack of Petaloo flowers and laid about them as the foundation for the quilled flowers...


Then once I added a few of those quilled flowers on top of the Petaloo flowers... things really started to take shape!


My Mom dropped by for a visit (she's also known as MomChops over on my blog)... so I put her to work painting all of the Petaloo Flowers with a nice assortment of Shimmerz Paints...

When you come to my house you have to be ready to dig in and do some crafts... especially on Saturdays!

(any man, women or child who enters the craft room on a Saturday is in danger of being handed a pair of scissors or a paint brush)
(even my husband has fallen prey to this phenomenon)


I decided that the color for my quilled flower petals would come entirely from Shimmerz sprays..
I really wanted them to have a nice shimmery shine to them and the best way to do that was to start with plain white paper and spritz the heck out of them!


Once they were nice and dry...
I cut them into one inch strips so they could be run through my Cuttlebug quilling folders!

(if you have never seen the quilling folders in action and want to see a video demonstration... leave a comment here and let me know!)
(I'll put a little video together of how I made the flowers for this project and post it right here on the Shimmerz blog!!!)


MomChops painted the chipboard letters and ALL of the Petaloo flowers for me...
(I took her to lunch to thank her after we were done... she was plum tuckered out!!!)

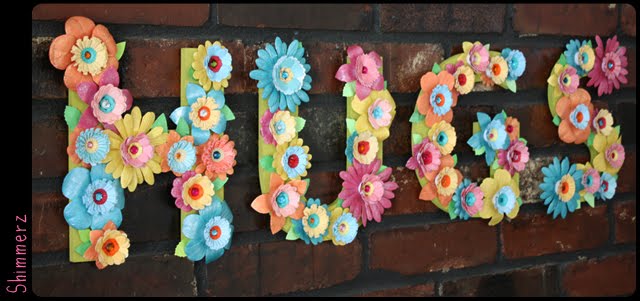
41 fabulous shimmery quilled flowers and 42 fabulous painted and shimmery Petaloo flowers later...


I started assembling the whole thing!

I filled the centers of those flowers with bright sparkly gems and used some of the quilling leaves under each flower pair.

To get everything to stick together nice and tidy...
I used an assortment of liquid glue, ZipDry and a hot glue gun!


Here is the finished sign of HUGS!
(this little sign is going to be given as a birthday present to the daughter of a very dear friend of mine who likes lots of sparkle and nice bright colors)!!!!

...and here are a coupla more pics so you can check out the details a little better!


Thanks so much for dropping by and big thanks to Stacey and the whole DT for having me over for a visit! I had a blast! I'll be back in about a week with another project!

Have a great day!

Monday, April 19, 2010

Sparkles for Spring

I was recently inspired by this project idea and decided to create my own based on this design.


I started with some fun papers from My Mind's Eye called Quite Contrary. I used Tickle-Me-Turquoise to paint my circle stamp. I really like how the Shimmerz paint filled in around the edges of the stamp providing more definition to each circle. Then, using Celery, I painted the edges of the butterfly for a distressed and sharper pop. Finally, I chose three polka dots on the butterfly wings to paint with Hi Ho Silver.


I am proudly displaying my little happiness of spring on the mantle in my living room.
It must be working...it was 70 degrees and sunny here today! Do you have a little happy in your spring?

~ Jessie A.
Posted by Picasa

Saturday, December 19, 2009

Children's Fingerprint Tree with Shimmerz


I'm in charge of the 2-3 year old Sunday School class at church and since Christmas is right around the corner, I wanted to do an easy and inexpensive ornament craft with them.

I came up with this Christmas tree.


Each "dot" is actually a finger print. I used Shimmerz paints because they are totally and completely safe. If my daughter licked her finger, I wouldn't worry a bit. When crafting with many little ones, it is important to know that they will survive the experience, right? (giggle)

Lyssie (just turned 3 y/o) is very proud of her handiwork (or should I say fingerwork?)


If you are interested in making this craft with your sweeties here is what you'll need.
Materials
1. One 8 1/2 x 11 inch piece of white cardstock
2. Royal Red and Celery Shimmerz
3. Brown paint (I used acrylic because that is what I had on hand.)
4. A star of some sort. (I used a brad, but a punched star would work too. Or you could even do a yellow fingerprint for a star.)
5. Ribbon for hanging
6. Pencil, eraser, hole punch and triangle template
Directions
Prep-Work
1. Cut 1 ovals out of your cardstock. I used my Creative Memories oval cutters. This made it really easy.
2. Trace a triangle very lightly in pencil (this marks the boundaries of your fingerprint tree.)
3. Paint your brown trunk.
4. Punch a hole and thread your ribbon through the top.
With the Children
1. Paint one finger with Celery Shimmerz and stamp it inside the triangle. Repeat until you have the look you want. You can manually stamp the child's finger, or give them more freedom to do it themselves.
2. Paint one finger with Royal Red Shimmerz and add ornament accents.
3. Add a star (if desired)
4. Write the child's name and date on the back. Erase your pencil triangle.
5. You're done! Wasn't that easy?
Happy Shimmery Crafting!
xoxo
Bethany Kartchner

Wednesday, December 16, 2009

A Shimmery Christmas


I love playing around with vintage images. When I found a Christmas Postcard kit by Crafty Secrets, I knew that they needed some Shimmerz to really shine!


First, in order to distress the images a little bit, I spritzed with Treasured Hymn. This is such a cool spritz. It immediately tones down any stark white images and gives them a beautiful slightly distressed look. Next, using Under the Sea Blingz, I added some texture and sparkle to my birds and other blue images. Aren't those birds gorgeous?


On the next ornament, I really got into Shimmerz and painted Santa's outfit with Royal Red so that it would stand out more. I also painted Gold Glimmer on Santa's furry spots to add texture. For dimension, I painted a chipboard star using Royal Red and I stamped a few holly leaves and painted them in with Celery.


The chunky, vintage-glass glitter quality of Gold Glimmer Blingz really shows up in my close-up.


I used Gold Glimmer Blingz again on another Santa along with Under the Sea Blingz on his gifts.


Here is a close-up so you can see the texture.


I hope that your Holidays are happy, healthy, and Shimmery!

xoxo
Bethany Kartchner