Showing posts with label shimmering spritz. Show all posts

Saturday, July 24, 2010

Butterflies and Shimmerz

Happy Weekend! LG here blogging for Shimmerz Paints today. 

I know you have read a thousand times already how much we adore the different products of Shimmerz Paints. This is because it is worth telling about! Shimmerz Paints add sparkle and shimmer to any project you want to create. It gives that special touch to everything you use it on.

Today I would like to share with you a very easy and simple 8.5"x11" layout that I did. Initially I illustrated a butterfly pattern that I would like to use on my layout. Then I used my scanner to scan the image and duplicated it on Photoshop creating different sizes. Lastly, I printed them out and individually cut my image. This is what  I used as templates for my background effect.

The traditional way of draw and cut would also be fine. Simply draw the silhouette of any shape you would like to use on any leftover paper and cut them out.


These butterflies are recyclable and can be used several times. It can be used as masking or a template to create embellishments. Don't limit yourself. Try out several patterns like leaves, birds, stars, etc.

 Here is the layout that I finished using my butterfly templates:
"Do Not Disturb" Layout by LG Belarmino - Shimmerz Spritz Tuscan Sun, Sea Foam and Mango Madness; Shimmerz Vibez Sunset Strip; Shimmerz Pearlz Carrot Top and Sunny Side Up

Here is another layout using the same butterfly template:


Friday, June 25, 2010

Shimmerz is always on the pages of my Art Journal!

This is a page from my Art Journal dedicated to the moon and the stars.

I brushed Pixie Dust Blingz to create a moon and its lights. I have colored the stars with Sunflower Shimmerz.

A bit of Pixie Dust Blingz, is "finished" on the flowers.

I gave a hint of light at the edges with Marigold Shimmerz.


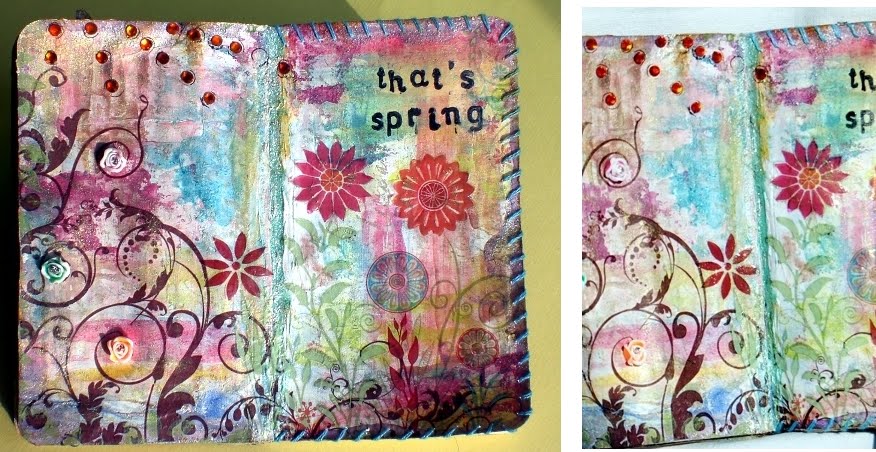
Here are some pages of my small art journal where I used the Shimmerz products.

Page "That's spring". I used for the background: Aqua Marine, Golden Wheat, Key Lime and Pink Shimmerz.

Page "Zip". I used to color the flowers Flashee Fushia Blingz.

Page "Spontaneità". I used for the drops Marigold Shimmerz.

Page "Silhoutte". I sprayed Jeni B Blue Vibez to create large balls.

Page "Busto". I used for the background: Burgundy, Key Lime and Tickle-Me-Turquoise Shimmerz and Licorice Shimmerz Spritz. For the dressform I sprayed Cotton Candy Shimmerz Spritz.

Page "Foglie". I sprayed Razzle Dazzel Berry Vibez to create the background using the metal leaves as stencils.

I love all the Shimmerz products!

Have a great day with creativity!

Roberta

Wednesday, April 28, 2010

Shimmering Blooms


Isn't Spring wonderful? All the flowers in the garden make my heart sing. It is also blooming here at Shimmerz! I've really enjoyed playing around with my Shimmerz and Petaloo flowers. In my video, I show you how to decorate a metal frame that I purchased at Target using white Petaloo flowers and Shimmerz Spritz and Pearlz.

The technique is very simple, but the results are stunning. (Of course, it doesn't hurt that the girl in the pic is adorable...giggle...)


You can see the detail in the following close-up shots.


In the video, I used the following Shimmerz products that you can purchase here.

Baby's Breath Spritz (on flowers)
Snow Storm Vibez (on flowers)
Ballet Slipper Pearlz (on flowers)
Gold Glimmer Blingz (on flowers)
Pixie Dust Blingz (on frame)

Happy Shimmering!

xoxo
Bethany Kartchner

Sunday, January 31, 2010

Life Lessons Project with Shimmerz Spritz

Today I'd like to share a project that I created using some fabulous Shimmerz Spritz colors: Bed of Roses (my favorite) and Eucalyptus.

I confess that I've been coveting one of those great 7 Gypsies artist painter's tray for a while now, but my local scrapbooking stores didn't have them in stock. So I resorted to finding something similar at the craft store. Well, I found a long wooden display frame which I painted black and then created the dividers with black cardstock. Here's how the completed frame turned out:


Each section has either a pocket or envelope where I've placed my journaling - the "hope" section has a stitched pocket made from glitter paper, the "love" section has a mini envelope made from vellum, and the "peace" section has a handmade cardstock envelope.

I sprayed a combination of both Bed of Roses and Eucalyptus Spritz colors onto the piece of doily in the first section titled "Life Lessons" as well as the cardstock envelope in the "peace" section. I also sprayed the chipboard letters with Shimmerz Spritz to get the neat speckled effect on the chipboard letters that spell "life", "hope" and "peace". You can get the same effect by quickly drying it with a heat embossing tool.


The next time you'd like to try something different with your chipboard alphas, give them a little spritz! You'll probably love the result just as much as I did!

Thanks for visiting today! Hope you have a wonderful week!


Sunday, October 25, 2009

CPS -Shimmerz Grow Card

Hi Everyone,
I'm Maggie Lamarre with the Education team. I'm excited to be here with you as we showcase the fun sketch from Card Positioning and the magic of Shimmerz.
Have you been having fun looking at all the awesome tutorials and inspiration so far?
Grab your  cuppa joe and get comfy for a very very short tutorial, so don't blink :)

I'm an advocate for simple cards specially with the Holiday looming so so soon. This year I said to myself I'm going to get organized and get all my cards mailed out by Nov 26th. I'm very proud of myself for starting this early :)


Supplies:

Marks Paper Company English Garden, Making Memories Metal sentiment, Basic Grey Rhinestones, Jenni Bowling Bingo card, Offray ribbon.Tag. Shimmerz Bamboo Leaf, Bed of Roses, Chik-A-Dee, UHU Glue, Gartner studio cardstock.

How to:

1. Spritz all 3 Shimmerz on non-porous surface then drag the tag onto the surface, then redo 2 times, let dry, drag again by smearing any edges that didn't get saturated.
2.Cut the pattern paper 5x3.5 and distress the edges,adhere to the base.


3.Loop ribbon thru the tag and distress the edges, adhere to the pattern paper.


4. Spritz Chik-A-dee onto the bowling card let dry for 2 mtes or use a heat embossing gun.
5.Adhere the rhinestone to the card then add the Sentiment to the bottom.


Voila you are done in less than 7 mtes :)

Here it is again :)


We would luv to hear from you, leave a comment and let us know what some tricks you have used to make creating faster?

Have a fabulous week,
Maggie

PS don't forget to sign up to be a follower to be the first to know all the happenings on the blog :)

Wednesday, October 14, 2009

My Number

Hi, Lucy here, with a layout I created using a die cut paper as a mask. I used a number die cut paper by KI Memories over dark brown cardstock and Shimmerz Spritz in Treasured Hymn and then highlighted with Eucalyptus to make the title area a little lighter. Don't the colors just pop on the dark background? I love that iridescent quality in Shimmerz products!! The other supplies are all from the October kit from A Million Memories.

The story behind this layout is about my 4 year old wanting to 'change' her number to 6......lol. I accented the 4 & 6 by hand stitching the numbers to make them pop.
Thanks and see you soon!

Lucy

Sunday, September 27, 2009

HaPy Boo to YoU

I started to pick some embellishments, the flowers from Prima Marketings white Big Bloom Bucket had the perfect shape, kind of like the wings from the bug. All what i did was spritzed them with the Shimmerz Licorice Miniz Spritz and OMG... i think this is now one of my favorites. This Spritz leaves a wonderful visible silver shimmer on everything
Recipe:
Stamps: Hanglar Stanglar (not available if you do not have a mailing address in Norway or Sweden)
Papers: Stampin up (Yo-Yo Yellow, Basic Black), Reminice (foil Halloween and DP Graduation Collection )
Embellishments: Shimmerz Spritz Miniz (Licorice), Robins Nest (yellow), Prima Marketing (flowers), Stampin up (black grosgrain), Stickles (Yellow and Stardust), Bead heads (Quixotic cards),
Tools: Martha Stewart Zig Zag Punch
Copic Sketch: Face/Hair: e000, e50, e00, e17,e11, e31, e15, r20, clothes: c5, c9, c6, 110, c0, c7, y18, y11, y19, y15, Halo/ ground: w0, w3, w2, w1, W5, W6

Saturday, September 26, 2009

Sending Birthday Wishes

I have colored the cute Hanglar girl with my Copic makers and than used on the birdhouse Shimmerz (wed wagon paint) and on the sentiment and outside of the card Golden Glimmer paint. The tag came already in a walnut stain, i have added on top of that 2 different colors of Shimmerz spritz let it dry and than stamped with Stampin up Classic ink (Really Rust - stamped once off) the swirls.
Stamps: Hanglar Stanglar, Sentiment (Stampin up Circle of Friendship), swirls Stempelgelde (Grunge Collection)
Papers: Making Memories "Autum Splendor", Stampin up
Embellishments: new Shimmerz Fall paints (Wed Wagon, Gold Glimmer) and Spritz Colors (Treasured Hhyme, Babies Breath), Stampin up (ribbon, string), bird feathers and pin from my friend Kristine
Tools: various circle punches

Thank you
Claudia Rosa

Thursday, August 27, 2009

You Are a Star {with Cornish Heritage Farms}!

First, let me say how excited I am to be here and playing not only with the wonderful Shimmerz products but also with the Cornish Heritage Farms stamps! Thank you Stacey for allowing me to join in on the Shimmerz fun!!!!

I have several Cornish Heritage Farm sets that I love but this particular set was a new one for me. It is from their All Things Considered Collection and is called School Primer. I knew when I saw the writing tablet, that I had to use it on my card. Oh goodness, is that going to be a versatile stamp--for backgrounds, journaling, tags, etc.

I stamped the writing tablet onto cardstock and used that to place my sentiment and embellishments. The chipboard star I covered completely in Sunny Shimmerz. Then after it dried, I used the Baby's Breath Spritz on it to create a fun texture and color. Papers: Memory Box eggshell CS, Memory Box parsley notecard & CS, K&Co. Wild Raspberry
Stamps: Cornish Heritage Farms School Primer
Stamp Ink: Memento bamboo leaves
Embellishments: Deluxe Designs chipboard star, Shimmerz Sunny, Shimmerz Spritz Baby's Breath, Bo Bunny double dot ribbon, Basic Grey Boxer buttons, Karen Foster's Scrapper Floss brown, Rose Moka tiny alphas, Pink Paislee chocolate alpha


Thanks again to Stacey, Shimmerz, and Cornish Heritage Farms for letting me play along in the swap. This was truly a lot of fun! Have a blessed day!

Sunday, August 16, 2009

I Dream Of Shimmerz

The DreamGirls set the challenge and I accepted!

Prompt: Create a monochromatic challenge using all white or cream
Technique: Stitching
Product: Lace

Not only was this my first all white layout, but only one of a few where I didn't use any patterned paper (GASP!) I've found that the secret to creating with all white is texture, texture, texture!!!

I started out by spraying an entire piece of cardstock with Shimmerz Baby's Breath spritz and allowing to dry completely. I then took a 10x12 piece of glittery lace cardstock and adhered it to the cardstock with spray adhesive. I covered the seam with a piece of lace and then topped the lace with strips of tiny pearls. Next, I added pearls and clear rhinestones to the centers of the lace cardstock snowflakes to further add dimension to the layout.

I then added the title. Since the rest of the layout is BLINGED OUT, I added stickles to the thickers and then hand stitched a tiny halo above the "a" in "angel".

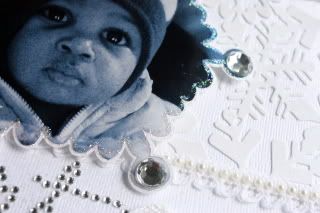
The final pièce de résistance is the adorable photo of my baby boy, Xander. I printed the photo on a transparency--no special technique behind this, I just ran out of photo paper (LOL). To continue with the snowflake theme, I cut the picture into a snowflake, adhered it to a piece of white cardstock, then trimmed it so there was a 1/8" border left. I mounted the photo using foam pop dots and then outlined with stickles. Lastly, I added large rhinestones to the photo.

This layout is covered with so much bling, it'll make your eyes water, the shimmering spritz takes it over the top with shine!

Here, you can get a better idea of how much texture I created

Close up of the photo-- I sprayed the back of the transparency with spray adhesive and it created a "grainy" look to the photo...love that!

thanks for taking a peek!