Showing posts with label Shimmerz Paint. Show all posts

Tuesday, January 7, 2025

Puppy Poses | January 2025 Color Kitz | Brandy Vaughn


Hello, friends! I am thrilled to have a collection that works so well for documenting my daughter's pup. Especially one that matches her little vest. It makes my heart smile.


To create this layout I began by choosing the papers that I wanted to layer up in a strip down my background. Then I ripped and distressed the edges and glued the papers together.


After that, I decided I wanted some mixed media to peek out from underneath the torn papers. I mixed a little bit of Shimmerz-Golden Wheat with some water and used the packaging technique to add it to my page. Then I added some splatters just to give it a bit more interest.


I had this heart sitting on my desk that was left over from a previous layout. It was the center of a cut file that I cut from smooth white cardstock. I added the leftover Shimmerz to it and decided it would be a nice backdrop for my title. I also cut some tags from my January kit scraps and added them above the photos then looped some twine through the holes to finish them off. I also pulled a stamp set from my stash and a few stamped images.


Finally, I sprinkled around some ephemera and puffy stickers from the kit then pulled some alphas from my stash for the title and this layout was complete. I hope you have enjoyed this process and are inspired to create a layout about your own furry friend!

Be sure to check out the Shimmerz Shop for all the details about the January Color Kitz. Don't forget to add my name to the "notes" section of your order for a FREE paint.

xoxo
Brandy


Monday, August 19, 2024

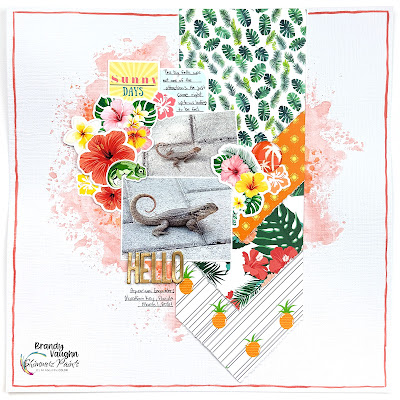
Hello | August Color Kitz | Brandy Vaughn


Hello, my friends! I am super excited to be showing my newest layout using the August Color Kitz. This was one that I did not expect to be creating. I had not planned to document these photos until I saw the kit, but then I knew instantly what I was going to do.


I began by choosing a few pieces of paper that I wanted on my layout. Then, I cut them into strips and added a point to one end.


Next, I pulled out all of the ephemera pieces I wanted to use, including the adorable little chameleon that prompted me to scrap these photos. 


Once I had the pieces arranged the way I wanted them, I glued them all together without gluing them to the cardstock so I could move them around as one whole piece.


Finally, I used the packaging technique to add some color to my white cardstock. I started with Creameez-Trippin in the Tropics and then added a small amount of Coloringz-Tangy Tangerine.  Finally, I painted my border with the Creameez, added my title and a little bit of journaling and my page was complete.


You can see this layout come together in the process video listed below. Check out the Shimmerz Shop and grab your August kit while you can. Don't forget to add my name to your order for a free product!

xoxo
Brandy


Friday, May 29, 2020

Beauty with Shimmerz Paints

Hello friends!

It's Jennifer today with a new project featuring tons of Shimmerz paints and some good ol' elbow grease. This layout was a true labor of love . . . for the first time in a long while, I broke out my Big Shot and dies to create stunning flowers that I absolutely love.


To get this project started, I painted two pieces of watercolor paper. The first was the beautiful colors of the flowers and the second was the green and golds in the leaves. 


Once both pages had dried, I began cutting the flowers using metal dies. Each flower is three pieces of paper - the middle layer is quite intricate and was not cutting well. To alleviate this problem, I grabbed the Simple Stories Simple Vintage Garden District collection and cut patterned papers. Doing this made the process much faster and I love the contrast.


After the flowers and leaves were assembled, the layout came together in under 15 minutes! Again, I used patterned paper from Simple Stories for the background and began adhering flowers.


Each flower and leaf was adhered with foam squares to give more depth and dimension.


To complete the project, I added a few chipboard hearts and a title.


The overall effect is so pretty and the colors of the Shimmerz Paints are stunning!


Thank you so much for stopping by today. A complete list of products and links follows - if you find yourself in the Shimmerz Shop, remember to type JENNIFER in the comments at checkout to receive a freebie with your order.

Inklingz:

Coloringz:

Creameez:

Have a great day!

Friday, February 14, 2020

My Valentine with Samantha Robles

Happy Valentines Day everyone! The wonderful day to celebrate love. Of course, every day is a great reason to celebrate love but how often do you get to use reds and pinks together? Really only on Valentines day, right? So I went ALL IN with today's layout.
I'm not gonna lie to you guys. Some of my favorite Shimmerz colors are the shades of pink we carry. Every shade of sweet pink you can imagine. I started the process with a 9" circle cut from my Cricut. Then add some gesso to it and leave it dry for about 20 minutes, or until no residue comes off on your fingers. During the dry time, I cut my heart circles cut file from Paige Evans. 

Yay! Your circle now dry and ready for color. The colors used on this wheel of pink is:
and finally, Pink-A-Boo Inklingz

I always say with ombre, start with the dark first. Which of course is Ruby Spritz. I start by spraying one layer, then drying with a heat tool. Once it dries, I add another layer. Each color gets 2 layers of each color. The more layers you add, the more intense the color becomes. I didn't want it to be SUPER over the top though.


Once the ombre circle is totally dry, I glued the back of the heart file and placed it right on top. After adding some foam stickies to the back of the circle, I layer my photo on top with this cute velum from American Crafts. I've been hoarding it for a good 3 years now and I finally parted with it to bounce off the gold in the pillow in the photo. It ties all the colors together!


Once the circle is layered down, I add some of my Doodlebug Design Love Notes | Pick You Odds and Ends hearts. Some are glued down. Some are layered with 3d foam tape. I then write down all the things I love about my oh-so-cute 3 year old son, Oakley using the Doodlebug Love Notes Conversation Hearts Paper. The final touches are some splatters of Ruby Spritz, some enamel "Shimmerz Spotz" (Coming soon to the Shimmerz Shop), some Dotz, as well as some former alphabet stickers from American Crafts I've had stashed away.

I hope this get's you inspired to share the love today! Show everyone some color and love and it always comes back <3

Don't forget, if you spend $35.00 in the Shimmerz Shop this weekend, you get 10% off + a free 1 oz bottle of Sweet Heart Vibez. LOVE that!

XOXO
-Samantha Robles


Thursday, July 30, 2015

Stamping using Shimmerz

Hi There Lovelies,

Today I would love to share with you a card I made.
In my video tutorial I am going to share with you how to stamp using Shimmerz Coloringz
mixed with Shimmerz Paint Pots.


I was so thrilled with how the stamping in the background worked,
that I cannot wait to keep stamping with my Shimmerz Supplies.

Here is a close-up:


Here are the Shimmerz Products that I used to make the card.


The products are:

Shimmerz Coloringz - Oh Say Can You Sea (my favourite)
Shimmerz Coloringz - Peachy Keen
Shimmerz Shimmeringz - Goldie Lox
Shimmerz - Orange Sherbert
Shimmerz - Candelight

Here is the video tutorial, so you too can get stamping!!


Don't forget, if you put an order in with Shimmerz.  
Use my name (Renee Aslette) in the "INSTRUCTIONS TO MERCHANT" 
section in the checkout page, and you will receive a 
FREE product of your choice.

YAY!!!  Who doesn't love a freebie!!

Keep an eye out this week for some exciting new release colors.

Thank you so much for stopping by! xx


Monday, July 27, 2015

Shimmerz Paints......what happens if they dry out?


Hello there.

Lydell with you again today, with a short information post.  
You may have some of these gorgeous little tubs of paints in your collection.  Some ranges and colours have been discontinued....but they are still awesome.  I have LOADS of them and they are old, and you can't buy them anymore and I still love them all!!!!

You may have seen a cool idea on the blog sometime and thought to yourself...."Hey....I have some Shimmerz Paints......I think they are in the cupboard...."  and off you go on your search to find them, only to unbox and remove the lid, and realise that your paint you purchased in 2010 is stone dry.  ugh.

BUT..... Don't panic.

Certainly don't throw them away!!!!

They are essentially watercolours.  Water based paints which were once the perfect shimmery consistency, that have now evaporated leaving a disc of solid paint in the bottom of the tub.

Living in Australia with our dry hot summer months....45 degrees Celsius (and sometimes even hotter)  The paints I bought in 2010 have dried out several times.  The beauty is- that if they should dry out (inevitable here, I am afraid)  no problem..... Just add Water!

That sounds easy right?

It really is.

Add the water and let it sit.  Lid on.  Give it a stir and you would never know it had ever been dry!

That is awesome.

There are some further recommendations though.......I have learnt from experience!


The first time I did this, the regular tap water I used added a bacteria to my paint and the next time I removed the lid, with our hot dry climate it had grown a kind of mould on the top.  ick.

So my advice would be to use Distilled water.

Image result for distilled water


Still no big deal though, it peeled off and left the normal paint underneath.  Because I had gone down the path of adding regular water, I added a drop or two of Isopropyl Alcohol (pure rubbing alcohol) which kills off the bacteria, evaporates and leaves you with healthy fluid paints again.

Image result for isopropyl alcohol


So to cut out those last couple of steps, just start by using the Distilled water and you should skip the unpleasant step of bacteria from the tap water (mixed with our heat is the ultimate breeding ground!!!)


Hopefully you live in a climate where this is not your problem, 
or maybe you use your paints before they have the opportunity to dry out!

At least you know now not to give up on your water based paints if they do happen to dry out over time!