Hello, friends! I'm back today to show you my final layout using the November Color Kitz.
I began by fussing cutting fussy cutting leaves and fruit from one of the papers. I then took the remainder of the paper and tore a piece to use the back side as a foundation for my cluster.
I also included some ephemera pieces from the kit as well as a couple of pieces that I previously painted and fussy cut to add more texture and visual appeal to my cluster.
I glued all the pieces to the plaid paper, not the background paper. This way I can move the cluster around as one piece to ensure I place it exactly where I want it.
Finally, I added my title using the gold alphas from the kit then topped off the layout with some splatters of Creameez in Whitches Blue.
I hope I've inspired you to give the November Color Kit a try. Head on over to the Shimmerz Shop to check out all of the details on the kit.
Don't forget to add my name to your order for a FREE PRODUCT!
Hi crafty friends! Melissa Minor @Cards By Melissa Minor here and today I'm sharing a layout with you using the November Color Kitz. This is my favorite kit Shimmerz has released this year. Every paper is gorgeous! The paint colors match all the papers so well. Fall is my jam!
When I started my layout I didn't have a clear idea of where I was going with it. So, I started by choosing a few papers that I really liked that coordinated well together. I also chose 2 of the paint colors, some ephemera pieces, and other embellishments I knew I wanted to use. I then fussy cut the images on one of the patterned papers. I had a hard time cutting up the paper because I love it so much! The images in the picture below are the ones I fussy cut! BEAUTIFUL!
Next I started cutting circles using my old Creative Memories circle cutting system. I haven't used it in forever but it was perfect for cutting lot of circles in different sizws. I then began arranging the circles onto my background paper. Oh! I forgot to mention, I used clear gesso on the background paper so that I could paint on it later.
Once I had all my circles arranged I added some foam to the back of my photos and adhered to the page. I pulled out the Shimmerz paints from the kit: Teal The End Of Time & Here I Yam . I added a little paint around each of the circles. It's so pretty and shimmery! I used a couple dots from the kit and added a little tangled thread behind them. I finished my layout by adding an acrylic title from my stash and some sequins from the bonus bundle.
Hey all, Nicole here with my second project for the month using the November Color Kitz Bundle! I'm documenting a rainy day in Prague with this fun kit.
The first thing that I did for this layout was to make my autumn rainbow. I used all 5 paints from the kit to make my rainbow. I didn't draw it out or anything fancy, I just free handed it with my paint brush and I love the way that it turned out. I then painted some of the leaves from the coloring sheet that comes with the kit as well.
I distresed my photos and added them to the layout in three areas creating a visual triangle. I then hand drew clouds on the blue and white checked paper, fussy cut them out, and then distressed them as well. I added the clouds and leaves that I painted near the photos. I then came in with some of the die cut pieces to finish off my clusters.
I then added my title using the gold alphas from the kit, making sure to glue each of the letters before putting them down. I added journaling and splatters to finish off my layout.
Thanks for coming on to read about my layout. I hope this inspires you to use your November Color Kitz. If you decide to grab a November Color Kitz Bundle for yourself, don't forget to add my name Nicole in the shopping cart to get a freebie with your order! I also have a process video for this layout that you can watch here: https://youtu.be/2_f3NDi3sKU
Hello Crafty Friends! Melissa Minor @Cards By Melissa Minor here and I'm really excited to be sharing a fall layout for the Shimmerz Paints Design Team. I used the gorgeous November Color Kitz. The November kit has so many beautifully designed patterned papers and cute ephemera pieces. I had a hard time deciding which paper to use because they are all so pretty. I didn't want to cut into them. Do you do that too? Do you want to save the really pretty papers? I finally decided I would back my photos using the red dot paper. It's a beautiful fall red and I think it really made my photos pop.
I used every single paint that came in the kit on my layout. I started by painting a piece of watercolor paper with Punkin Pie-Vibez, Here I Yam-Shimmerz, and Red-y or Not-Coloringz. I splattered with a little bit of Gold Digger that I had in my stash. Then I used a foilage die and die cut lots of leaves. They are so shimmery and I think they look just like real leaves! I inked the edges of the leaves with Distress Oxide ink in the color Vintage Photo.
Next I began working on my base page. I started with a piece of 12x12 Mixed Media cardstock. I used a 12x12 screen view stencil and my paints to create a background. I used Witches Blue-Creameez for the majority of the stencil, then came in with Teal The End Of Time-Shimmerz around where my photos were going to be.
I love that the kit came with gold foiled alphabet stickers this month! They were perfect for creating my title. My title says Fall-Ing In Love. There weren't enough "L's" on the sticker sheet. So, I did a little sticker surgery on a couple of the capital "T's" and turned then into "L's". No one would ever know they didn't come that way!
I got brave and when I thought my layout was just about completed I decided to bring in the Christmas Cheer-Shimmerz from the bonus bundle. I painted a die cut circle and also added some of that beautiful yellow color around my photo. That yellow pulls out the yellow in my photo. I added a few of the ephemera pieces and used the bonus bundle sequins to finish up my layout. I really like how this page turned out. Don't wait too long to get your kit! I'm going to say this is my favorite kit so far this year. I have a process video below. The next time you place an order on the Shimmerz Paints website add my name (Melissa Minor) to the comments section to receive a free paint! Thank you so much for stopping by.
Hey all, Nicole here with my first layout of the month using the Shimmerz Color Kitz Bundle. My scrapbook layout is full of beautiful red fall color!
The first thing that I did was choose this beautiful red and white polka dot paper, it is my favorite out of the kit! I tore it about 3-4 inches from the bottom and marked on a foundations mixed media paper where it would fall with a pencil. I then added the Red-y Or Not Coloringz from the kit to the bottom of the mixed media paper.
I decided to add the little strip of foliage to the top of this layout, where my photo would go. I then embellished using the die cuts and dotz. I finished by splattering with the Punkin Pie Vibez and Teal the End of Time Shimmerz paints.
My page came together pretty easily, especially with all the goodies in the kit! I also have a process video for this layout that you can watch here: https://youtu.be/qVEKHnSq5qQ
Thanks for popping on to read about my layout using the November Color Kitz Bundle.
Hey friends! Brianna Lepper here today sharing a new layout using the super gorgeous November 2022 Color Kitz. Make sure to check out my process video down at the end of this post. Here's my layout:
I ended up cutting the cut file out twice and painted each one using all of the colors in the kit except for Granny Gray. I used that one for the background and sprayed/splattered it around the center of the page.
Here's another look at the cut file with more of the pretty background:
I adhered the two cut files down to my page diagonally and then tucked in the pretty acetate floral embellishments from the kit.
I matted my photo using several ephemera pieces and then added in the Dotz from the kit. They are so cute!!
I love all of the textures and layers on this page.
One last look at my layout. I added in some tangled thread under all of my Dotz. This kit has some gorgeous colors in it and I'm so happy with how it turned out.
Thank you so much for stopping by today, I hope that I've inspired you in some way! See you next month friends!
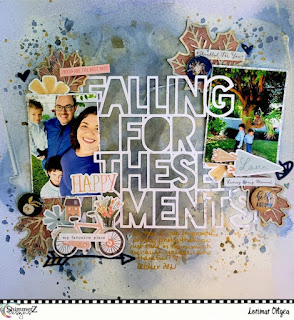
As the days continue to cool down (at least on my side of the world) and we are gearing up for the upcoming family festivities, it is always great to take some time to enjoy the extraordinary ordinary moments with our loved ones. Today's layout features all the components of the superbly gorgeous November Color Kitz which you can purchase here; I also have a process video on my channel.
It was fairly simple and quick layout to make, so let's get started!
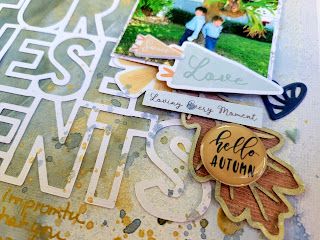
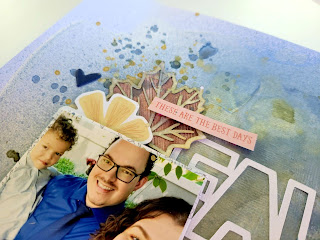
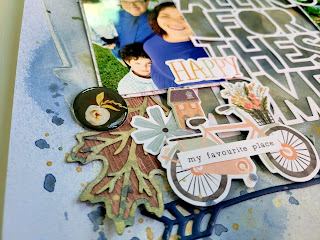
I began with a sheet of textured, white cardstock which I had prepped beforehand with clear gesso (white gesso will work just as well here, too!). Once the gesso was dry, I sprayed Rock-A-Fella Blue unto the background, followed by splatters of Tarnished Treasure and Greener Pastures. While my base was drying, I began to work with the leaves (cutfile included in the Colorz Kitz) which I colored with Egg Noggin', Tarnished Treasure, and Golden Wheat. After they were dry, I backed with a wood patterned paper from the Cocoa Vanilla Studios These Days Collection.
Once all my elements were dried, it was all downhill from here and very easy to assemble. I first stuck down the text cutfile in the center of the base and added a photo on either side (each photo was matted on patterned paper and popped up on craft foam). Then I arranged two leaves and some embellishments around the photos. Added in the Dotz and splattered some extra Rock-A-Fella Blue and Golden Wheat to finish things off. Journaling was added beneath the title of the cutfile using gold ink.
That's it! Before I forget, be sure to include my name in the comments section of your next Shimmerz order to get a freebie.
Hey everyone, this is Niki @nikiclairecreates and I have a new layout and process video
to share today using the November Color Kitz. You can find the process video at the end of this blog post.
The November Kitz contains Don't
Rain on my Parade Vibez, Going Peach Side Shimmerz, Precious Metal Shimmerz,
Misty Morning Inklingz and Show Me the Honey Inklingz. As well as these amazing
paints, there is also a pack of three Dotz, some gorgeous sticky backed pearls
and of course the exclusive cut file, which reads 'Thankful for Every Little
Moment'.
I started with a sheet of white
card that I trimmed down and distressed the edges. I mounted this onto a sheet
of Maggie Holmes Marigold paper that had colourful stripes on it - this paper
was a great choice as the colours in the paper match the colours in the Kitz
perfectly!
I cut the outline of the cut file
in kraft card and cut the internal letters in light pink.
I added three colours from the
Color Kitz to my layout, as a base to put my photo. The colours I used are:
Misty Morning Inklingz, Show Me the Honey Inklingz and Going Peach Side
Shimmerz. These three colours are so pretty together and my plan was to create
a lovely area of colour for my photo to sit on.
Once dry I arranged my cut file
onto the layout and popped up all of the internal pink letters on foam pads to
give lots of lovely dimension. I added my photo and a few embellishments on the
painted area.
I also created a little cluster
of embellishments down in the bottom right corner of the layout and added some
splatters of the Color Kitz Paints.
I used a metal die and my Big
Shot machine to cut out some leaves from white card. I then painted these with
the other two colours in the Color Kitz: Precious Metal Shimmerz and Don't Rain
on My Parade Vibez. These leaves look so pretty painted in those gorgeous
colours.
I added two of the Dotz to my
layout and a few of the sticky backed pearls on each side. Here's another look at te finished layout:
I've put together a process video for this layout that can be viewed below.
Thank you so much for joining me
today and I hope you have enjoyed this layout and video. Don't forget that if
you place an order via the Shimmerz Store, add my name to the comments to
receive a little freebie!