Monday, November 30, 2009
JOY frame
A closet up of the background with the Shimmerz added to it:
Some close up shots for you to see the detail in the flower and the gold leaves branches:
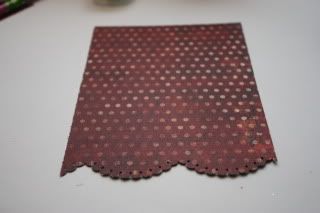
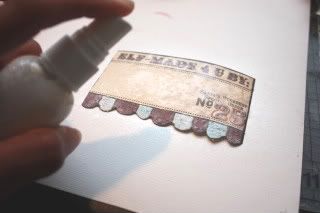
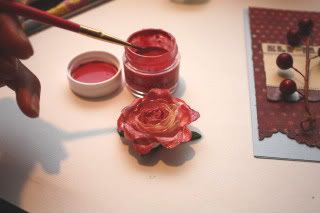
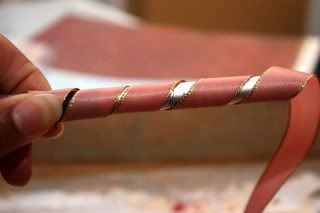
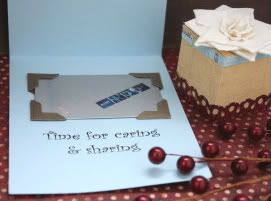
I hope you enjoyed this little project, and that you can see just how fun it can be to experiment with your Shimmerz products! Happy Monday!
-Deanna
Masked Fabric Art Quilt
Hi, Lucy Edson here with my first video tutorial for Shimmerz!
Shimmerz Spritz is perfect for masking on fabric as you can see on this video I made. It added an amazing sheen and color to my masked mini quilt. Take a look at how I started this project:
I added a little more misting to this after I finished the video - the dress form is Chickadee Spritz the shadow masking, Ruby Spritz and then I added a little 4 Leaf Clover on the right side and Mango Madness over the left edge of the Ruby to add a little more color.
To make my sample into a mini quilt: I layered the masked fabric with cotton batting and a cotton backing, creating a quilt sandwich and with light yellow embroidery thread, free motion quiltied the outline of the dress form first and filled the background with a random pattern. After completing the quilting I straightened the edges and zig-zag stitched them to stop any fraying.
Then, hand stitched some paper doilys onto the sides and layered a few embellishments.
The top has some gold Hambly rub-ons applied after the quilting - I love the look of rub-ons on fabric.
I have some other samples from creating my video and I'll share those with you as I complete them.
Thanks and I hope you enjoy another way to play with your Shimmerz Spritz! To see all of the DT videos together in one place visit the Ed Team Vlog.
Lucy
Sunday, November 29, 2009
So Grateful
For the butterfly, I edged the acrylic shape with my Shimmerz Hi Ho Silver Blingz, let it dry, and coated it twice. It really give some nice definition to the shape.
For this particular stamped image, before I stamped my image, I created a "wash" with my Shimmerz Vintage Wine by stamping on it and then "rubbing" the image into the paper. It gives such a pretty coloring behind the stamped image. Once that dried, I went ahead and stamped my image onto the circle.
And finally, just a nice close up shot of the stamped images that I spread throughout the page. I did what is known as a "kiss" stamping technique with this because I stamped my first image and then went ahead and kept stamping with the same paint until it was too light to notice. I repeated this twice throughout the layout.
Thanks for stopping by today, and hope you are all enjoying the weekend!
-Deanna
Thursday, November 26, 2009
Thankful Hearts
Today I wanted to share a page with you about two people that I am very thankful for . . . my parents. They are such good, good people and I'm honored to call them mom and dad. :)
To add some interest behind my paper strips I sprayed Licorice Spritz on my background cardstock. I love how rich it looks on the Kraft colored cardstock, tying all the deep colors in the papers together.
Thanks for coming by!
Jana
Wednesday, November 25, 2009
Design Team Call
Design Team Responsibilities:
3 required projects each month, posted on your personal blog and the Shimmerz blog. More is great! One must be Shimmerz specific.
1 tutorial with photos during your Design Team tenure.
Willing to promote Shimmerz on blogs, forums, Facebook, and anywhere else possible.
We are looking for Team Players!
Benefits:
Name and blog link added to the Shimmerz blog.
A Design Team kit to start creating Amazing projects.
Publication Incentives.
A Design Team Discount
New Product Releases!
Chance to be part of a Wonderful Design Team!
What To Send:
Submit 2-3 projects (Does not have to feature Shimmerz, but we want to see the sparkle and shine); Good Photography is a MUST!
Name and Contact Information.
Blog Address.
Previous Design Team Experience and/or Publications.
A few sentences on why you want to be a part of Shimmerz.
If interested in being a part of Shimmerz, please apply by emailing photos of your projects, and other information to mcelyea@q.com by December 28, 2009. The new Design Team will be announced on January 1, 2010.
Blog: shimmerzpaints.blogspot.com
Website: shimmerzpaints.com
Email: mcelyea@q.com
Tuesday, November 24, 2009
Thankful.....
In honor of Thanksgiving and the season, I re-created a little layout about the things I am thankful for. Complete with a signature *Z* in the title and loaded with Shimmerz goodness!
Using a corrugated cardboard sheet, I spritzed and spritzed and wait...spritzed some more using our Tuscan Sun and Rockafella blue miniz. While the paint was still wet, I sprinkled some fake snow and gold glitter on top.
Flower after:
I dipped the tip of the paint rosettes into our Shimmerz Gold Glimmer (one of my FAVES) and then into some of the left over gold glitter that was ahem...laying on my floor still waiting to be swept up!
So who woulda thunk, that you could make something so cute out of a blob of layer upon layer of paint tinted with Shimmerz?
And before I leave: thank you thank you thank you to Stacey and the amazing people here at Shimmerz for making me feel so welcome and loved as a part of this group!
I urge you to create a layout today about the things that you are thankful for and you can submit it into our Thankful Contest as the icing on the cake. Check out the post for more information!
Have a safe and wonderful Thanksgiving!
Dena
Monday, November 23, 2009
Spritz on burlap
This is me and my daugther. There is nothing better in the world than having her little arms wrapped around me. Oh how I ADORE this little girl!!!
The papers and the chipboard alphas and arrow are from Bo Bunny.
Thanks for stopping by!!
-Stacy Cohen
Saturday, November 21, 2009
Masking and Stitching
To create the circles mask - I simply laid various sized lids on my cardstock and spritzed with Shimmer Spritz in Baby's Breath, let it dry then used a paper piercer to outline the edge of my circle, then handstitched the perimeter with a backstich with cotton crochet thread. The stitching really makes the masked areas pop and add a wonderful texture. I also spritzed the paper behind the photo with Seafoam Spritz to make it appear to be more solid in color.
Papers here all by Sassafras Lass and the digi photo frame is from Rhonna Farrer's Vintage Photo Tools.
Thursday, November 19, 2009
An Idea for Leftover Spritz Puddles
When you've got a puddle mess, take a small piece of muslin and simply wipe it up. (Remember Spritz is water-based so it cleans up without any effort.) After cleaning up a few puddles, that little piece of muslin takes on the most glorious shimmer. It is like making your own fabric. Gorgeous.
You can use your hand dyed (or should I say hand cleaned-up) muslin on a layout, a card, or to make a little mini-art quilt like I did.
Materials: Shimmerz Spritz (cotton candy) and Shimmerz Blingz (hi ho silver); My Little Shoebox pattern paper, Maya Road lace; Prima stamp and flower; Colorbox ink; seed beads; DMC embroidery floss; Making Memories ribbon and paint; Basic Grey chipboard heart; eggshells; Stampin' Up! wings stamp
The pink background is Spritz (cotton candy) on muslin that I sewed and beaded onto a vintage text page.
To make the mosaic, I painted eggshells with acrylic paint and layered it with Blingz (hi ho silver). I also painted the edges of the heart with Blingz (hi ho silver). I love the chunky vintage feel of Blingz!
So the next time you have a Spritz puddle, use it to create another beautiful project!
Happy Creating!
xoxo
Bethany Kartchner
Shimmerz Education Team
Wednesday, November 18, 2009
**Like A Cloud Up In The Sky....**
Grateful
I am so very grateful for my husband! He has made my life pretty close to perfect! I mounted this layout on a one inch thick, 12 inch in diameter wooden circle that I painted brown and have it displayed on an easel for a beautiful fall home decor item. Don't keep those beautiful layouts hidden in a book. Be proud and put them on display for all to see. Especially all of your pretty, Shimmery ones! :)
Happy Thanksgiving and blessings to you,
Lori Renn
Shimmerz Education Team Member
Explore
I used Royal Red and Golden Wheat Shimmerz paint and December Sky Blingz . I didn't add anything else. This is what Shimmerz and Blingz looks like. It reflects light and it shimmerz.
Tuesday, November 17, 2009
Versatility
Recently, I created a layout for Scarlet Lime Kits that used Shimmerz spritz in Plum Pudding. We were given muslin fabric in the kit and I wanted to spruce it up a bit. Shimmerz spritz was just the thing. I simply spread out my fabric and generously spritzed it all over. When it was dry, I flipped it over and spritzed the otherside, for a nice even coating.
The result was a beautiful all over shimmer to my muslin trim. It also helped make the fabric a little bit stiff, which made it more pliable for creating the pleats! Two birds with one stone there ;)
Included in the kit was also a set of masks. Normally, masks would be used to create an image onto a surface. I liked the design of the mask so much that I wanted to use IT as an embellishment. A quick coat of gesso, gave me a surface on which the spritz to really stand out. A couple of quick bursts and I had super cool embellie for my layout:
When all was said and done, my finished layout looks like this:
Try your hand at using our Shimmerz Spritz on various surfaces and see what you can come up with!
Monday, November 16, 2009
Warmest Wishes
This was such a fun card to make and with so many techniques used with it as well. I wanted the color of the letter stickers to be closer to the colors in the card I chose, so I went ahead and colored it in with some of my Shimmerz Periwinkle which toned down the stark white and then I embossed them with clear embossing powder. For the stamped lamp post, I went ahead and colored in the flame with yellow watercolor crayons, let that dry and then went on top of that with my Shimmerz Opal and gave dimension to flame with Dimensional Glaze.
You can give old stickers new life by adding Shimmerz paints to them. For example, I gave the little snow lady some extra shine with my Shimmerz Paints by using Shimmerz Sunflower for the star, Shimmerz December Sky Blingz for the scarf and Shimmerz Angel Wings for the face.
I punched out some snowflakes from blue card stock, and spritzed the blue card stock snowflakes with my Baby's Breath Shimmerz Spritz, which gives them more of an "icy" feeling.
The finished product is fun and such a delightful little card that will be given away.
Thanks for stopping by!
-Deanna
Remember Give Thanks
Imagine some Tickle Me Turquoise Shimmerz on a Thanksgiving card. Having a hard time?? Well let me show you what I did! I took a piece of vanilla cardstock as my base and distressed the edges. After doing that, I applied Tickle Me Turquoise Shimmerz all over the outer edges. LOVED the look, however it was a bit bright. No worries!!! More Shimmerz to the rescue! I then reached for my Antique Lace Shimmerz and sponged that right on top! Take a look at the result!
It almost gives a patina effect and I am loving it!! And my finished card...
So yeah, not exactly your typical Thanksgiving card, but fun nonetheless!! I loved reaching for such a bright summery color even in the midst of fall. Just goes to show...you can use ALL your Shimmerz colors ALL the time!
Hope you liked it! :)
Melissa
Sunday, November 15, 2009
Gift Card Holder From Start To Finish
It may look like it takes a long time to recreate the look, but trust me, it doesn't. Shimmerz dries very quickly!
I started by scoring and folding a 4 1/2 x 12 cardstock to create the 4 1/2 x 6" card base.
Next I used the border punch to create a scalloped edge on the bottom of a 4 1/4 x 5 3/4 piece of patterned paper and set aside.
I spritzed a die cut with Baby's Breath Shimmerz and dried with the heat gun and set aside.
I then took my ribbon, originally cream, and placed it on my work surface.
Next, I saturated it with Barn Door Shimmerz Spritz. Don't worry about getting messy, Shimmerz cleans up easily with soap and water!
I took a Prima rose, originally white...
and rubbed it in the over spray on my work surface.